Under dash electrical fire....almost!

Lotuss7

Well-Known Member
Site Donor
Messages
440
Reaction score
26
Location
SF Bay Area
A few of months ago I had an electrical short on the headlight switch / wiring under the dash on my 1970 2800cs. Car filled with smoke, I managed to pull off the road and by feel isolated the short. The spot that is hottest is the most is likely the compromised area was my assumption! Worked...but my fingers took a while to heal.

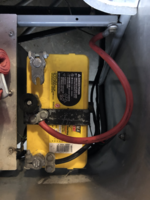
What I am left with is melted wiring on this portion of the harness and the headlight switch pin connector. Photo attached.

I'm seeing a couple of options:

Purchase a replacement partial harness either new (if available?) or used and replace all.

Not my preferred direction, however, as I think it is too invasive for the amount of damage. The damaged area is limited to the wires coming off the switch connector for a distance of about 1 ft. If I can find a partial harness I would rather splice in this section of the wiring into my existing harness.

Are there suggestions as too where I can locate a partial harness? Preferably used but new if necessary. And for this limited portion of the harness could it be from an E3 as well? Gotta think the switch is identical and likely the wiring?

Advice would be greatly appreciated!

John


main light switch wiring.jpg
 

Lotuss7

Well-Known Member
Site Donor
Messages
440
Reaction score
26
Location
SF Bay Area
Thanks Chris. E3 partial harness should be good? at least for this short run? Thinking partial used E3 loom may be easier to source than an E9.
 

Thomas76

Well-Known Member
Site Donor $
Messages
1,246
Reaction score
698
Location
Michigan, USA
I recall a point in my wire chasing where I noticed the headlight circuit wasn't designed very well on the 1970 (same year I own). I didn't think it was a safe design so I changed it. Can provide details if interested.
Sorry I can't help with procurement.
 

Ron Plantz

Ron
Site Donor $$
Messages
66
Reaction score
41
Location
Morocco, IN
Probably safe to assume a 1971 shares the 1970 design. I’m interested in seeing what you did to improve the wiring.
 

sfdon

Well-Known Member
Site Donor
Site Donor $$
Messages
8,236
Reaction score
4,583
Location
sfbay area
The origin of the problem is unlikely under the dash.
 

HonaloochieBoogie

Well-Known Member
Messages
326
Reaction score
363
Location
Port St Joe, Florida
I’m more than a little surprised nobody has commented on how scary this situation was. Hats off to everyone jumping in to diagnose the problem and help solve it. But for me, devoid of the skill and confidence to work on my cars, I’m left wondering if I should add a small fire extinguisher to my glove compartment.
 

Stevehose

Well-Known Member
Site Donor $$
Messages
12,985
Reaction score
5,657
Location
Sarasota, FL
Not only this, neither the high or low beam circuits are fused. I have relayed the low beams (huge improvement in brightness), and separately fused both circuits. And I keep a fire extinguisher under the passenger seat.

The hazard in the design is that the low beams do not use a relay, the full current goes through the switch.
 

Lotuss7

Well-Known Member
Site Donor
Messages
440
Reaction score
26
Location
SF Bay Area
Thanks for the replies.

I should paint a fuller picture of the situation before concern about design flaws are considered as the cause of the short. Although those may still be warranted.

A week before, the hinge to the under dash panel which accesses the fuse box and hood lever broke loose. Failed rivets. As a result I had removed it and the adjacent panel to repair the hinge. Disconnected the hazard, fog and rear window defroster switch wiring. Taped and tied them out of the way. Drove the car the car with no apparent issues. On this day I reorganized and zip tied the wiring. I must have exposed a hot lead in doing this. This was the initial source of the short which then ran back to the headlight switch.

And it was daylight and no lights were being used.

I have a fire extinguisher in the car but it wouldn't address the heat generated from the shorted circuit. Smoke was all from melting wire and I pulled everything apart before an actual fire started. What I do wish I had at the time was a 13mm wrench to disconnect the battery. One is now in the glovebox.

So...anyway, I will try and find a partial pre 74' E9 or E3 harness. If anyone knows of a source? please let me know.
 

nosmonkey

In Rust We Trust
Site Donor
Messages
1,102
Reaction score
1,001
Location
London, UK
I rewired mine so that the high and low beam wires run as triggers for relays to the lights with wiring straight from the battery, massive increase in brightness. A quick release terminal on the battery is also a good idea, run them on all my classics. Hopefully someone will be along with the wiring you need!
 

Ohmess

I wanna DRIVE!
Site Donor $
Messages
4,876
Reaction score
2,690
Location
Aiken, SC
So I had a bunch of melted wiring in my car. Prior owner installed a huge stereo system, ran the system off the number 1 fuse (left side lights), pulled the 5 amp fuse and installed a 40 amp fuse. Somewhere along the line, probably when cranking up the tunes, they melted the fuse block, wiring behind the fuse block, wiring at the end of both the front and rear side lights and the taillight housing.

Your assumption as to the location of your problem is probably wrong. I learned through my repair process that the melting occurs at the ends of the wires because resistance is cumulative and is therefore highest at the ends. For you, this means that the source of your problem may not be the place where you found the most heat. Rather, as the problem travelled along, it was manifest at the place where resistance in the circuit was highest.

So, you need to find the precise location of your problem and make sure you fix the source of your troubles. The process is really tedious, but must be done if you don't want the problem to come back.

Start with the wires. You need to make sure that each and every wire coming off the switch is not shorted somewhere. If you don't know how to do this, just ask and I can post a quick and dirty set of instructions. Then, to the extent you find connectors or fuses or whatever, you need to check the wires coming off of those. By way of example, the left side light circuit that runs off the light switch runs through the fuse block. You therefore need to check the wire from the light switch to the fuse block, and the wire from the fuse block to the front side light and to the rear side light. Again, the wires with power should have continuity end to end, but not continuity to the chassis.

Then you need to make sure whatever the wires run to are properly insulated. For example, the side light housings have small electrical connections formed into plastic insulators. You need to ensure the integrity of the connectors and insulators within the light housings. My rear tail light housing was melted and had to be replaced.

Then, given that you have melted wiring, you need to chased down and replace each and every melted wire. I reused the connectors on the wires, carefully removing the original wiring. The original connectors in our cars were very robust, and I was unable to find substitutes that were as well made as the original (and electronic circuits was a hobby of mine, so I have good idea of where to look.) I worked backwards up on each melted wire until I found good wiring, cut there, and installed crimp and solder butt joints, with shrink wrap over the joints. Here are the crimp and solder connectors. With these connectors, you strip each end of the wire, insert into the connector, and crimp each wire in place (don't forget to slide a small piece of shrink tube onto the wire before you crimp the second wire.) You then flow a small amount of solder through the center hole, and cover the joint with shrink tube: https://www.belmetric.com/standard-...ulated-butt-connector-1614-gauge-p-15698.html

As Stevehose notes, you should plan to install a relay in your headlight circuit while doing this; it greatly reduces the current flowing through the light switch.
 

Thomas76

Well-Known Member
Site Donor $
Messages
1,246
Reaction score
698
Location
Michigan, USA
Looks like others have chimed in already, but I added waterproof relays and mounted them near the battery. The original wires through the headlight switch now feeds the relay instead of headlights. New fused power direct from battery through relay contacts. The original design seemed crazy to have that heavy current travel not only a long distance but also through a switch.
Same problem with window motors on early cars, also fixed with relays now.
 

Lotuss7

Well-Known Member
Site Donor
Messages
440
Reaction score
26
Location
SF Bay Area
Carry a 10mm box wrench to undo ground strap, much quicker.
Too small for my ground strap....13mm for mine. But ground is the answer!! May try this type of connection, quick off.
 

Attachments

  • tempImageUlvaEj.png
    tempImageUlvaEj.png
    2 MB · Views: 119

Lotuss7

Well-Known Member
Site Donor
Messages
440
Reaction score
26
Location
SF Bay Area
So I had a bunch of melted wiring in my car. Prior owner installed a huge stereo system, ran the system off the number 1 fuse (left side lights), pulled the 5 amp fuse and installed a 40 amp fuse. Somewhere along the line, probably when cranking up the tunes, they melted the fuse block, wiring behind the fuse block, wiring at the end of both the front and rear side lights and the taillight housing.

Your assumption as to the location of your problem is probably wrong. I learned through my repair process that the melting occurs at the ends of the wires because resistance is cumulative and is therefore highest at the ends. For you, this means that the source of your problem may not be the place where you found the most heat. Rather, as the problem travelled along, it was manifest at the place where resistance in the circuit was highest.

So, you need to find the precise location of your problem and make sure you fix the source of your troubles. The process is really tedious, but must be done if you don't want the problem to come back.

Start with the wires. You need to make sure that each and every wire coming off the switch is not shorted somewhere. If you don't know how to do this, just ask and I can post a quick and dirty set of instructions. Then, to the extent you find connectors or fuses or whatever, you need to check the wires coming off of those. By way of example, the left side light circuit that runs off the light switch runs through the fuse block. You therefore need to check the wire from the light switch to the fuse block, and the wire from the fuse block to the front side light and to the rear side light. Again, the wires with power should have continuity end to end, but not continuity to the chassis.

Then you need to make sure whatever the wires run to are properly insulated. For example, the side light housings have small electrical connections formed into plastic insulators. You need to ensure the integrity of the connectors and insulators within the light housings. My rear tail light housing was melted and had to be replaced.

Then, given that you have melted wiring, you need to chased down and replace each and every melted wire. I reused the connectors on the wires, carefully removing the original wiring. The original connectors in our cars were very robust, and I was unable to find substitutes that were as well made as the original (and electronic circuits was a hobby of mine, so I have good idea of where to look.) I worked backwards up on each melted wire until I found good wiring, cut there, and installed crimp and solder butt joints, with shrink wrap over the joints. Here are the crimp and solder connectors. With these connectors, you strip each end of the wire, insert into the connector, and crimp each wire in place (don't forget to slide a small piece of shrink tube onto the wire before you crimp the second wire.) You then flow a small amount of solder through the center hole, and cover the joint with shrink tube: https://www.belmetric.com/standard-...ulated-butt-connector-1614-gauge-p-15698.html

As Stevehose notes, you should plan to install a relay in your headlight circuit while doing this; it greatly reduces the current flowing through the light switch.

Ohmess....great response! Thanks.

I do think I know the source of the short but will definitely check further. And your advice on tracing back bad wire for the splice is what I intend. Fortunately a 1ft. section of the harness is apparently all that was damaged but am checking elsewhere to be thorough.

I need to replace the light switch and pin connector. This pin connector was the only connector affected.

Like the crimp and solder connectors! And yes, shrink wrap. You know what they say...the best solder joints are the ones where you forget to put on the shrink wrap first!

Oh. And a relay!

John
 
Top