71' Euro 3.0 CS

SkiFast

It's never too late to have a happy childhood!
Site Donor
Messages
83
Reaction score
73
Location
Seattle
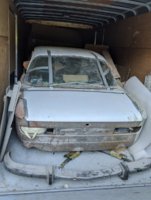
Team, I rolled the dice, buying a trailer full of a disassembled 3.0. Since I had already placed my bet, I’ve been taking out boxes of parts, one at a time, and restoring what I can. I honestly had little idea of what was inside, I only could glance through a side door and the rear before making a buying decision. Meanwhile, my risk manager was on vacation –

My last Bimmer was a 635CSi in the early 90s (with full Zender kit and Ronal R9 wheels); my last restoration was 40 years ago. Which is to say, I’m rusty as these cars can be, and I’m open to the wisdom of this forum.

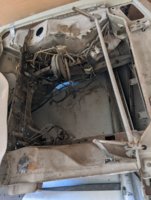
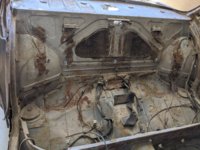
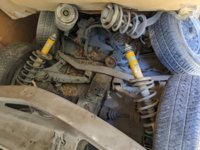
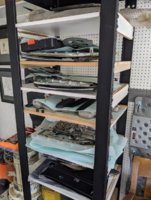
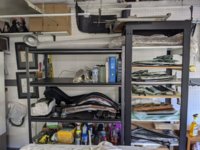
I’ve now made my way to the front of the car, and I must say, everyday I open a box with a new surprise (new parts!). I think I have the find of the year. New fenders, a new quarter-panel, new hood & trunk, and much more body panels. New rubber and other odds and ends. I also recently bought a parts car, but not certain I'll need the body parts afterall. Maybe I can help someone else out?

The bummer? I found out this past week this is a Euro 3.0CS (still was making my way to the front of the car, box by box…seriously). The engine and tranny had been taken to shops to be over-hauled. Both paid for, but they were never collected and long since sold off by the respective shops. I would have liked that engine setup!
The good news is this group. Don is going to get me fixed up in the powerplant department.

Here is what I seek:
  • Does anyone have a Gant Chart or Workflow model of their restoration to share?
  • Has anyone written their restoration process or created a parts inventory list or checklist?
  • Also seeking a list of all nuts and bolts. I cleaned enough to know I don’t want to do anymore!
I’m a visual guy and like a good game plan/process. I’m sure I’m not the only one?

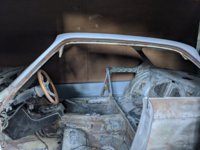
On my next post, I will outline my game plan and leave it open to advice. My perfectionist is focused on the body and mechanics. I’m less worried about the ‘perfect’ interior; I’m going to go with what I’ve got and just replace the things that make sense (headliner, carpets, etc.).

As they say, it takes a village, and I’m open to the wisdom and experience of this community – Bryce

(And gratitude to the man who sold me his dream car, may I meet or exceed his expectations. His name, ironically, is also Bryce J.. Sending prayers for your health to recover.)
 

Attachments

  • Body 2.jpg
    Body 2.jpg
    189.3 KB · Views: 215
  • Front 2.jpg
    Front 2.jpg
    197.4 KB · Views: 214
  • Center 1.jpg
    Center 1.jpg
    273.9 KB · Views: 216
  • Rear 1.jpg
    Rear 1.jpg
    343.2 KB · Views: 219
  • Suspension 1.jpg
    Suspension 1.jpg
    327 KB · Views: 210
  • Cleaned Week 1.jpg
    Cleaned Week 1.jpg
    223.5 KB · Views: 212
  • Cleaned Week Two.jpg
    Cleaned Week Two.jpg
    351.9 KB · Views: 206
  • Cleaned Week 3.jpg
    Cleaned Week 3.jpg
    301.8 KB · Views: 208

SkiFast

It's never too late to have a happy childhood!
Site Donor
Messages
83
Reaction score
73
Location
Seattle
Crickets?
  • Does anyone have a Gant Chart or Workflow model of their restoration to share?
  • Has anyone written their restoration process or created a parts inventory list or checklist?
  • Also seeking a list of all nuts and bolts. Has anyone done this?
 

Ohmess

I wanna DRIVE!
Site Donor $
Messages
4,887
Reaction score
2,706
Location
Aiken, SC
Bryce -- I fall into the no gant chart category Chris describes. That said, I have a comment on nuts and bolts. As I was working on my car, I had good luck with replacement screws (marine quality stainless steel), but I became concerned with the quality of the replacement nuts and bolts. As a result, I have been stockpiling nuts and bolts for several years now. This, in turn, means finding a relatively efficient way to clean them up.

My process is pretty simple. I drop them into a bucket of Evaporust overnight, rather like soaking a carburetor body in carb cleaner, pull them out, rinse and dry with a paper towel. All the old grime comes off easily, and any rust turns into a putty that is also pretty easy to remove. I then set them out to completely dry and organize the next day. Do a little every day and you will save money and retain the good quality fasteners originally used on our cars.

This stuff is primarily an environmentally safe rust remover, but for anything small enough to fit in the bucket, it works great as a parts cleaner. It is also not toxic, so you can use it without gloves:


Markos

Well-Known Member
Site Donor
Messages
13,369
Reaction score
7,503
Location
Seattle, WA
Hi @SkiFast,

Sorry I didn't mention the euro CS thing. Looks like someone tried to make it CSI-like at some point, but the body is ultimately a CS. The hole in the front frame rale was manually cut out to run ECU wiring. Also, the fender has evidence of a CSI bracket. The battery tray doesn’t have the d-jet fuel filter bracket and you likely don’t have the fuel pump bracket under the driver’s rear seat. It is also missing the holes for the d-jet ecu, but someone did mount an ecu there (passenger rear seat well). What this tells me is that someone didn’t stick a 221 VIN on a CSI chassis. That is a good thing because your VIN is original and the firewall showed no signs of tampering.

About the project management. I use kanban with post-it notes at home. I used a kanban app called Trello to part out Vitaliy’s car. At work I use agile, mainly using Jira. You can try to build out waterfall project plan. I’m sure there are many free apps that mimic MS Project etc. I think you will be setting yourself up for delays and setbacks if you try to track from a big project plan. Especially if you are working your plan backward from a target go-live date.

My camper remodel kanban board. That was an 8 day project. For you I would break up into individual two week sprints, or you will never have enough room for all of the stickies. zig you are using software then you can break it up accordingly.

Obviously this was close to day 8. :D

D4835ED3-D451-4D51-A13A-5006BBAA8091.jpeg
D84B48AE-2577-4B03-B0C6-4144B8E66F6F.jpeg
 

TodB

Well-Known Member
Messages
1,273
Reaction score
324
Location
Saint Augustine, FL
Hi @SkiFast,

For you I would break up into individual two week sprints, or you will never have enough room for all of the stickies. :D
This.

Right now, it must be really overwhelming with boxes of parts and a shell. Where do you start? Trying to build an entire plan, even if you had someone else’s to start with, will be time consuming, a morale buster and it will be in a constant state of flux. You will spend more time on the plan and maybe never finish it.

Breaking the resto up in small, manageable projects will get you moving faster, give you some quick wins and keep you focused. Try it on a small piece.
 

SkiFast

It's never too late to have a happy childhood!
Site Donor
Messages
83
Reaction score
73
Location
Seattle
Hi @SkiFast,

Sorry I didn't mention the euro CS thing. Looks like someone tried to make it CSI-like at some point, but the body is ultimately a CS. The hole in the front frame rale was manually cut out to run ECU wiring. Also, the fender has evidence of a CSI bracket. The battery tray doesn’t have the d-jet fuel filter bracket and you likely don’t have the fuel pump bracket under the driver’s rear seat. It is also missing the holes for the d-jet ecu, but someone did mount an ecu there (passenger rear seat well). What this tells me is that someone didn’t stick a 221 VIN on a CSI chassis. That is a good thing because your VIN is original and the firewall showed no signs of tampering.

About the project management. I use kanban with post-it notes at home. I used a kanban app called Trello to part out Vitaliy’s car. At work I use agile, mainly using Jira. You can try to build out waterfall project plan. I’m sure there are many free apps that mimic MS Project etc. I think you will be setting yourself up for delays and setbacks if you try to track from a big project plan. Especially if you are working your plan backward from a target go-live date.

My camper remodel kanban board. That was an 8 day project. For you I would break up into individual two week sprints, or you will never have enough room for all of the stickies. zig you are using software then you can break it up accordingly.

Obviously this was close to day 8. :D

View attachment 100900View attachment 100899
Good info. For me, some work is sycn
 

SkiFast

It's never too late to have a happy childhood!
Site Donor
Messages
83
Reaction score
73
Location
Seattle
First of all, Markos, that is scary knowledge for a glance at a car.
To me, this project is just that, which as a combination of Serial and Parallel processes.
Let say in Phase One is: a) clean all parts, b) start body work, and c) source parts. Taking b) body work, what is the ideal process and the ideal solution? For example:

1. De-rusting (such as acid dip vs. Soda blasting vs. other),
2. Metal work, welding, Strengthening (strut mounts, stitch welding, upper & lower strut/stress bars),
3. Priming (epoxy vs ?) and what is the best for different areas (what layers and when),
4. Types of coating and sound proofing, insulation (optimal for under carriage, trunk, cabin, engine compartments?)
5. Optimal time to add essential parts (i.e. electronics)

Maybe that is part of the learning process, but also not looking to reinvent the wheel . To me, sticky notes are a modular form of workflow, it can work.
Thanks in advance everyone
 

bavbob

Well-Known Member
Site Donor
Messages
3,372
Reaction score
1,585
Location
Boston, Ma
I own a 635 and have for 30 years, the E9 mechanical basics are identical so your 635 experience will be invaluable. Where I found a MAJOR difference is that the E9 is handbuilt so expecting the cosmetic/non-mechanical things to line up is not going to happen.

Search here for Markos deconstruction thread which will guide you in how to reconstruct your already deconstructed car.
 

SkiFast

It's never too late to have a happy childhood!
Site Donor
Messages
83
Reaction score
73
Location
Seattle
This.

Right now, it must be really overwhelming with boxes of parts and a shell. Where do you start? Trying to build an entire plan, even if you had someone else’s to start with, will be time consuming, a morale buster and it will be in a constant state of flux. You will spend more time on the plan and maybe never finish it.

Breaking the resto up in small, manageable projects will get you moving faster, give you some quick wins and keep you focused. Try it on a small piece.
Appreciate the concern Tod. My secret weapon is that I'm elder ADHD type that can stay on point when interested. I have enough ego and experience in building things to stay on task. I just need to see the path. Part of the reason for the workflow is to break this project into phases, tasks, and timelines. I just think that way. I also accept I'm the least experienced in the group as it relates to this car. I don't know what I don't know, thus the list. From here, I can connect to the collective consciousness, the combined knowledge of this uniquely passionate group
 

Gransin

Well-Known Member
Site Donor
Messages
1,529
Reaction score
1,273
Location
Vasa, Finland
All e9 restorations are individual with individual goals. Making a list of what to do and when, and explaining different routes/options for every single decision would take forever, and as soon as you're done with that list (series of books), new procedures will be out and you'd have to rewrite the entire thing again. :D

I would start with the shell, and spend a lot of time on the forum reading through all the resto threads, general discussions, and you can learn alot by reading the discussions in the cars/parts for sale section as well.
I'd say 99% of all the things there's to think about when restoring an e9 has been discussed or written about on this forum, it just takes time to find it/stumble upon.
This thread you've got here will help you tremendously as things progress and specific questions arise, and sending PMs to whoever member that you've read about doing something you've got a question about. But there's no "this is how its done, start - finish" list.

I started doing some work on my shell first, and as things slowly progressed I realized what parts I needed to move it forward.
Simultaneously I repaired and fixed up the suspension, driveline, electrical system and engine as side projects.
After that it was paint and reassembly of the car, then interior + glass and trim.

There's so many ways to restore a car, it all depends on priorities, but we will all help you along the way!

@autokunst recently had a thread about dipping/blasting/coating:

More to be read about it in his project thread:
 

Marc-M

Well-Known Member
Messages
377
Reaction score
311
Location
Preston - Lancashire-UK
Good luck with the restoration.
Nuts and bolts – I got them all zinc plated – they went off full of rust and crap – came back looking like new – some were gold passive finish,some were standard zinc finish – its not that expensive – just give the company a bucket full… and then spend a few hours with a beer sorting them out when you get them back.


Do not use standard bolts on the suspension – they are a higher tensile strength… however wallothnesch have new bolt fitting kits for engine and suspension etc – not cheap – but some are metric fine….
I use a company called Nameric in the UK ….
https://www.namrick.co.uk/acatalog/Home_Metric_HT_Bolts___Nuts__24.html

I guess there will be something similar in the US

I use for reference and ensuring the sequence putting things back the parts catalogue that I down loaded from wallothnesch.com –
bmw parts.jpg


The body is the place to start…. I would say.
Make a solid frame /Jig to bolt the body to
Get a roll over frame
Support the inside of the car if you are cutting it up putting new sills in etc.
Before welding the car up – dry fit everything as you go along with the doors on…. If you don’t. you will find the door gaps/ swage lines wrong and much more….


Marc
 

dang

Administrator
Site Donor
Messages
4,260
Reaction score
3,280
Location
Rocklin, CA
That's pretty funny about the owner having the same name, a friend bought a 65 Mustang years ago from someone with the exact same name. She just submitted a change of address for that car to the DMV and was on her way. :cool:
 

SkiFast

It's never too late to have a happy childhood!
Site Donor
Messages
83
Reaction score
73
Location
Seattle
Good luck with the restoration.
Nuts and bolts – I got them all zinc plated – they went off full of rust and crap – came back looking like new – some were gold passive finish,some were standard zinc finish – its not that expensive – just give the company a bucket full… and then spend a few hours with a beer sorting them out when you get them back.


Do not use standard bolts on the suspension – they are a higher tensile strength… however wallothnesch have new bolt fitting kits for engine and suspension etc – not cheap – but some are metric fine….
I use a company called Nameric in the UK ….
https://www.namrick.co.uk/acatalog/Home_Metric_HT_Bolts___Nuts__24.html

I guess there will be something similar in the US

I use for reference and ensuring the sequence putting things back the parts catalogue that I down loaded from wallothnesch.com –
View attachment 100912

The body is the place to start…. I would say.
Make a solid frame /Jig to bolt the body to
Get a roll over frame
Support the inside of the car if you are cutting it up putting new sills in etc.
Before welding the car up – dry fit everything as you go along with the doors on…. If you don’t. you will find the door gaps/ swage lines wrong and much more….


Marc
Great Advice, but missing one thing...what type of beer? Seriously helpful, thank you
 

SkiFast

It's never too late to have a happy childhood!
Site Donor
Messages
83
Reaction score
73
Location
Seattle
All e9 restorations are individual with individual goals. Making a list of what to do and when, and explaining different routes/options for every single decision would take forever, and as soon as you're done with that list (series of books), new procedures will be out and you'd have to rewrite the entire thing again. :D

I would start with the shell, and spend a lot of time on the forum reading through all the resto threads, general discussions, and you can learn alot by reading the discussions in the cars/parts for sale section as well.
I'd say 99% of all the things there's to think about when restoring an e9 has been discussed or written about on this forum, it just takes time to find it/stumble upon.
This thread you've got here will help you tremendously as things progress and specific questions arise, and sending PMs to whoever member that you've read about doing something you've got a question about. But there's no "this is how its done, start - finish" list.

I started doing some work on my shell first, and as things slowly progressed I realized what parts I needed to move it forward.
Simultaneously I repaired and fixed up the suspension, driveline, electrical system and engine as side projects.
After that it was paint and reassembly of the car, then interior + glass and trim.

There's so many ways to restore a car, it all depends on priorities, but we will all help you along the way!

@autokunst recently had a thread about dipping/blasting/coating:

More to be read about it in his project thread:
Wonderful links and sage advice - much appreciated!
 
Top