Odometer

bdyton

Member
Messages
14
Reaction score
0
Hi there I recently changed the speedo as the odometer was not working and I need the speed in kph not mph. I got a replacement unit from e-bay and all was good but after just 113 km the odometer has stopped again on the new unit. Two in a row with the same problem? They are tricky to change for sure and I am not looking forward to another morning of frustration and bleeding knuckles.....

So has anyone seen this before and is there a fix? Could it be that the "reconditioned" unit is just bad - two in a row with the same issue does not seem plausible to me.....
 

Honolulu

Well-Known Member
Messages
1,918
Reaction score
226
Location
Honolulu Hawaii
Could be several things, some of them may lead to more difficulty involving the aforementioned knuckles.

Sooooo....do the easy things first. Observe Mechanics Rule: look at what you did last. Make sure the speedo drive cable is turning when the car goes forward. See to it that the cable is fully and properly seated in the speedo head. If you have a way to artificially drive the speedo perhaps you can test it without removing from the dash. If that all brings no joy, out it will have to come. Maybe the eBay seller will take it back.

Hint...I have a kph speedo spare.
 

HB Chris

Well-Known Member
Site Donor $$
Messages
19,418
Reaction score
8,759
Location
Huntington Beach, CA
I think almost everyone has had this issue, it is incredibly common. It has to come out and have a good speedo shop replace the odometer gear, it slips.
 

bdyton

Member
Messages
14
Reaction score
0
Hi There - Thanks for the Advice - it is pretty much what I thought. Problem is I live in Dubai - shipping anything here is expensive - The last one came from Germany it is under warranty so I will try that route first - Thanks Charlie - I will see if I can get this one swapped first.
 

jmackro

Well-Known Member
Messages
2,463
Reaction score
728
Location
San Juan Capistrano, Ca.
Make sure the speedo drive cable is turning when the car goes forward. See to it that the cable is fully and properly seated in the speedo head.

Unless the speedometer needle isn't registering the car's speed, the cable isn't a suspect. The speedo and odo are driven off the same cable, so if one is working, the cable should be OK. Unfortunately, it does sound like something internal to (both) gauges.
 

Honolulu

Well-Known Member
Messages
1,918
Reaction score
226
Location
Honolulu Hawaii
Has anyone posted photos of the speedo innards?

I've just beem through two of the early 80s electrically driven odometers where the gears turn to wax, and have also long ago done the mechanical 2002 style several times. Believe the CS is similar to those 2002s, but would like to see...

Will likely go into my spare kph unit to find out, but knowledge is power. If it's as simple as a gear slipping on the shaft, then the worst of it will be de-crimping the chrome ring that keeps it together.

Thanks!
 

bdyton

Member
Messages
14
Reaction score
0
I figured that as the speedo was working that it would not be the cable. The only other mechanical input is the trip Reset which makes me question whether the trip reset cable is somehow binding inside the unit and causing the odometer to fail.
 

Honolulu

Well-Known Member
Messages
1,918
Reaction score
226
Location
Honolulu Hawaii
I just took apart a '73 (+/-) Bavaria car speedo to salvage some bits for my '85 K100RS mcycle odo. Somewhat to my surprise it looks like the reset cables are very similar, but I need to find and pull out my spare unit to compare.

That said, if they are similar, the reset cable should not cause a problem. As stated above, slippage of the initial number wheel (very common in my 2002 experience) should be easy for the moderately mechanically inclined. The fix involves light application of a ball pein hammer (yes BTDT) so you know it's good.

Oh, one more thing, you don't "replace" the gear in a 2002, you just slightly deform the shaft on which the number wheels ride, so one of them is firmly fixed to that shaft. It ain't rocket science, but it helps to have a spare cluster or two with which to mess around. Ask any long-time 2002 guy, he'll have several.
 

wazza.csi

Well-Known Member
Messages
113
Reaction score
3
Location
Canada BC
Odometer Problem

Repairing the Odometer is a job you can do yourself if you are careful,
1-First you must remove the speedometer from the case.
2-Remove the 2 Screws from the bottom of the frame (Part the cable screws to)
3-Pull frame apart from the Odometer base.
4-Hold the speedcup and gently twist the pointer until it comes loose.
5-Remove the 2 dial screws.
6-The problem will be a dummy odometer wheel that slips on the odometer shaft.
7-Carefully pull the odometer shaft out far enough to remove the dummy odo wheel.
8-Use a dot punch to make 4 or 5 indents on the face of the dummy wheel to tighten it when
pressed back on the shaft.
9-Apply a small of loctite on the dummy wheel and press it back into place.
10-Check that there is just enough play for the wheels to turn freely.
11-You should now clean the frame, tap the drive gear from the frame which is held in with
a ball bearing, the cable shaft and magnet will now push through from the bottom (be careful not to touch the Magnet to anything metal)
12-Clean all parts and use a light molly grease to reassemble. A drop of oil should be put
in the bearing in the top of the magnet.
13-Check to make sure all gears are meshing correctly and turning freely.
14-Replace dial and pointer and all check everything is working correctly.
 

Bert Poliakoff

Well-Known Member
Site Donor
Messages
1,574
Reaction score
352
Location
Scottsdale, AZ
Odometergears.com highest qualiy gears available as they are machined rather than molded. The owner,Jeff, will be more than happy to talk with you on the phone. For complete restoration of the speedo. Palo Alto speedometer. Both of these are not cheap but are very high quality
 

wazza.csi

Well-Known Member
Messages
113
Reaction score
3
Location
Canada BC
Odometer Gears

I had a company in New Zealand for 20 years repairing speedometers and was a VDO service agent for all of that time. I have repaired 100's of this model speedometer using the method described, If you are keen on a DIY repair the only 2 steps to take extra care with are removing the Pointer and keeping the magnet from touching any metal objects!!
 

wazza.csi

Well-Known Member
Messages
113
Reaction score
3
Location
Canada BC
HI. Sorry have been trying to find some decent pictures on the Internet but can not find anything! I am living in China and my cars are in storage in New Zealand so I have no chance to take photos! If you pull your speedo out of the case and are unsure of anything please PM me and I can help you out!!! Cheers Warren
 

restart

Well-Known Member
Messages
1,194
Reaction score
173
Location
KANADA, Roberts Creek, BC
why remove the pointer? It's not necessary if you are just repairing my odo? on the 72 and 72 models I have done anyway.
This is a dead easy job, you just need the patience to get the instrument out at the right angle.

only 2 steps to take extra care with are removing the Pointer and keeping the magnet from touching any metal objects!!
 

wazza.csi

Well-Known Member
Messages
113
Reaction score
3
Location
Canada BC
I have always removed the pointer to make the odometer easier to get at, and to clean all of the Odometer wheels! While not necessary it is relatively easy to remove and makes the job easier, Before removing the pointer lift it over the Stop pin and mark the dial so you can replace it correctly!
 

dascoupeguy

Well-Known Member
Messages
272
Reaction score
0
Location
Central California
odo guts picture posted

Here is a pic of my speedo/odo. took it apart to fix it. Speedo was working fine, odo wheels were slipping, or so it seemed...

When I checked the gearing, I found the the worm drive gear had worn enough to break contact with the crown gear on the right in the pic. The screw in the center allows for adjustment for wear and this was simply done. and now it works fine. retightened and some grease on the gears.

No need to mess with the plastic wheels on the shaft.

Hope this helps some of you guys.
 

Attachments

  • speedo1.jpg
    speedo1.jpg
    34.4 KB · Views: 128

Tierfreund

Well-Known Member
Messages
545
Reaction score
1
Location
Duesseldorf, Germany
A little tip on removing the pointer: It´s ver easy to break and there are special tools to help with it.

But the best tool I´ve found is to use two small spoons. One from each side. lip under the pointer, bowel on the dial face, push both ends simultaneously and the pointer goes "pop".

Don´t cost a thing (spoons stay unharmed and can be reused for further pointers or coffeespinning duties) and works like a charm.

I agree, taking the pointer and the face of makes access to the odo gear easier.
 

thehackmechanic

Well-Known Member
Messages
426
Reaction score
98
Location
West Newton, MA
I just repaired my odometer with the part from Odometer Gears

I just repaired my odometer with the part from Odometer Gears. Jeff is a great guy, enormously helpful.

Here's the thing. If the gear that's bad is the one at the END of the shaft, you DON'T need to pull the face off the speedometer to get it out, so you DON'T need to pull the speedo needle off. But if the gear that's bad is the one that's NOT on the end of the shaft, you DO need to pull the face of the speeedometer to replace it, which means you DO need to pull the needle off. I just did this and wrote it up for next month's Roundel. I'll paste it here.


The Hack Mechanic / May 2014
By Rob Siegel
Clocking the Miles

During my drive last Memorial Day down to The Vintage in Winston-Salem, the odometer in my ’73 3.0CSi ceased ticking up the miles. In the past, when I’ve had odometer issues, I’ve cheerfully sent the speedo off to North Hollywood Speedometer. They’re fast and do great work. Almost too good; they clean instruments so well, the adjacent gauges look old. For that and skinflint reasons, I decided to tackle this one myself. I’d met Odometer Gears’ Jeff Caplan at Oktoberfest, and he’d assured me that any hack mechanic can repair an odometer. (“And,” he claimed, “whether you pay North Hollywood or do it yourself, you’re using our gears.”) I e-mailed Jeff for a price quote and began to remove the speedometer.

I have a wood-grained instrument cluster from a wrecked 2800CS I parted out 25 years ago sitting on my desk. I assumed that I’d removed said cluster as whole, as you’d do in a 2002; undo the speedo cable, loosen two knurled nuts, remove the electrical connections, and slide it toward the steering wheel. But I found that, on an E9, it’s much more difficult. You need to either remove the individual gauges one at a time from behind by reaching up under the dash, or unbolt the “grab rail” from the front of the dashboard (horrible in an air-conditioned car), or remove the cowl (very difficult unless the windshield is out, which is probably how I did it in the parts car). I used the first method. What a pain. While I was in the neighborhood, I also pulled the clock, which had read “12:15” for 28 years.

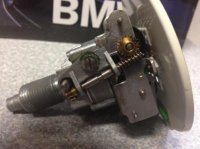
To fix the odometer, you start by gently prying off the chrome bezel that holds on the glass cover. You can then pull off the metal back and expose the inner workings. There’s a squarish case enclosing the cogged wheels. Reading online, I learned that there are two common odometer failure modes – either the gear on the outside of the case cracks, or the one inside the case spins freely on the shaft. Mine was experiencing failure #2. For this, there is a well-documented kluge – you push the shaft out using a rod or nail of a similar diameter (which also holds the rest of the gears in place), then slightly enlarge the end of the shaft with Vice Grips or a small punch or a dab of Viagra. You then slide the shaft back through, and press it into the gear that was formerly loose. If it’s tight, you’ve potentially fixed it without having to disassemble the case. I did this, and tested it with a speedometer cable and a drill. It worked fine, I buttoned it up, e-mailed Jeff “never mind,” put the bezel back on… and then noticed that the thousands dial was between two digits. Damn! I pulled it apart, pushed the shaft back out, corrected the number, reassembled it, and the odometer no longer worked. I e-mailed Jeff again with my tail between my legs. He castigated me for being such a hack, saying that the “deform the shaft” method would’ve likely failed in short order anyway. The gear cost $25, and came with all the phone or Skype support I needed. Let’s do it. Considering the challenge in pulling the gauges out, I’d hate to have to do this repair twice.

But as I looked at the speedometer, I realized I’d need to pull the needle and face off to get the gear out. This gave me major heebie jeebies, but Jeff explained that there are three tricks to it. First, you run the unit with a drill and record what the speedo is reading at the drill’s maximum RPM. Second, before pulling the needle, you gently lift it over the pin stop, lay the unit flat on a table, see where the resting point is, and mark it on the edge with tape. Third, Jeff cautioned against using the needle-removing methods I read about online (popping it off by hand or with a needle removal tool or a fork). He instead recommended undoing the back of the case to expose a cylinder that the needle’s shaft is connected to, then grabbing the center of needle while rotating the cylinder back and forth. He warned that, on my E9’s “silver dollar” speedo, the little chrome center piece (more like dime-sized, actually) would pop off and would need to be re-glued during assembly.

All went as described. With the needle off, the face can be unscrewed, which allows you to replace the errant gear. Hold the numbered cogs in place, draw out the shaft, remove the old gear, insert the new one, press the shaft back in, and verify that the odometer reads its pre-repair value (a consequence of performing this procedure is that I will never believe low mileage based solely on odometer reading without accompanying provenance). Then, gently press the needle back on at its resting position, lift it over the pin stop, hook up the drill, and verify the speedo registers its pre-disassembly speed. Perfect.

All that remained was to glue the little chrome center piece back on. And that’s when perfect turned to damnit! A glob of superglue dripped onto the black face of the gauge. I immediately wiped it off, but it stained. Careful scrubbing, first with soap, then with Ooops, then very lightly with the corner of a soft Scotch Brite pad, made the discoloration virtually undetectable. But the mishap inadvertently provided a good caution sign: Yes you can do this odometer repair yourself, but if you would be heartbroken by a cosmetic snafu, perhaps you should call the pros.

And the clock? Fixed with a Pelican Parts article and two capacitors from my local Radio Shack. With the odometer and clock repaired, time and distance tick away. And, really, that’s too bad. I didn’t realize how much I preferred it when time stood still in my E9.
 

rsporsche

Moderator
Site Donor $$
Messages
10,682
Reaction score
3,711
Location
Atlanta, GA
Rob,

i have a question for you on this. i have my speedo apart right now and i have determined that the gear on the shaft is shot and doesn't grab the shaft any longer. so i have read what you have written several times, and i have a question for you in regard to removing the needle

'undoing the back of the case to expose a cylinder that the needle’s shaft is connected to'? for anybody else that tries this, you remove 2 screws on either side of the threaded piece that the speedo cable mounts to ... then the back of the case comes off.

so now i see the big cylinder and the needle shaft in the middle of it. i have tried to hold onto it and rotate the cylinder ... but they do not seem to separate. any suggestions?

is the cylinder supposed to come off of the shaft or will it pull the shaft out of the needle? for those that recommend 2 spoons, would the 2 spoons work better pulling up on the cylinder to pull the shaft out of the needle?
 
Last edited:

Honolulu

Well-Known Member
Messages
1,918
Reaction score
226
Location
Honolulu Hawaii
Slip off the number wheels onto a short bit of wire. Eyeball where the 1/10 mile (or kilometer) number wheel sits on the shaft and with a light tap from a ball pein hammer, very slightly deform the shaft so that the tenths wheel is a tigh fit on the shaft. Reassemble.

It's shameful that no one has told you how to do this yet. It ain't science, just a bit of tinkering that any 70s-era Bimmer (or Beemer) owner should be able to do. Small hands, patience, a clean work space are what you need.

I think there is a good illustrated write up on the 2002FAQ list. IT can be surprising how's I liar those cars are to the coupes.
 
Top