They were to hold the shock absorber covers.
You are using an out of date browser. It may not display this or other websites correctly.
You should upgrade or use an alternative browser.
You should upgrade or use an alternative browser.
Patricia A. Mayer's 3.0 CS / Paul Cain's Fjord project / The 300 mile Test Drive / VIII / Final Punch List
- Thread starter paul cain
- Start date
-
- Tags
- restoration list
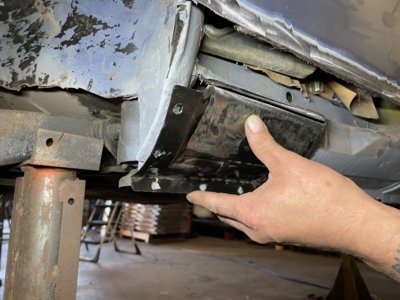
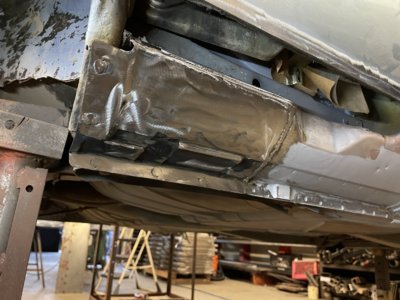
@eriknetherlands Good catch. @HB Chris is correct, these are the mounting holes for the rubber aprons that covered up the ugly bumper shocks. Rest assured they will be welded up.
No one has caught the original error I made in this area. Hint: it is repeated on both sides.
No one has caught the original error I made in this area. Hint: it is repeated on both sides.
The original brackets came out of the valence and then had two bends prior to the 90 degree bend to the mounting plate? This would have pulled the outer end of the mounting slot more in line with the bracket coming straight out of the frame (I think).
Vent slots in the valance should extend longer towards the brackets?
No, that’s a late 73 feature for the big bumper coupes.Vent slots in the valance should extend longer towards the brackets?
I’ll take a swing. Did you cut the bracket slots a little to tall? The grommets don’t fully fill the opening.No one has caught the original error I made in this area. Hint: it is repeated on both sides
Are You using Coupe King’s brackets?

Last edited:
Dohn
Well-Known Member
I remember talking to you about this car over dinner at O'fest! I am in awe of the expertise on this site, and of course, in yours. It convinces me that when the time comes to re-do my coupe, finding an e9 experienced shop is critical. There are so many nuances to doing it right, as opposed to just putting it together. I'll definitely be watching this thread closely; thanks for documenting the journey!
@Dohn Thanks for chiming in. That was a lovely evening at O'fest, enjoying the company of you and your wife. Also listening to Bill Auberlen do a very humble and riveting summary of his career. A great Keynote speaker.
I want to thank @Dohn for taking interest in Patricia A. Mayer's 74 3.0 CS. Being from Dayton, of course he knew the chapter president of the Toledo chapter of the BMW CCA Phil Ross. (Patricia's home town was Toledo). The conversation quickly accelerated as he joined the enthusiasm of finding out more of Patricia's life story and what lead her to buying this coupe on May 7th, 1974. At the O'fest dinner @Dohn walked me over and introduced me to Phil. This has started a very long email follow up with Phil Ross taking on the roll of Inspector Clouseau taking all the Patricia facts down and reaching out to all vintage BMW contacts in Toledo who might have known Patricia. Thru Phil's efforts I discovered that there are two Patricia A. Mayer's who recently passed away in the Toledo area. Here is the one that has the matching address in the original owners manual. See attached. This research continues today as I am hell bent to find out more about Patricia's life story.
If anyone has verifiable facts about Patricia A. Mayer's life, I have a shiny Heyco red screwdriver with your name on it as a gift.
@Dohn, let me know in the future how I can help you with your project.
Thank again for joining the conversation.
Attachments
Right Rear lower sill repair. Step by step.
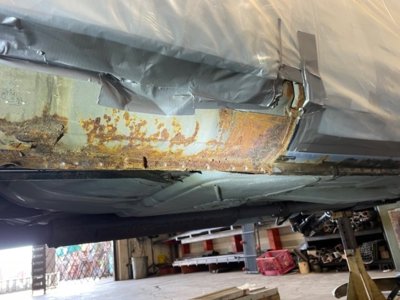
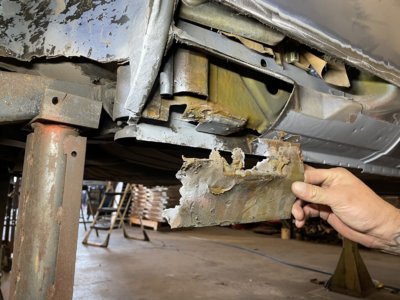
1 - Lower rear fender at sill cut away
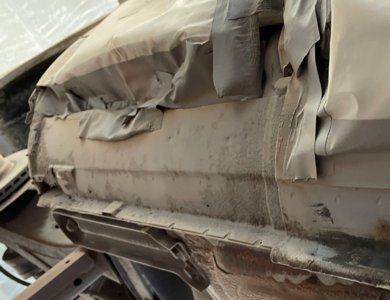
2 - Sill area immediately after media blasting. This is raw metal.
3 - Structural sill cut away showing perforated center sill. Note that the sun roof drain is fitted (this is a non sun roof car)
4 - Replacement sill section cut to fit damaged area. The seventh test fit is usually the charm.
5 - Fabricating and welding is all done by Elbert - the maestro.
6 - Now doing the third test fit of the lower fender / outer sill panel. W&N supplied.
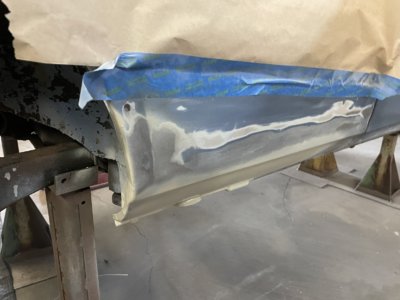
7 - Lower fender panel welded in. There is a very thin layer of 2 part catalyzed epoxy filling the welded seam. White primer is the original ultra thin factory primer.
8 - All the new panels were skuffed with 220 grit and given two coats of Direct To Metal (DTM) primer on the insides.
9 - Then, after welding, two coats of DTM primer on the outside. Some very modest shaping will be required in last stage of high build primer. That's another chapter.
All four corners are getting this treatment and sequence. Right side of the car is finished. Hope to finish the left side before Christmas.
1 - Lower rear fender at sill cut away
2 - Sill area immediately after media blasting. This is raw metal.
3 - Structural sill cut away showing perforated center sill. Note that the sun roof drain is fitted (this is a non sun roof car)
4 - Replacement sill section cut to fit damaged area. The seventh test fit is usually the charm.
5 - Fabricating and welding is all done by Elbert - the maestro.
6 - Now doing the third test fit of the lower fender / outer sill panel. W&N supplied.
7 - Lower fender panel welded in. There is a very thin layer of 2 part catalyzed epoxy filling the welded seam. White primer is the original ultra thin factory primer.
8 - All the new panels were skuffed with 220 grit and given two coats of Direct To Metal (DTM) primer on the insides.
9 - Then, after welding, two coats of DTM primer on the outside. Some very modest shaping will be required in last stage of high build primer. That's another chapter.
All four corners are getting this treatment and sequence. Right side of the car is finished. Hope to finish the left side before Christmas.
Attachments
-
 right rear 1.jpg67.2 KB · Views: 213
 -
 right rear 2.jpg260.2 KB · Views: 205
 -
 right rear 3.jpg397.5 KB · Views: 203
 -
 right rear 4.jpg328.9 KB · Views: 207
 -
 right rear 5.jpg319 KB · Views: 208
 -
 Right rear 6.jpg258.6 KB · Views: 209
 -
 right rear 7.jpg217.8 KB · Views: 205
 -
 right rear 8.jpg293 KB · Views: 206
 -
 right rear 9.jpg257.1 KB · Views: 224
Paul, I believe that is the drain from the C pillar Roundel.
3-Right Rear, that is the C pillar vent drain. Was the rust at the horizontal section below the drain remediated before the patch panel was welded in?
Usually the right side is worse than the left.
Usually the right side is worse than the left.
@adawil2002 Short answer is 'yes'.
Longer answer: I made a serious effort to document each stage. That missing photo would have been something like no. 3.5. All internal panels that had any potential for rust were ground clean before proceeding.
Longer answer: I made a serious effort to document each stage. That missing photo would have been something like no. 3.5. All internal panels that had any potential for rust were ground clean before proceeding.
@paul cain, thank you for the added info.
Depressing to see that inner rocker perforation on a car that looked super clean to begin with.
Love the documented work. These are not cars easily restored by the average hot rod resto-mod shop, unless they have the right mindset (eg willing to spend time to research), and experienced owner is there to guide them.
Most shops & owners don’t want to take the time ($$$) to learn the right way and they just do hack work. fortunately we have true high end places like Paul Russell, and VSR1 (and the Obsessive people here like Paul, Chris, Sven, etal).
Oldbmwcoupes
Well-Known Member
Jfeng conveys my sentiments exactly. I’m shocked at the hidden rust on a car that looked great to me. It’s a great lesson in coupisms-even the seemingly best cars should be expected to have rust. And have it ugly in hidden places. A proper restoration requires some deep digging and financial resources and commitment that other classic car owners may not be willing to give. It’s nice to see that no body panel will be left behind by Mr. Cain.
The damage caused by that C pillar drain tube never ceases to amaze me. My car was pretty much exactly the same as yours. The only rusted metal I had to replace was that same lower rear sill panel on both sides. One can’t help but wonder how so much water can get in through that C pillar vent as its opening is essentially pointed downward. So rain falling on the car while parked could not really get in there by gravity alone. It could only happen when the car was at speed in the rain and water was being sprayed upwards into that C pillar opening.
Nevertheless it seems that even on an otherwise dry car that area is always going to be have to be checked because it is a classic case of rusting from the inside and potentially invisible on the outside.
Nevertheless it seems that even on an otherwise dry car that area is always going to be have to be checked because it is a classic case of rusting from the inside and potentially invisible on the outside.
Last edited:
I think the Coupe is at the very top of the ignominious list of classics that hide rust in devious ways. The heartache, time and money that could have been saved for want of some well directed catalysed primer during production!
@Bmachine, @Oldbmwcoupes, @JFENG and @tferrer Based on the proximity to the road dirt I think the majority of this rust on the very ends of the sills started externally, from road salt.
I really believe that @tferrer 's comment bares repeating and reflection. The rust on this inner sill, sandwiched with the lower fender is exclusively the fault of the Karmann process engineers who totally overlooked this area for primer application. For want of a few ounces of primer before the rear fender went on, it would have solved the issue in image no. 1. Pennies on the dollar of a $13,000.00 purchase in 1974.
This primer stinginess repeated throughout the entire painting process on E9's with ultra thin layers of primer in critical areas. 9/73 and forward coupes are much better in terms of the amount of schutz application compared to 2800 CS's. The goal on this project is to crush these items with either modern DTM primer or epoxy primer. Followed by careful schutz application, followed by another sealer. Hopefully, turning what is the weakness, into a strength. I was expecting this metal work to be 3 weeks of fast R&R sheetmetal replacement(s), and we are now on month three. Its Ok, because we have seen 'bottom' and well on the way to building back up.
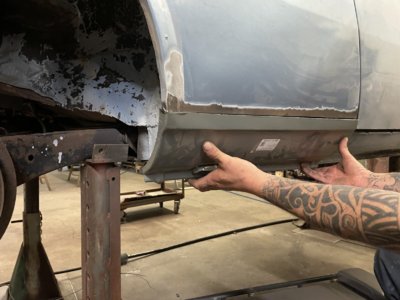
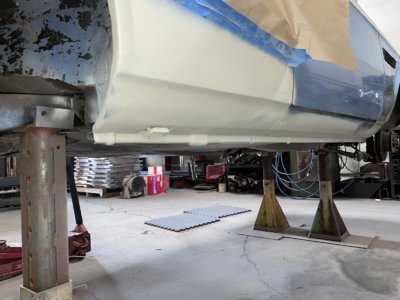
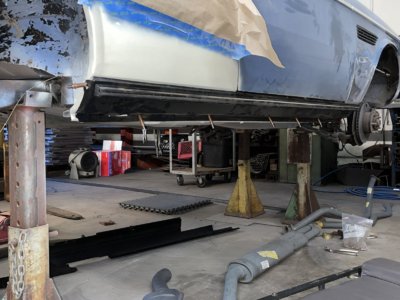
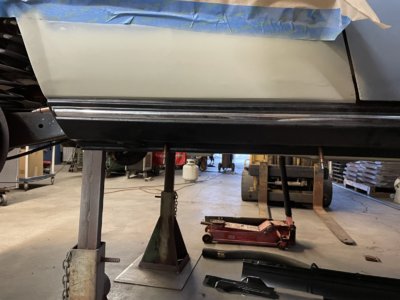
Here is a few shots from yesterday, extremely gratifying to see the alignment and raw metal finish work. This is all before high build and final shaping.
I really believe that @tferrer 's comment bares repeating and reflection. The rust on this inner sill, sandwiched with the lower fender is exclusively the fault of the Karmann process engineers who totally overlooked this area for primer application. For want of a few ounces of primer before the rear fender went on, it would have solved the issue in image no. 1. Pennies on the dollar of a $13,000.00 purchase in 1974.
This primer stinginess repeated throughout the entire painting process on E9's with ultra thin layers of primer in critical areas. 9/73 and forward coupes are much better in terms of the amount of schutz application compared to 2800 CS's. The goal on this project is to crush these items with either modern DTM primer or epoxy primer. Followed by careful schutz application, followed by another sealer. Hopefully, turning what is the weakness, into a strength. I was expecting this metal work to be 3 weeks of fast R&R sheetmetal replacement(s), and we are now on month three. Its Ok, because we have seen 'bottom' and well on the way to building back up.
Here is a few shots from yesterday, extremely gratifying to see the alignment and raw metal finish work. This is all before high build and final shaping.
Attachments

Last edited:
Proper metalwork takes time. A friend has a saying, "It took longer than I thought it would but then I thought it would."
Athena took 5 winters to complete with still being able to drive during the Summers.
Athena took 5 winters to complete with still being able to drive during the Summers.