Power steering pump rebuild

Stevehose

Well-Known Member
Site Donor $$
Messages
12,997
Reaction score
5,672
Location
Sarasota, FL
Hello friends, welcome to another episode of Kitchen Table Projects, where I stumble through another component fixup and annoy my wife at the same time. This episode will be the power steering pump, mine has begun screetching at >4k rpm, and dissasembly of the bearings (more on that later) has revealed that they are shot. All is apart and cleaned, I will try to document some things that aren't covered in the blue manual (which has some decent detail), like the PITA involved when it says to "remove the needle bearing" which was like solving a japanese box puzzle.

The components:

IMG_2648.JPG


After removing the dealer undercoating overspray and 44 years of gunk, behold the date code 4-72, pretty cool:

IMG_2645.JPG


More to follow.
 
Last edited:

Stevehose

Well-Known Member
Site Donor $$
Messages
12,997
Reaction score
5,672
Location
Sarasota, FL
I just ordered them from Tischer BMW, have not heard yet if they are all available but will post the list and what I am able to get.

I was going to source the bearings separately because usually that's cheaper but these are not super-common ones and the needle bearing has an oil groove in it so in searching for them they aren't much less that BMW ones.

Where are you sourcing parts?
 

m5bb

Well-Known Member
Site Donor $
Messages
2,082
Reaction score
911
Location
Peachtree Corners, GA
Only you Steve.

Mt Gay Rum hat on table and glass of wine.
:razz:

Good luck.

There is a place in AL that rebuilds power steering units. Not sure about 72 models but did get one for M5 from them a few years back.
Just in case.............
 

Stevehose

Well-Known Member
Site Donor $$
Messages
12,997
Reaction score
5,672
Location
Sarasota, FL
Finished with no disasters

Now that you've caught your breath from my dipstick repaint DIY, I have now finished this rebuild without any disasters (probably because no wine during the week for me). Here are the parts you need, I ordered from Tischer (GetBMWParts.com):

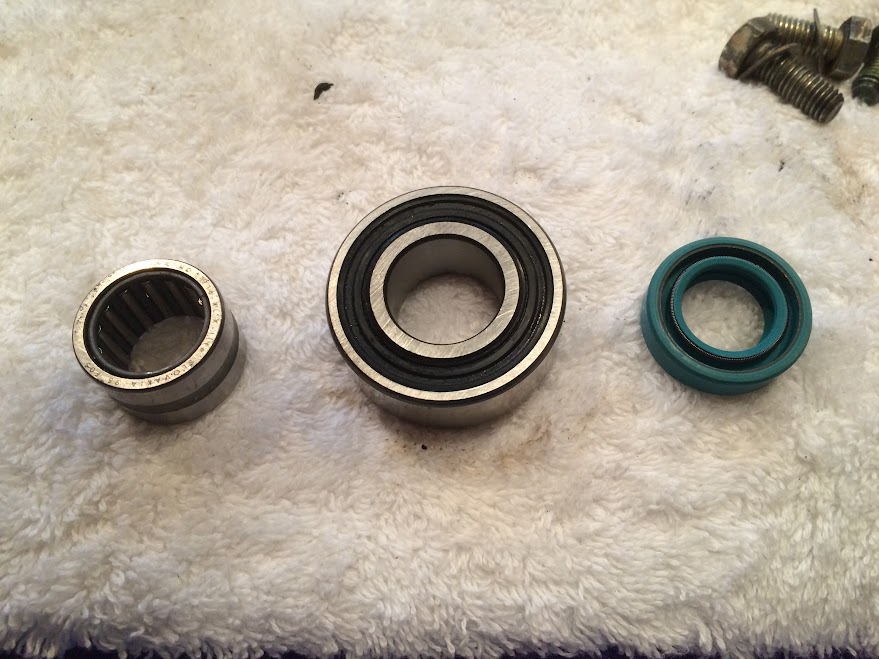
32411105146 shaft seal
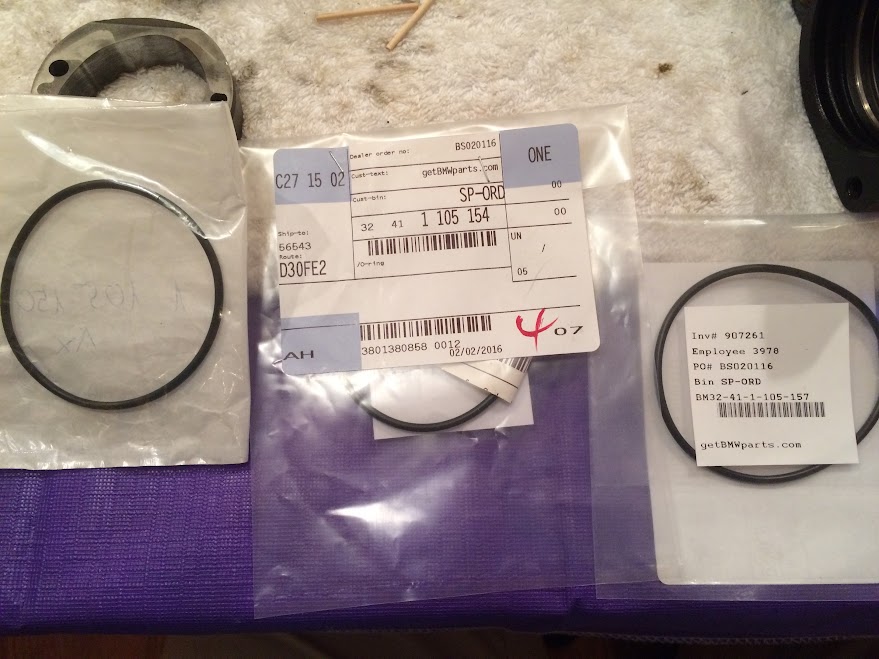
32411105157 o-ring
32411105150 o-ring
32411105154 o-ring
07119963354 crush washer
32411105145 sealed bearing
32411105147 needle bearing
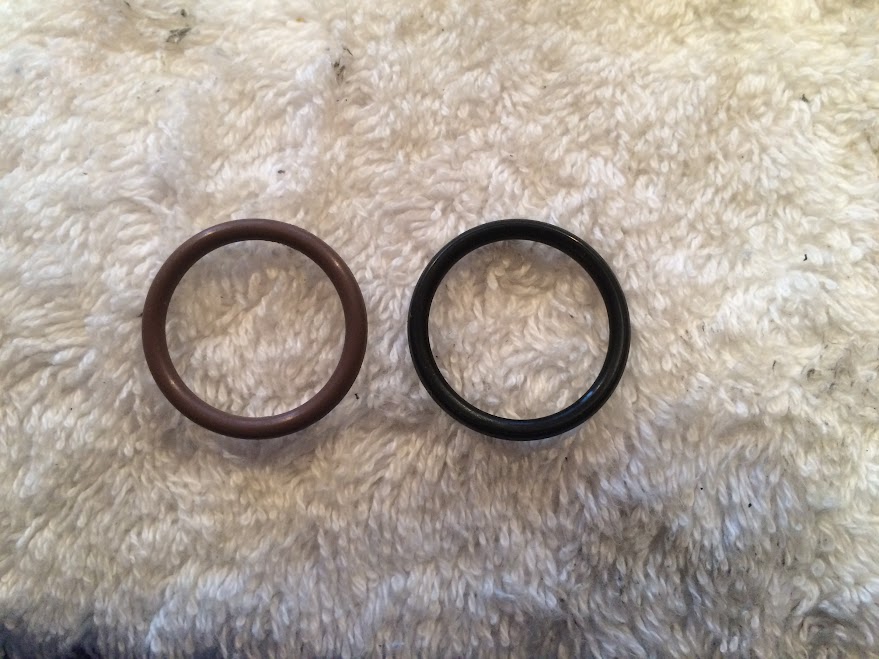
32411105151 o-ring NLA - replaced with Viton 20 x 25 x 2.5mm

The small o-ring is NLA so I sourced one of similar dimensions on Amazon, I had to buy 10 so if anyone wants one I will drop one in the mail to you.

The bearings and shaft seal and 2 of the large o-rings had to be ordered from Germany. They came in only a week, not the 2-3 they said.

NLA o-ring and brown replacement, large o-rings, and bearings and seal:

RzIQznmOpE_wan_sqF1uzAnAKCwRfvh1DcnTTTLIKXKLkw699ZjfTaKEM6TRv_agLMl8GVuEjiQy-drDLIfY1XKSinN_iEJ1SS-vTzlH_eJ7H_6EkvjCNg3CYVpimyxoST5V87l0EZYpIbPCNNaGVrth--q1_a-afuvNSR30iz-QuXfzICszjeoZX1zdRoEaha3Ib6j-JkzpxpE7gPtDE4ffeXnfVbXS10JAr_QsTxmm-NS_cHqWeNeTxFawD_FEshqd_QFTKdX6kRQh2tOOXfY9QR4Kxo-Y_DyGLRpKIhMkoaX-ktDjR3gtwECfS_uQO0OLs25Qd7FQi4wNo6PXmKd6RiWuIhPvD1JHfisgc-nuMjPGYbY4fF55phypBezin1PT2I-8JxDfB30bHzuF3ozwRdlDPIhTJbxASQks6lCE_rOIIZQNosgHTEh0rjo30e-JOITVi4Bo48vbRrUcTAJiwaM5vfklClFIC4NDtcw6aYDUFeblkmZpgTm1gHnajcg3Yg0Rx_Zpw7hnz8LA1KmQHL02IhbAueYFlrJraHC9gQmNODNQcQVjnQnoV1Q9df7t=w879-h659-no

pCPYPTvCjT-Ejl0oMLaXQZEVLrKYYkrhk4-Y7ucoNSgXcKGtzg0swOE_zZjXwHSvODggXjKR5DEeudWsWw0eLk7-pbcZ6ZR601nF7AbUhXBO3IthcfWnLREg86p9oVYga5wAUNpQPSNVqLBqcOKSpIWgukbiNcuf_JFw5scUc40CexlfGAextQwzEObkDu5GEO0ElhexV5xCMxgxfqPYarrIF7iAQ2cHiDAZ_T98gCfusjmx1MOALVKHwncif68avHmdrDJG_xE99ojBmNujVzrlwotv6GvseMcuPoWuFs6zAShhPijIArxEXmoCNoBE3k29-i2F-XEJuq9uF0CQLx4I1SW4frTkKQqxr9q7MIibpwmwC10fNBX3uQBZUptwdWZXkgGDHyDgag_k9Oof1iSmBjM_lCS9xV2KDoAFCHVbXTdjXmOKqKU1_jvaXYNvY533_cXWtr-5iRoH7bsnpfwu7njEOEAsItvKJE1yc3XrzoHTGswDrdOIAqSsdTJPHdz4CO4fAtYqivenakrBfr7ZRE8LWNBuBsQE7muxZtYyq-8ujGxi9bzsvlTv5LdelpKQ=w879-h659-no

AVarTO_IGwRaVhbJ8FRjak1ZSQnKURkoEIg4N93LDF0oAg8Ncfk75W79f2pv5PzHIJvi59nGR3Y3mnO4Lr_jGw-ZeAGZ6gajKNbZw6IqtvBd6-GTyv5DwguWEZZjhDrwlWbl8b2CwBUKxASgD0GDHE-ZjGAEH_mQjRWBLQ9KnqUvo3FNxuF-r2EQUYxlqkCCv1STaZ6WuycvmlqJ5YUbOYgYOwabHcBQV6C9Atm6jIns2nraVebStdX84j6BHHoj6TMOOAaU--I3W8Cp-rJYtxlXozUKAEP3NJRQ14bMXuTxmfHWU64NVdt3h3L-h0GqxDhKFpO-hILGAwc-N2Dyu7XUwwtjlJG5RXVTZJg3-4SYRepaeVsfW1VnO33wCFhw-Z6UjNvC_xlxfiz1sroiPRjSAnAzHqBcToUyd9PvKP8XOsV0c2SnP1P6Iyjp1uki2cBBLF_G70u2ZWevMzkxzUWjg5u9iHrkXC3Tu6bK6lUdHwCLMsv5iolXX3wfDel-dyPNdr_fu9td80GRe7u24MG7FMvBMIz41UIMOl2fKCfmwHOtSIuTrREQhtNxcJRlSP5t=w879-h659-no


I have an early e12 pump on in the meantime and I noticed that although it fits, the innards only have 1 bearing not 2, and the bearing is not as big so it seems the e9 pump is more well built.

The manual is quite helpful so keep this handy:

http://www.e9-driven.com/Public/Library/BMW-E9-Manual/pages/en/32410830.html#refertoc

It's also a good idea to take pics of each step of dissasembly so you can refer to it later.

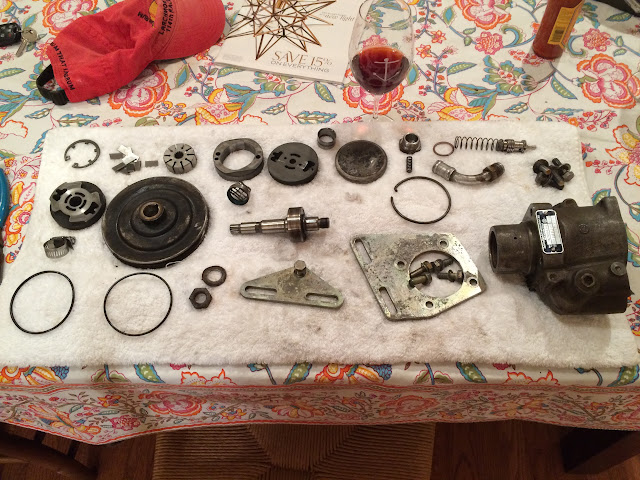
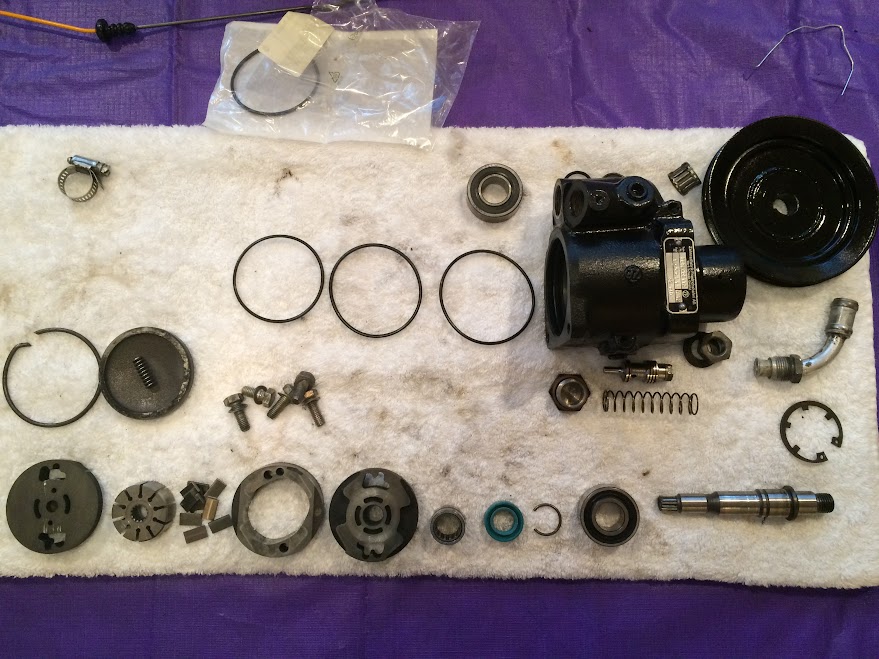
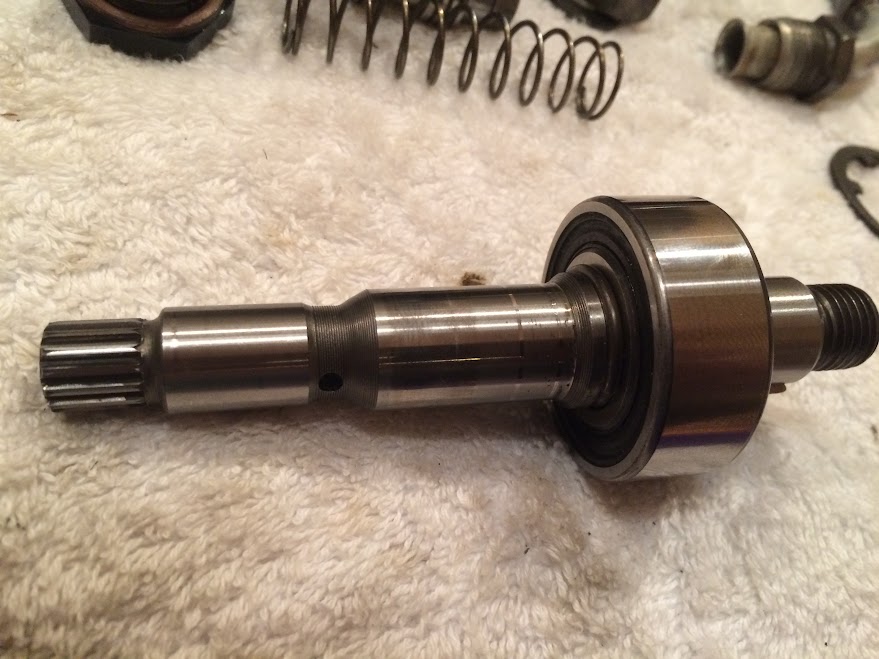
Here are the parts lined up in basic order of assembly going from right to left on the bottom:

nnk4iuMyinB4ZMdHVfeRqiQ0QXief6G5obx3R2Gaa8uxTl5NPs8hEdMn1YJDA9C7uUWzJ9P_dSoOkKIqfzNII7-mqRJN2Rqr26e255QqAR3fxMvuWz2GwFwKaWcmgKEB3czgNj14CPasAe1Hibbv-WSDuITL2EENx5gOdECeLrOoks4Wvj6KNgvN3hKrn5k_napkyzf_ze-FiT3diN_nT4wQ1GqSkW1pS3W2fWaP0CtbR8G59pmfOkLVurGZM1U421nH8C_ZG26m34je6sjC4WEj3Ycz6UvYPiL5HBPtsWW7g1-kAomKCI2jarQLuiDQxNYW26rAf_AP8t8vH02ZPi6KvI2G1-2ePmtjLzp4Cc6vJCjNfHXfZy_snJ04KkXUJsnhXML1kBVeHZs5RbqBJSNK41B1akyi7sjsJLXbLC4x6gfAp8xgR9fAKBItRu8iMsRG02QjMkiX7G756s19kPa8pozFq9IqsH55tIKrScVFz4QLquBH_cIffNftUivI3-XGj4eObW5bf6ppgokfGfLRFoF-Otk7CmAo_rZpd8Mj0_VFsYTrhITkD504EAMslX8W=w879-h659-no


On goes the bearing to the shaft first, followed by the snap ring once in place:

5sIckOPvffpoCRMLOgMq61X6-3Xi-AbwhOAPDZdyeZSIFzFE_rcAm1bOTfs8g-QL8SG-7Oi-MC5yShsN3nHfwxWqO0uKlRMY8qbpbgJ50CAOUAFzilIKuSvjvWhcS2q1ERi4h9vaTHbc5LntFv1yzaixId9Q4cZP-1D816XcBOkTeuBXpNwsrgQGK3Rz-23E7EgGb-sgDsJoP9AzHcQEqRtPyUMffUGmoPHEnWbdXCynEfnTi7f5Vf03LMzQ65slO8BlTeElKyzrBWwYJIh_79GBBoHK3Od5xwiCkg5ROkZtr30KO9fN627ikgjnTTz09HbAHOuyYcsmv0bfyFxecg1pn4eQgraRIOMTOp12jcdQI59bLTffRb8nqw8vYgFjneDxFGFpsEJZGPgo4whP4TSjn5tgVUUz668YRTz7wyMqJS7Ip0vIOCTX9iZ2Jb9Fx7n6mART7fK7zQMGq4d5xdnemkYLyo_43rvap8Yh6mccoD3G5B_Xbv1ta6yBGjNMBhAW4Z3DdrutIq0TXqDXDkECKdc_E80bmawZCDla5Ni8KlTGJ89wmU69YIam97g_pBfv=w879-h659-no

rbMRpYDL5qMfLsqdDaIo3L9YdOlc1e-zN20ouVbXNSQZw1pzkJV__yZgGtWMxTJASXNLXdaJZfqqhRbg4cQaELrfisAJDvs35TRD0JRrENLS7AlOY8Ady1dzRjM1ieyGMK0hHpaczs4tE4NxmxjEvia1D7MbC0jy3nt3BxLogJCIdnomYDmi1GekkDKQ8fPKSZvSiuCtaiH3bEyEDtgCgW6NvT6_qrGtxsZb_5OgVWcNZ2KSJlsqFEX8-DvSlTXRpUy5jKOxkq29Cz0Xy7N2bghAGKBDXBOMCyngIkVVDY23BzCeXXDvNypd5xLdQBucKaGd8wLpFWOdcKwHO-7zwupmO0tUx_hoiUvN7VcgaU9GntOk4ZgwZTz5Om-JB7Kkq3wWBTTPL4Sd6kNjOWczBC6i6aYO_OAQ11XVrSMVXJPFMtaiHPdlJLvLzZUO4vqLN15nJVFCyZr3t80-_AyaxYijojRNZm3OkIlsbFwTOmB3kynwKZWOJvD6ugmvyn8YJwmFxGnJY0CR9gzZCOf2kMLDvfQnIuWhAeDvLMjmeJLJnbwNd2WzB8CjInVm9FOOMYWc=w879-h659-no


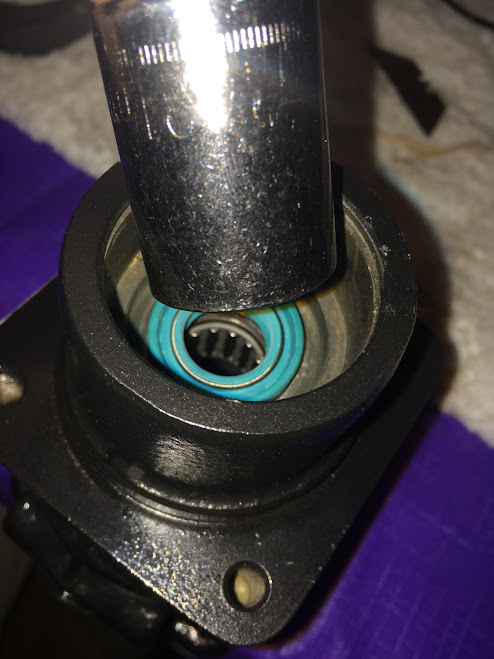
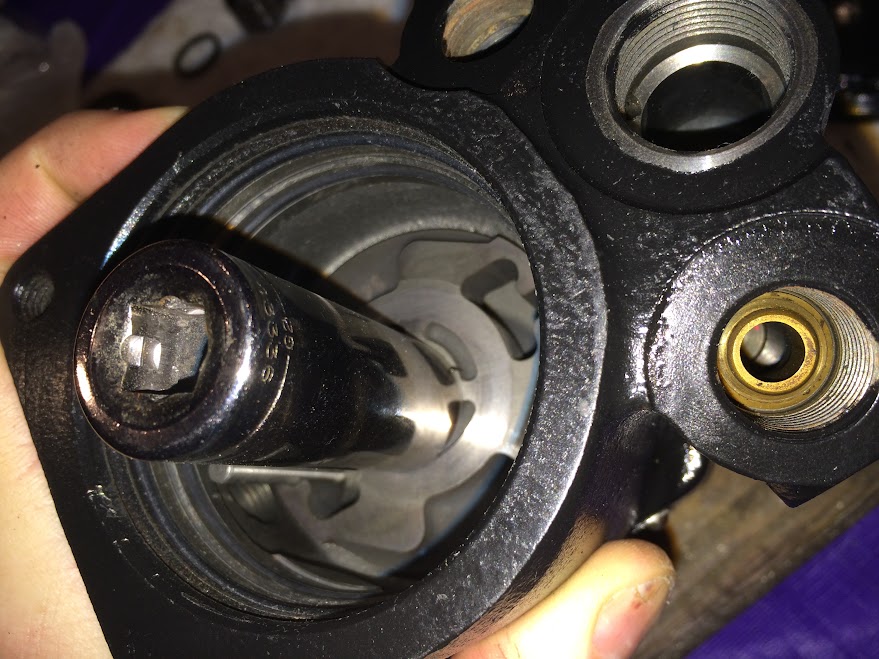
Next in goes the needle bearing, it is critical for all bearing and seal installs that it starts going in evenly, if c0cked one way you'll ruin it (amhik). Use a socket the same size as the outer race but just small enough to fit in the shaft and tap slowly and evenly to get them started in straight, gradually increasing force as required. I used an 11/16th 3/8" drive for the bearing (17mm would work) and a 20mm 1/2" drive for the seal:

NTcfnxcFYlfTbBoLB-jkkGmlvpoIycOffnZ6EWYWtfPXAz9ZDm9WBiMIyAw1JQNfi3qDQk9RR7kkpK4nQ5B_UfTYCS1PlO1m49hUECkFUchs3Z5wx-oKD_oZGJ8FRDjK20Gajp5YpBIHXtBxG14HKMT1GL8FUhpg27hgZTb27T70kJahfegAVe_36NDzKZO8WBVSDf7mZva_4affGd4wZrIEvRYeT8QtHYVmcUYVv8Jg7M3zsyv1grcgiJEWO9GVUKsn_A8Vwyar-HSTf1HhVY9tX52e1ypjx0plsNctgNmhHklKSZ91Qf9Eacc6MqAm37y7Q5iKAxBScwMoQ2EET5lBCtU1HasSCqE9iipQuMLWCWf0MTEvTosSQftLvBQsXINPhMysE9LJcoHtsHeQa6luejRs3MhcjBjHFdBiu_WlTg5CQj7jxNMr5CVrRIhrE6KfRfEA0jj6dlOCp9mDs3FhsP36J4HbwKSUF0Ch_zSTMp4Lx5xprRzg0-HHRX_zSXOFCC9PftBMCU2A3NqXJ-m4c6wAAeDkn_FSUio6JJqyqnNcH66D3ewYrFJ8fqa_DqxY=w879-h659-no


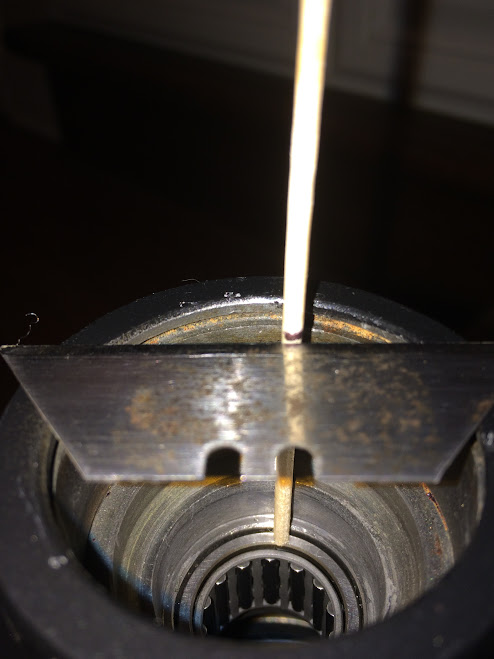
It has to go in 37mm from the face of the front housing so I made a depth gauge and hit it in until enough, if you go to far it can be tapped back from the other side but just be careful with the hits as you get close to the spec depth:

YVUhoFD032dTWxDMT3jpm_B0tpOL8MI8AHWf4oAS6Y6ZJ-hi653hKBDW-7LHZTs8CkBWyK5TFZM4pRaeu16J1HbmrrOHYSholFlFNUnOSm0OvNQdTWKTjIKtJKnL8AO1k9QkVmA4HTnKJv9Tf0ynzcGmAENBemh875iAdo_HDGhQqT61Y14jNt4wGPZPVZDfzs6tmp53Q3c4zSIxRaYQoBhUUwjF3PgeTMACYd3F7I70jsRR10PYvbGomzgg26hK8X8BSpC8jcDyTKQ1Q4LtpzWaa5vndhdOQJfCK63_NYAxWnpWdY56FCaTfS-G9gWY6S78Lr4QPiLrrc_lnC0dQh8YqWzsVwRLSzcmssMG-4m7ueYUXEI5mn99PvyLZTXBviKfAlzAWO5IxILQfpassxB2QG7t5RClXydUbeI9aErDRTHmAAA-UZsYXlIh1UJVCYUvx1A-9H1dkmAY4LzJb-STWZacsfOAU1nMmgGJ8_tF_3L-wgLMxYy6-uf2zpeLFsGpR1fqxIqkRgFBJvfaNxa0uyX-9FjvLonLbMU6mD94zJhH2vYj031E6QBqypglW9EH=w495-h659-no


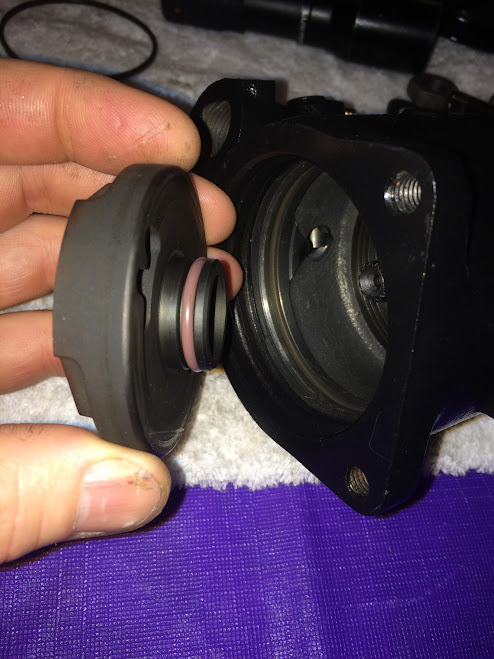
The seal next, hit flush to the bottom:

DR0MOAraPRz2fNycrOdvbEbp-jVf4fBfcpMZZvVJDSMDa2qnMJzfFqG9J3DpMOz4PuaXd8r9AxPBZNP2tA6xL-aE_vNdaa3smvA7Ge_n5MC6acJT-59ZNxnT6H_3_jKZl5B0W_fCwMO0qIfspkIHAt3kiadKG_Lmif4Fzryx1XizqmxYf2DJdMnfnlZMosMheqSAhHhJEhaquBVahAkt42QEs9JisbeXsuwNRtrWXXAz6_vqxcyyeihWaN25VJ8GnJgb8-nFq7sbRM01FVJwo2etZe99kZoAfnkms_EGbKZCwxsIPnHOppxy7YqWATzTladWrCH877t62P7Vd_1F8iPyrB6vc5KdoLQG4bQW9Prl4rUYrEMhpjq4cUKxxjVhp00nkQ19rGWMAuHCvrd0r7qU0qyZdFh9_6rhEW09vgZQmm4ucLgrvJtBoIT0xbmnjOog_q_8A06V6ZKzLGbXbkCaOhf57tbeLuUIuKIKEWNl3vGIm8mvAZCOUOaHNIvfj8mosOB5NmMNNdAMW2gNvCWpZPcnrxZXfedmTvOoQ4Kc_atj_Ai5N49nmlupxeWnTg9-=w495-h659-no


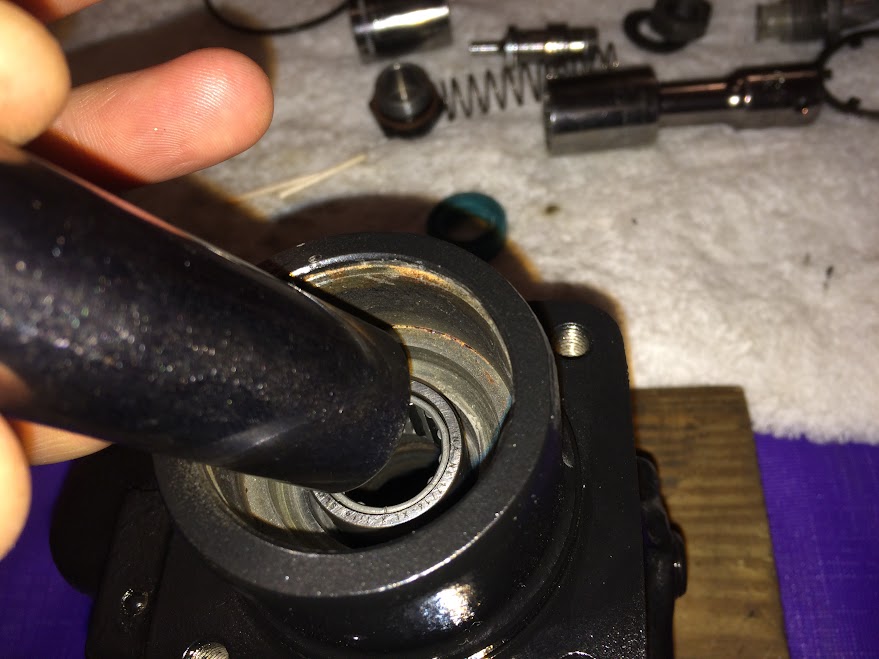
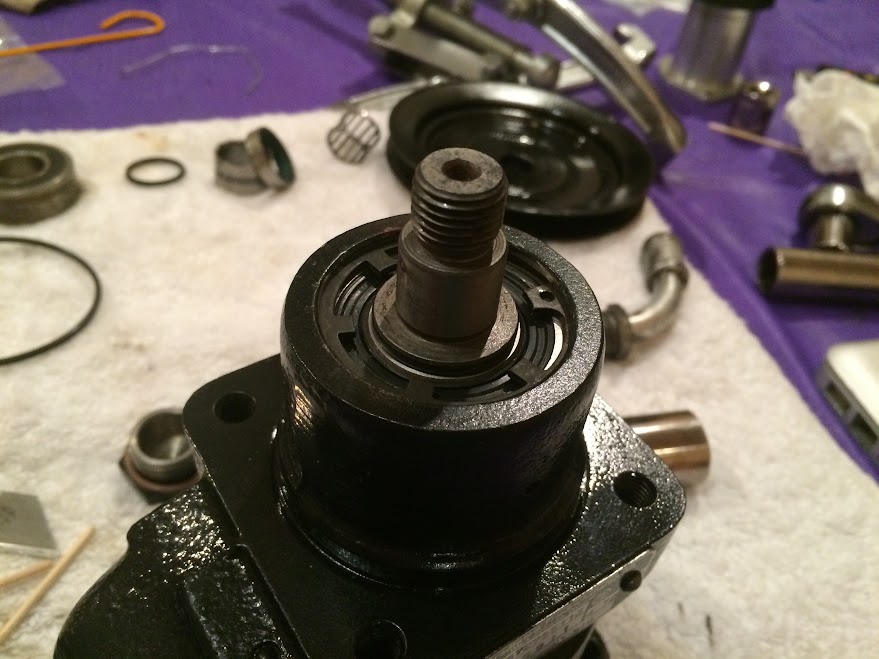
In goes the bearing/shaft assembly from the front, I put it in the freezer for a while to help the bearing fit into the housing but it didn't put up too much resistance so probably not necessary, I used my trusty orange BFH to hit the end of the shaft until the bearing bottomed out in the housing, then it's all in with the circlip installed:

Zt2Y4d-2DISOuNvVbmnlSlPg0qzt91Qh3pz7xjeR9YxI45XpA2Hq9ZVUFNCF3i9v7zgtO3UV0A6LaU0MrBlxIoP-uIua0YxUNG8hvwNRpglVFh_UtJI7Jr3hGIfFtlG3oOxUti8qalercubZr1Z4uNodaHJn4QYHNRHIFXnS5m9Y3t39joBGku3Vv4cewiC6YPG9bGjBkJ70y7S2qyfmrdNBJRi4i_A7-TeUwxGsEbsDUbapx99WLEkbqkQv4FpJoQGxwMpiCUjihQr9tlf8_3qreeZ1Hjf-oP-Ga4KsuFjDwTJRqAe-0oyQ0t2lpMUlyPUUysw4sc4ia7PGF9BKHDKoPY7sIrmkaRCNff_Cnorg1Xn9nufiCGXKum0GT61RwoqBJyF4pVAneikFHCgt0xp-QIIS8ot2FdUgK9xNzlIfj7JnAYyIGR2w3WTgZlUNzOrSy0AKQ8TX609SX1F1cmpicDGIzzGVI7J3NFgS84cLkqJzEUp3i8wCMzEHdl3wMj7CC2Plyte3VLGJ4DNJQplqeL6b8xgAYoUABR1Q5DkTWtMZxPd_dix026caC7YlSCER=w495-h659-no

II_L9Qh_tR7hBWCZ-DmSsMb5KG-c6XOolMJNZJGG63JnWcXzXIz6hZDqCHZPJfWINo-2I4q_R4KhNoEw0v0u7BWPi8lSm_EGIc29vNNssXrPSKyH8Ok5UumbR7n1J9KPVoOhjatududXuDBIIndxozySzImEmtadYxTHNER3skuR2vC-zOcGSCP1RRUmq5RI9iz2_wH_2-7aYnug1PiYDj2PrAaDz_mcBl9g9A_ggy6IAwfVOl4wEw0_jpSpjNaf1x9DICVkkXuYbGBd2E9az6lDYVJ5cSkGughcSzSnhu0hXNvdP8lsKbUJUY3WynNiXZGjSNtrQIlj-ZLXnFh1nRWp1pQPYkL2qyDYq2dUc5yqfHqqNx2yRN7QLO3xy26V_weHIrTjbXBKtiE88GVoZaVjGxXSJEmV78JetVirnFsO9i5CweXI735gWXKNgD5MNLZnmRFWjwP7eHZMBVamSAai_SjY1ICo-v8HTTk_jpz6NOCtpf4zwsb9CjSCgqHd1WlG1RuBBxaXv3iZt8rh6Luo2Q1C4YSZKcaYSZOqRLBqKvtJv_fC0jDHWQT6xjVJcS68=w879-h659-no


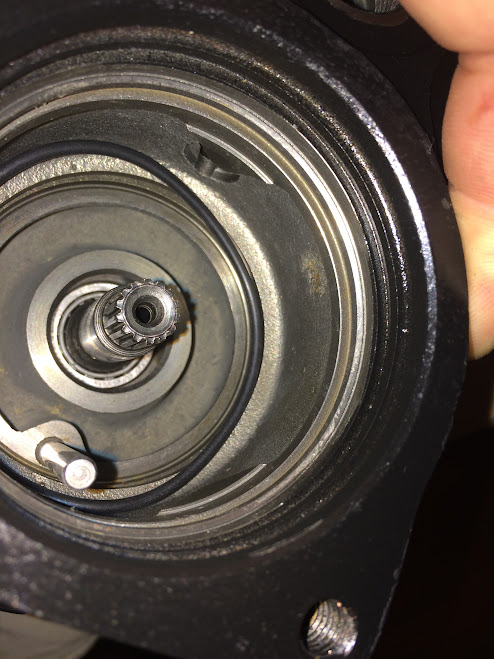
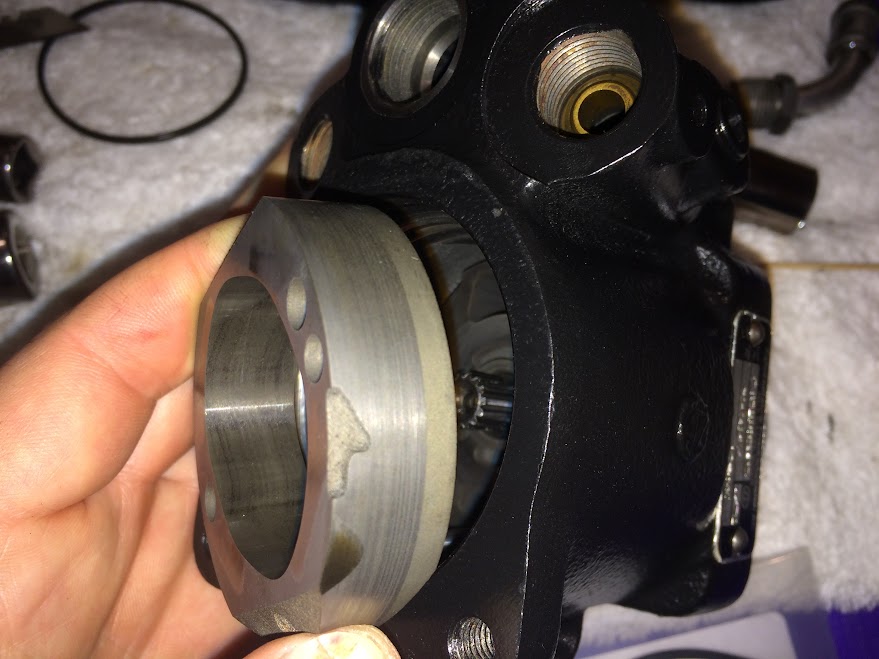
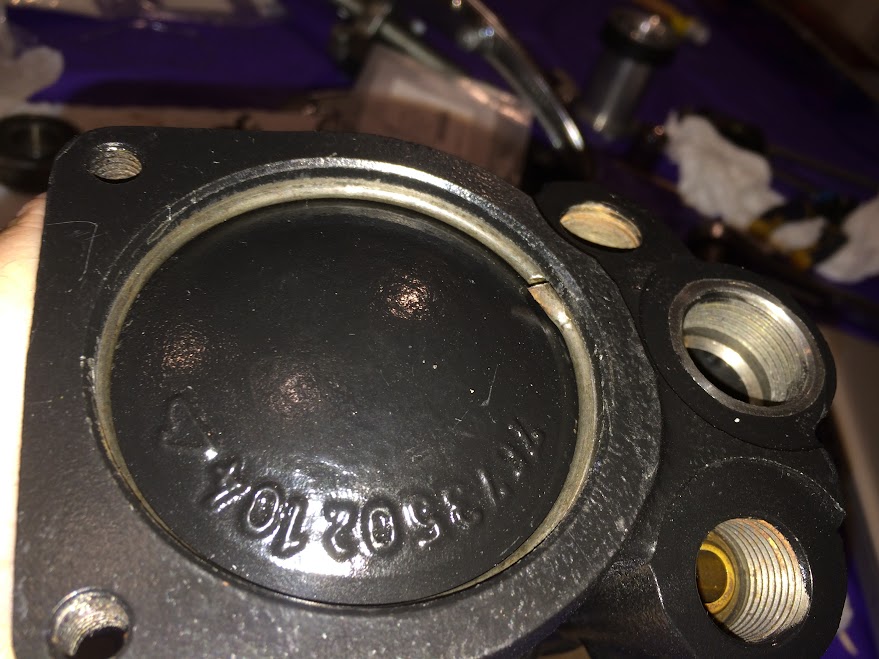
Next go the turbine components, first the o-ring 32411105150 followed by the piece with the small NLA o-ring, this needs to be tapped in flush to the body so I used a socket:

ovK-SP2-lVYCSAm2fMzoCB18L5wKVOw2uFwGQ_7lSY8jWoOAi5ZG4OYgfKHOotahITp1khDfXCDa2OucjniZEWonjJlE7rTSMCrXbkdYZbtiWtZ1pMXSZTtLF4WFtIXMsreu0ukhhRQabHsEum4Ylzsv6bfow8clmc2FM_K7Rb5aoA_dXF6GOSI91y3cLcWZ3WlAX0hjL58WuzwOwyQ9NqhGzasW8Ne4P6qDvmnfsRfGg5ZXK3QdEizcnM-5qIhORxG0xw5jpsSKRsYZwxx2orlL8cwoq_CB8H1nM9lgYlTwNYwTPFKpbUoVx40E7GQLO2dmIYi5BHA3SJcWRzP2-sBzuT4JA6eNU9yA1kYzcoGBllS5TBP9b_QPbz9iriBSEK_J98VZb37G99QC2XUK9YoAgXTOntrkORoFgztZKuzrmcf1FlCps71Y7w2-h0P8knaCqoRRVn5j67BbS-4_Dc9BnEwFF9CPBK2QShiHiqJjlwI8TZg0HWe1J1hXFYgmwI3ervFYLjl13Hu8u_WUkcpTo0bpxtsk1IG72cFD0_8bw_Ud7lUHzEQFFBWHGduIovdD=w495-h659-no

-PzZ37vCPlVcn_jSpYaMegngepKgr9JtPtp85XR2WBfM_O1JH2uziOKrEXTiXIFEJsKfaffIjbdKr0rj7cglCgHY8NgF-2b2UARrWzPkLmfkomWwaQTvec6bh-JK_GtRCxvkE8JNlzNFwLweg4mDoIb1wmac4w9w8H275GafCOIdSF3E7c5j-ZxMXeI85496jUxW_tNR74WB1eDqiccytUIJm_vZEMA7pTxmpSGGJfC2KtTJQriT8bpIgu5w45sLtCvpEgyRgS8zn2IsbMyACyr8njvL9Psgdk__4108vMBR_wt8QBs0KaCBsUc_U3mVlciCAXaQfLBpskw2kEvVMU68s674b-NOl3Si8rzKy5D7N3AaPfz2fen2mBtPSY8DGjgsZQmAGGL6x6KExDd9tj268VHqAc4UeDxJFZ2-reflSsY9FfeAm5q_NBXzrtS_0M-h_f3MrCW-whCYIGQmAom8Pf97V63XPzjVbZgG5asBFy1Eem-wZVbTZ8pCtMl99RL49aXRXTddOycMMxgA5b8vp6jow4O82hqoOa1Ka7d28wX-ZrQmlcyuFgej4Dkp4yVW=w495-h659-no

ScckKC3s_MU1gzNzLePaKATExZbKVEB4yyClIYLWs1o1RyImtPKvIQ5usNKBJPT1yICAgsSITExp7sb-nUTfYKZxSiTuQHAoPeMxBg9522HNeIo_LBS9XaQQyQDZjNkIIrhdjqA--0DgMtYw21dTfzu3VzyYihW_R8AzE9s4xWd2Fv8r-8hmqREUxJRGiJGcLHF7UM5r4YOTc3sa7D1ZL2MDaooauUoaFEbR74r-MaFyJLglqcHYeqHtHOGABqvHd3Iw_sdXsr2eAKxQkYndfTdC0e_wwNF_QrVRgej7F4AlrkkTUCKozyaAmEtcfQ_44Png1Bn7p-d5_A5-8BECc2VcGH8aSHx54rSXDMIMmqlNcj1b_2_I-EiGfy97WOjstg7-JoN29KVyGOdWtssBJpm1dxpxNN7tAJ_ja7dYn23-hF_SbbtOPkYVGpX9dCGxm6GANhLa3aFcw-H1FH0iNUayxAze7TL39zJX7OH38VN-jG98jVbY4GC4cotVNqbkxKGev7WgZNb9x3SukFDG5naCjbVLENwZld84HMzb2se44a-p971vp9DdAkBpFNbGNqTU=w879-h659-no


DISSASSEMBLY NOTE: the piece with the small nla o-ring on it needs to be tapped out with a suitable tool through the needle bearing hole from the front side, this will allow you to then get a socket on the needle bearing to hit it out of the housing. It took me a while to figure this out when I couldn't find a way to get the needle bearing out.

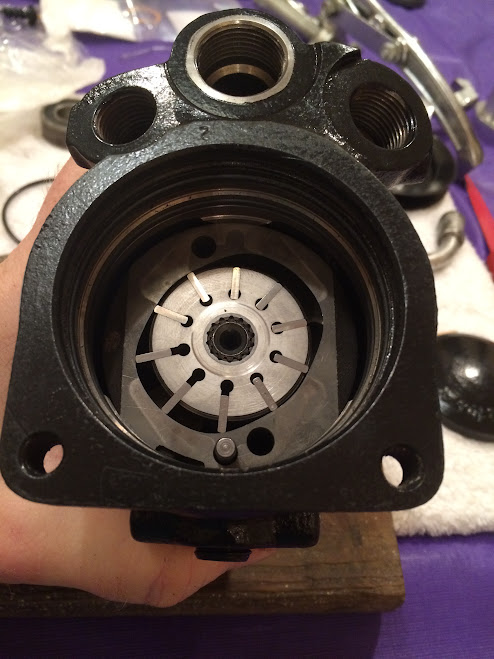
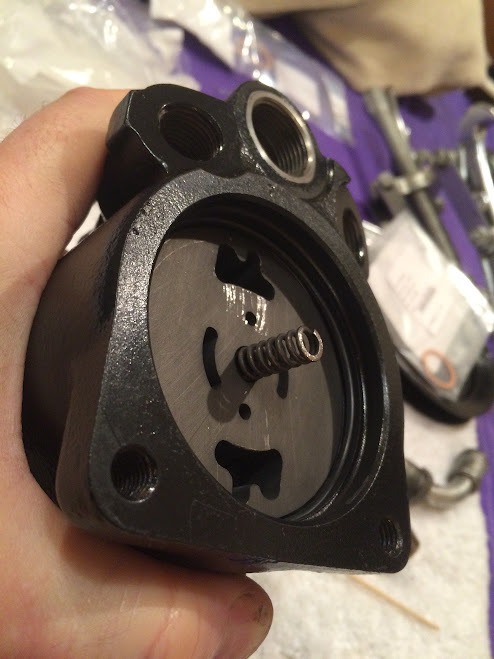
Next the o-ring 32411105154 and the midsection piece, the arrow indicates direction of rotation (clockwise when looking from front of pump):

dQQG9x3wcmVy5gF0MR0-aM12NvyCOZdA23R8Q1FOZwuGhAAw9MBcvJ5e_VrKPCYfo7YvSjLstj3vBmehQ6IRHsfb92EDTHqL4_gzi3VkS03r1kpSUc2ffXYNaYEAit0O4Y5R8Q0tilDmbtkbclaC63OcKEYZMLvngYAR9U-SiO4sraM08jQ0WIc52PFAE36PBpFtfnJCThm57XRz3Jq_6iEkzd_HlNmBKaMezyYvk0Tb8rfZlDRRsnWZGOGs6CpFa3bBlZRgJbeZFXhbyKmNEPre0bTTwmYEIPvJhVgZzZ5Ims__IdqGqgGj17n6IQPKIzuSJKdrJjXITxu3_dR7nwffoixRSKmJBW0YGSoc_LhTrXHi6Yek6Sse9ro_u8CiICUipxQZtahA6P0X3FkFZ5TT-daotuJqbs_oAhrRMxSQYI5pDiy3SfH13efU_Ngf726KFlxbGtPfDeV6Vm7YuNkt5iHf5Kv7iROAc-W3ZjDWSTqhLHrCjsxLNspU7jkyxpV4Xaa4VjfNqbtnAduSGxu2PABR5JlR1JE9MdLweYbTmUW8MDZoJUWL4y-ExT4lpJdy=w879-h659-no


Next are the vane and pieces, the manual says which way it goes in (recessed towards bottom), the blades will have a slight band of discoloration across the top, these go towards the center (the holes in the slots), I don't know if it matters but I did it anyway:

58Aeec26j0ZlWt_ciQiEa7RteKPuhUdxF_j8rSV7PRe0IFkxlCDosm5qHMLUHfmcwyk-GNs4fRt3XlrF1acOWNNbKFvBcI5sdvuRdcxU9jL4YRvguRRxppekOstOOEaUvRYiYZC8EgiHEuO-9ea81T8gNjG-pYeuNAF6XtSraPmGXaRVbwXj1SVV7nR5N7M2XuQRfe7MhUXjza0E-JAVq7mYRJPHyM7cEVnv5oaIyIBDNZH8MjSfKzNQs3ZQCH8REkZKLjUy1u4qOVKiVxnje6ro2DVURDBgGVEib8vx8IQIzu-_w0F8QWgFX-lAKy4sbL6i3rzfDfQsdEhd5NU_4IVmK4-zGe3nPziIz6YjA2joljgwo7zzHuYhddGuFIacjtmdFi2sgMUNMyySzIqpfjqY10hGlDlPKsmpFXK_D-oFhQenA9FY9NG3s4AcHhovS9gj85aSKey42Rin3Z-L56LNtz4zB0tekjK3opaqAoM5OpvhTJ3cwEvtsNnuMwNICgKZpVW_wOKp0aMFc-C6GUAMoHDDVuBpR2s-4DoaPdWnKYW3WpM4ZlOr9CbtCaRDEvLI=w495-h659-no

49CBnkImSmyhoJvp05mjkh8fVoWSmNYHQzKVBUflmtlTo8JqAmGdHbUSX8ydcn0ezepvLs-j67FGxz1nhbwykA48Ug6RzmP35H2BvCCXOmxEHng_6Bm6F1Kp0TjQtLuA9TMR19RLNGokPNMNpL8jTNIslxtEPnCGxDZrQvao5AExiuYvFFyUW3xIWPw48L5LvJ-CP4a_8uu1B4fOakg_zEuzqywmDdAU8lowCWMbfoejonS52XCISIKpSPMYFQPHrksLEgVH-HB9V6jBPHzAD4hVxmGmAotsrq7SPG3Blls1BTJj1m893GtahuJS_ubiVRe02GGDop3ZNF3KY0XD1puWgrLaXHntaXqAtGiaWntXQNy8F8d_AiSHhSzV8FBDyrrfN01BWBGDDlkupiCHy3_XCRq4_ddqVZq-7ZHzIU1WPa2CGmpVLGR4HQ0Jw1ObjEpdgad1pjMQG5BUHMGresVbOjWucvl-QS8vcCx1SpCXrtIuoGRJL5BTCYc7uhwhzt4xsxIiT-w9kosNtZc1tPaoT_j1zYz7vDx7sKe0Mwc5ptpT4xeGg54D40ow0dLqmP4b=w879-h659-no


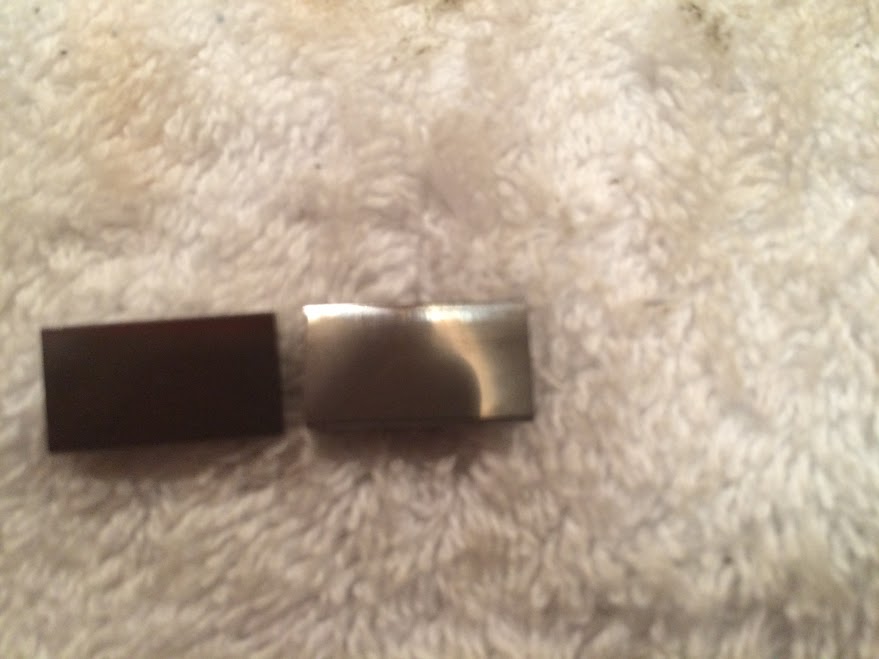
EDIT: they did not appear to be worn in any particular direction but perhaps a safe thing to do would be to put a dot with a Marks-A-Lot pen on each vane near the gear end before removing so they could be replaced in the same direction of rotation.


Then the last o-ring 32411105157 and top piece and spring:

AobUHmimQPUgzVPo8xO-MwQOdFR1b4pUPBgO7AkM-nSRxoNIK2WN3CRnUrmBsSpZRRu5sQZQYXx77yg5dCbVh_PIrDaPc1JJyJAo6St2j_ZV_DV5Y7NZzvlfV4ShHXW89LG9wEePhLBbLe8e8sg6VwpkpfzzwnDtLKxPeeGXiKRnKyacMmU-_SuZIf6bKl2pbyC4ahAC_FSGKsLo8gN_XhNBi5ZBQMYGKi3PubeyE8T3BFYgR8T2dWwGwGraxePPj8hN8MzYL1CXZUmHvX6MRJDlSE2C0Nx8PUe3jlxE0wJeucSKjX12iqGqM2D52kJtkwVK7ZP3HXctz_J8-pKc_oa97uSV_w_cHSGLzczCzOXou7jH6Fe7vUwIh4KTS4PC7tQNXrKpvF_Kv4pZbabSsmYY3oYvEtQ-2z2t70zxNFPrs51rCWXuuSxOQcnBZNb879XL9mSghwO1_6acczdyfWolElTofpjSTBN1bDOX8_jUgeYLmjwfdWnGi0q1vhSS607CghQhz2QOV_gpUrg9aoyp2HqMKCEtnytLdOKvSk5UGK-6aBduiy78XdTYGC_EdT3K=w495-h659-no


Back cover on and snap ring:

8Lb8R-YV8n6W2IBp9TJGGqID1Le9WVpvdy0i5HxCxYHJPVtxFnInnu0jOYEjekKf5KmHxiUxFNybsfFHof0hl7h5s_WP3AGdEp9Qst_DYp1UH3Kf_vHDvBgzTnGG0Xb0n_bFtqUWYa2Ei-OtZbUdAnLwr8PQgbRjPu1-a8Nz9lRX8nFYUp4pBCX865jqHbh3m0NYc9YP0j4w90tq-eYg77I_kOlhW3B_vIx2wPFu8b5o7xUfV3b7qmu2aUuvIa4k0vf5VH2yVEelA1QaKqYkkKiCPjVEh_RUI6BOPaOVfRD_Rr40pi7xG8lfsk3AGMEo5zrUTq2nmWoo0aqpl34wemlueOBMwKF4RfXX2Ve-jhiX-fdiBFnBKgLgfeTGO4CahCoqfyj6qKK7V46ED-0hfWgohMdr0sQ_8ed7vMPkP0sww8QiXUk2RNa3ePPnoH7dHw8XfJOmlT2RcQk4hv_Jdx4lCONmwzeZPXut54ZkUiqgIPcBc8e8GFSOUI64Vdl8SQpAqVucI_dKAsRKB_Cf5RadLJETqubj0ZpivrrHwjxZXRghScCrwUYF3lqgnFIHd5zO=w879-h659-no


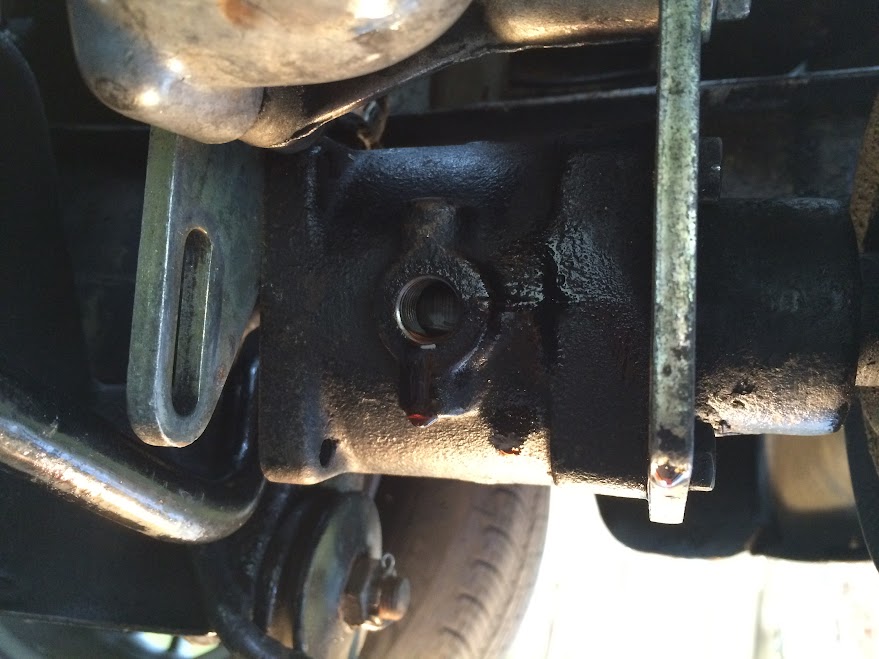
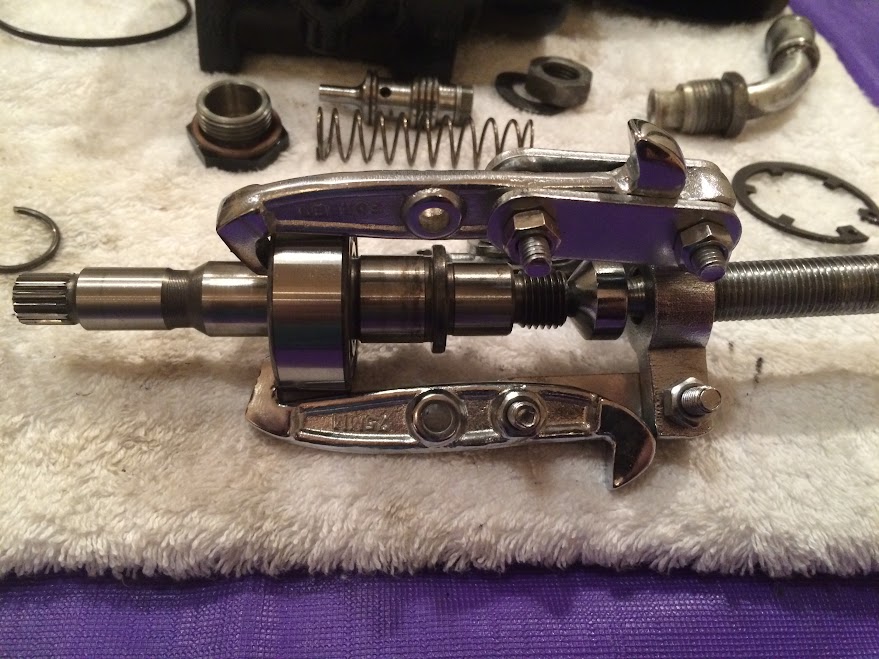
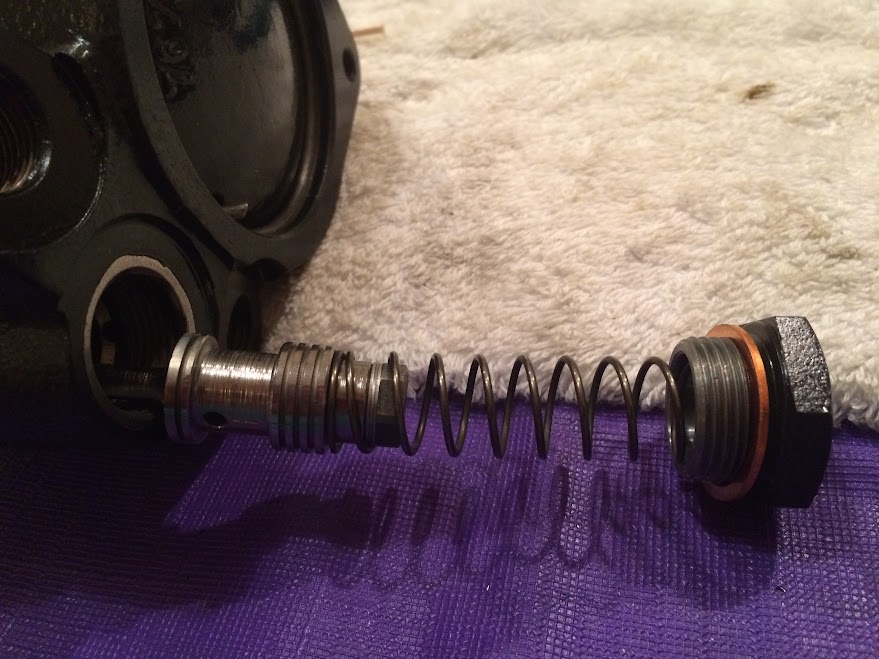
Next a new crush washer and cleaned pressure valve assembly:

fhS2nU0A8xRdJYnzEMo-cBevlLtOQwhE84BBnAHXmIAKvmx0KHnaxS9HWhEM1VPkJ2UWe64-SOkvJR5sp_N9Fi4gjBDCLWWONxNVb7mqFATTroZzDKRNKgh1Zz8NY56rkHhkM3gQ-ssCazIJlRpt6AtdNWk5nJeWt0mn3tbOkHUJPBsptZSRdkCfv_QsAIAZ84-087Akpc3-E-n6GrTFGhb_EzJQINAs95xeXgdTucfyTA7xgCIBgUYZK1p-2Lv83K2TwpazRFBfno1eTuGvIELlZUeqKKKePHU5KfghUiQQn5wThZsUWmXo4aEd67-4dbXki5piunPYPgBlEDUM4yRIBaRWFFcS0cw5GZAjrt4iNCVKksz1xgaIY32a_45nBu9aFm7qCuwYfUZAv6IHjm2P6RNp1zUxWFjjsULI9G93NfKW0-de9CEjm6TukvviMkK68UBwHvdWqi9dysExr8ZKbRFqKaJDh_SSYjbzv9ioAaX5doOwuLEafkmdNyar-2BlHwP68HBwkgjN4MUsKAKMtT2ZitoIokdKU4KUx__aaknTAMw_1T59MEor9XqDSMFv=w879-h659-no


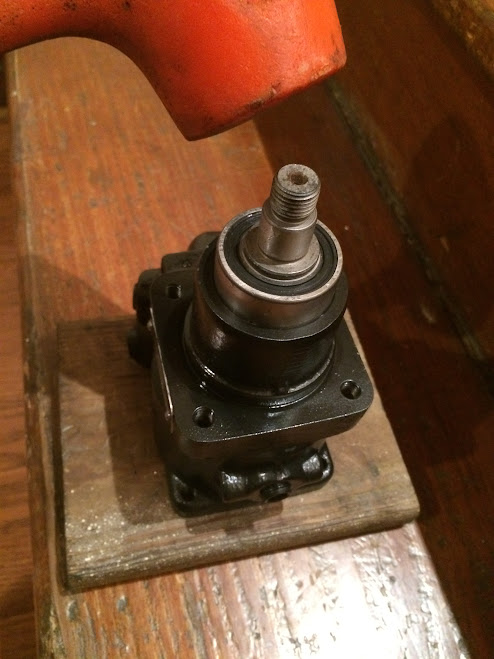
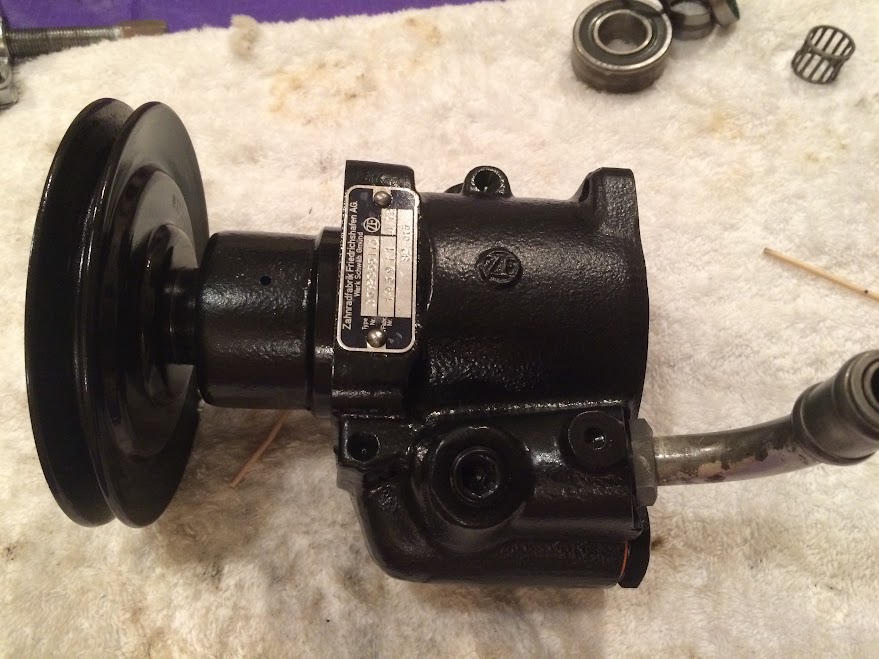
All painted, clear coated, and hopefully ready for many more years of service (don't tighten the pulley until you've put the mounting bracket back on):

aIf5ABQz-189qh5DRG06zkaXlqaQH59u_r_GZK_z4vpJejw73ucxVn4RUZRsdGecXg-ZllSmMCqOq3oB03_PmRXIqJPHJ_b82rX1C2RZiyu8yJvXeKi0an4KTyf8Qqatox_FBLiOPq7FXSLk7goK_NPYBI3zhSU3wWI6KsnJYDEizcxH7DWq7au2jw-YbANtNHDF5eye-epPHHEq6ekHIOuMRHQzn_PMJ88kv5pEKPfQ5mjUyAQ3Aj8hwbSFXzVrWNmvFUOvkEXsPUh4f4Q2mp2w3B5FfYwQssyGgNa0nZtznDyt-6_6qKnNHUPj00OCGs2XriiT8jE0wTUIN6ZrB7RSFzxH8gOqpGvjXiQjcS55z9Eeqhfry7U031CSM2MaDFa7Hyy8UzqbWHtYh2UqwP0tJZBmlrSN1KU8k5jTzC84nNBQWjqesl1Y3f1rkjG2xf6Eq0h6D3-Yd9jKXe6mep7XkE7xJbvyDecgsMP4UVWiRzJux4fIbAfqgYCxpWE6PJG9GtMNE9JXvM6PeI-MMj-FS13LgvRyE-n77gVka7k41_QlEn7P5sbrYJTQfj710yAU=w879-h659-no
 
Last edited:

bluecoupe30!

Well-Known Member
Site Donor
Messages
2,148
Reaction score
1,297
Location
Delta, British Columbia, Canada
Power Steering rebuild

Nice Steve, but what I want to know is who is holding the camera? Is your wife secretly the one lobbying for these repairs/upgrades and you are simply the technician taking over her dining room?? Huh? Those photos are very clear and well aimed...just looks like you have an accomplice. BTW, I had to clean up and examine the tag on my '72 CS PS pump. Reads 02/72. Fun! Mike
 

Stevehose

Well-Known Member
Site Donor $$
Messages
12,997
Reaction score
5,672
Location
Sarasota, FL
It's DeQuincey taking the pics!

Just me one handed with the phone, my wife was off watching one of her British shows, asking what all the hammering was for and is foul language really necessary :smile:

Nice Steve, but what I want to know is who is holding the camera? Is your wife secretly the one lobbying for these repairs/upgrades and you are simply the technician taking over her dining room?? Huh? Those photos are very clear and well aimed...just looks like you have an accomplice. BTW, I had to clean up and examine the tag on my '72 CS PS pump. Reads 02/72. Fun! Mike
 

HB Chris

Well-Known Member
Site Donor $$
Messages
19,418
Reaction score
8,759
Location
Huntington Beach, CA
Great job. A rebuilder we have used in Long Beach charges $175. I was surprised when he showed me the damaged needle bearings in our 2800 pump. I never would have known and wonder what it would have sounded like on its first drive in 34 years.
 

Gazz

Well-Known Member
Site Donor
Messages
945
Reaction score
620
Location
Gold Coast Australia
Great tutorial Steve.

I find that most jobs need swear words. If I kept a swear jar in the garage I would have made myself rich. Umm, that doesn't really work does it?
 

Stevehose

Well-Known Member
Site Donor $$
Messages
12,997
Reaction score
5,672
Location
Sarasota, FL
That's a good deal if includes parts which were about $80, no such service here of course. I noticed the bearings that came from BMW were from Slovakia and S. Africa, hopefully they are better than the common Chinese stuff.

A rebuilder we have used in Long Beach charges $175.
 

adawil2002

Well-Known Member
Site Donor $$
Messages
5,187
Reaction score
3,050
Location
Brunswick, Maine
I admire your confidence, tenacity and ability to take on such a project. Fantastic pictures and write up. I wimp out on such endeavors and readily admit it, from my past experiences, I leave those jobs to the pros.
 

lloyd

Well-Known Member
Messages
444
Reaction score
94
I am still attempting to gather enough courage to tackle the oil dipstick rebuild. In the meantime, I wanted to complement you on the very nice steering pump tutorial. (How many table leaves do you keep on standby for extended projects, or have you ever resorted to employing the "d" word (dining room) table. :roll:


A few questions regarding your rebuild.

Aside from bearing wear, was there noticeable/measurable wear on the housing internals and/or the vanes?

Did you mark those vanes for re-installation, or is it even necessary?

Were there any noticeable indicators of bearing wear/failure - other than the screeching >4000rpm, e.g., fluid discoloration, pump shaft play, or pump leaks? (One would expect the noise to have also appeared when pump was pushed to produce maximum pressure, e.g., low speed parking maneuvers.

Could pump life have been extended with lesser drive belt tension?

Again, nice job.
 

Stevehose

Well-Known Member
Site Donor $$
Messages
12,997
Reaction score
5,672
Location
Sarasota, FL
See below:

I am still attempting to gather enough courage to tackle the oil dipstick rebuild.
Wise to not rush into such complex projects!


In the meantime, I wanted to complement you on the very nice steering pump tutorial. (How many table leaves do you keep on standby for extended projects, or have you ever resorted to employing the "d" word (dining room) table. :roll:
Thanks, fortunately my wife keeps her teaching stuff on the dining table so we have an ongoing detente regarding project space but anything's possible
:)


A few questions regarding your rebuild.

Aside from bearing wear, was there noticeable/measurable wear on the housing internals and/or the vanes?
No, the insides including the vanes looked fine. Appears to be very well built.

Did you mark those vanes for re-installation, or is it even necessary?
No, they did not appear to be worn in any particular direction but perhaps a safe thing to do would be to put a dot with a Marks-A-Lot pen on each vane near the gear end before removing so they could be replaced in the same direction of rotation. I didn't think of that at the time but the lack of wear seemed ok (I will edit this into the original post). The vanes ride along the edge of the surrounding piece only from centrifugal force so there is not a lot of pressure on them to wear out.


Were there any noticeable indicators of bearing wear/failure - other than the screeching >4000rpm, e.g., fluid discoloration, pump shaft play, or pump leaks? (One would expect the noise to have also appeared when pump was pushed to produce maximum pressure, e.g., low speed parking maneuvers.
Full dislosure: the squeal turned out to be a loose alternator belt (doh!) but since I am about to make a 1200 mile trip I was going to rebuild this anyway as it has been on my list of pro-active repairs, the bearings inside were definitely worn - the needle bearing was grinding a little and the main bearing had some play and noise when the pulley was spun by hand so the end was coming soon anyway. The new bearings are solid and smooth. No leaks or discoloration of fluid.

Could pump life have been extended with lesser drive belt tension?
It never appeared too tight during my ownership as I only had it tight enough for the belt not to squeal when turning or flap around at high rpm, I'd say 44 years is pretty good life!
 

Stevehose

Well-Known Member
Site Donor $$
Messages
12,997
Reaction score
5,672
Location
Sarasota, FL
Forgot to add this pic, after unbolting from the car, this hex screw can be removed and the fluid will drain out here, then turn the pump a few times to get the rest out. Not messy at all and you don't have to siphon any out of the reservoir beforehand. I will also replace the filter in the reservoir after it goes back on the car.

URPELso0xpv1zUuBrXqoXtQdLgAMPx8S7cmc78EERyD1OHgBsJbwYzBF64tPwVvUJV1Ft49T8ndgHOxOylXhrhrXO6NSS2p2oOadnXif8pCh8Qih_PLTd1zIyoX2VIw598n0-MGztVx5KpMYxR1MEqoINz0aImmuSQAgMAoTO-mlHXEmgP2RezFCZN9LKz5k120phRf776hNWkGw1ap-yWSu7G4J2rcOdsjERmKqXGVkIMqu2S3F4IceDCNgL1kFftH4nVLO2LXxh1jNOaqiDuoxlT1HQcaHAFwLwfklHdx8ExbXn5LC581W7UnfxsEaMHa788pzHzqB7E40VOeTD8A0sVUOReJJoObCKLMi5psQRp5h9omyup-SW9Woq5lWZlhaV3MuseYjwqvBYm9d01_A87HnBooHDyv7VA1e0wt7KPZKK2VGZxqvS72GGTLu4EZ94fiH8gQR6zWN_T_HdLGWIDQZLOXUfFRj8BaVwMmBfHTsGLEMGMo5llV2vqXqqahJDKkco7QhHEHeRww5BfjNl4Bv5YxZ85fD4bm4HAjMQv9795YxSEbTK2IUJU-cVoxL=w879-h659-no
 

deQuincey

Quousque tandem...?
Site Donor
Messages
8,417
Reaction score
2,430
Location
BIO - 43°15'46.5"N 2°56'03.7"W
Forgot to add this pic, after unbolting from the car, this hex screw can be removed and the fluid will drain out here, then turn the pump a few times to get the rest out. Not messy at all and you don't have to siphon any out of the reservoir beforehand. I will also replace the filter in the reservoir after it goes back on the car.

URPELso0xpv1zUuBrXqoXtQdLgAMPx8S7cmc78EERyD1OHgBsJbwYzBF64tPwVvUJV1Ft49T8ndgHOxOylXhrhrXO6NSS2p2oOadnXif8pCh8Qih_PLTd1zIyoX2VIw598n0-MGztVx5KpMYxR1MEqoINz0aImmuSQAgMAoTO-mlHXEmgP2RezFCZN9LKz5k120phRf776hNWkGw1ap-yWSu7G4J2rcOdsjERmKqXGVkIMqu2S3F4IceDCNgL1kFftH4nVLO2LXxh1jNOaqiDuoxlT1HQcaHAFwLwfklHdx8ExbXn5LC581W7UnfxsEaMHa788pzHzqB7E40VOeTD8A0sVUOReJJoObCKLMi5psQRp5h9omyup-SW9Woq5lWZlhaV3MuseYjwqvBYm9d01_A87HnBooHDyv7VA1e0wt7KPZKK2VGZxqvS72GGTLu4EZ94fiH8gQR6zWN_T_HdLGWIDQZLOXUfFRj8BaVwMmBfHTsGLEMGMo5llV2vqXqqahJDKkco7QhHEHeRww5BfjNl4Bv5YxZ85fD4bm4HAjMQv9795YxSEbTK2IUJU-cVoxL=w879-h659-no

this is an extremely nice tip !

but, isnt it "before" not after ?
 

Stevehose

Well-Known Member
Site Donor $$
Messages
12,997
Reaction score
5,672
Location
Sarasota, FL
It's actually dropped down, you can't access the bolt with it in place so you have to lower it, I couldn't get enough leverage on it so I bolted the top of the pump bracket back to the lower 2 engine brackets temporarily. You can see the bottom slot to the left of the drain which normally would be on the engine. There is also another hex drain on the other side of the pump that I didn't touch.

this is an extremely nice tip !

but, isnt it "before" not after ?
 

JCS

Active Member
Messages
45
Reaction score
30
Location
Santa Ana, CA USA
Nice write up Steve,

I have been rebuilding E24, E28, E32 - Hydraulic Brake Boosters (since 8-23-11), and Power steering Pumps (6-1-13)
I decided to start doing a rebuild service for the E3, E9, E12, PSP (power steering pumps, since 8-15-15) also.
Now I have the E3/E9 Power Steering Hydro Gear Box - Leak repair, added (12-12-18).

Here is the link for the PSP rebuild service : https://photos.google.com/share/AF1...?key=dFBDQ3pvWXR3bGJGUXRxSnFRNjZpMm8zTmt6U1hn

I also have a new website, with links to my 16 website links.

LINK : https://www.e9coupe.com/forum/threa...repair-service-for-psps-hydro-steering.30348/
 
Last edited:

Peter Coomaraswamy

Well-Known Member
Site Donor $$
Messages
3,787
Reaction score
896
Location
Austin, TX
Forgot to say thanks Steve, next time I have to drain the fluid I'll use the hex screw, allot easier than pulling the hoses and wondering whether it's fluid or blood pouring all over the floor.
 
Top