Pranged my fuel door - third time 's a charm!

Willem Tell

Well-Known Member
Site Donor $
Messages
340
Reaction score
315
Location
Zug, Switzerland
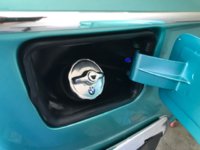
I was tanking up during a drive yesterday and accidentally spun around and walked into my open fuel door. Now it's not seated nicely as it was before.

I've read that this can be a pain to adjust. Can anyone offer advice on access/adjustment?

66495

66496


Are these covered holes access points for the door adjust?

66497
 

Keshav

Well-Known Member
Site Donor $$
Messages
2,770
Reaction score
2,783
Location
Germany
Remove/ pull out the two plugs and you can access the bolts behind. Loosen them somewhat and pull the door into place but be very careful not to open the door too wide or else it’ll crack the paint...even worse if it happens on the side panel. Hope the door didn’t get ‘bent’.....
They are tricky to put back in from scratch but in your case....it’s in there, don’t try to remove it
 

Keshav

Well-Known Member
Site Donor $$
Messages
2,770
Reaction score
2,783
Location
Germany
Those plugs help keeping the gas fumes out of the trunk.....reinstall after fixing.....
 

Willem Tell

Well-Known Member
Site Donor $
Messages
340
Reaction score
315
Location
Zug, Switzerland
That is an issue. More-so on my Tii... I've replace all of the gaskets, replaced the cloth-covered hoses, but the smell persists. Any tricks on the E9?
 

eriknetherlands

Moderator
Site Donor
Messages
2,760
Reaction score
2,001
Location
Netherlands, Eindhoven area
Mind you that behind the two plugs are three nuts. It is a bit odd, but it sure helps to know this. I was swearing a lot to get the door off my car, until I found the 3rd nut....
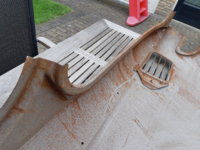
On the pic a NOS quarter panel, looking at the inside. You can just spot the 3 welded on (M6?) studs.
 

Attachments

  • 15592075052131398914755182483337.jpg
    15592075052131398914755182483337.jpg
    539.4 KB · Views: 287
Last edited:

Stevehose

Well-Known Member
Site Donor $$
Messages
12,997
Reaction score
5,672
Location
Sarasota, FL
Vent the gas filler neck out the trunk floor bottom by the gas tank and then cap the fume collection tank in the trunk.
 

EJ333

Well-Known Member
Messages
306
Reaction score
12
Location
Southern Cal
William,
Are you sure you didn’t sneak into my garage and take this photo ?
I did the same thing to my Agave and have been driving around with the fuel door ajar for awhile. Let us know how it worked out for you, because I’ll need to do the same. Thanks !
 

adawil2002

Well-Known Member
Site Donor $$
Messages
5,187
Reaction score
3,050
Location
Brunswick, Maine
On your 1972 Tii, check the rubber filler neck inside the trunk, it can appear fine and be cracked. Give it a good squeeze, if it is crazing or cracked replace it.
 

Willem Tell

Well-Known Member
Site Donor $
Messages
340
Reaction score
315
Location
Zug, Switzerland
Thanks for the tip Andrew. The filler neck and gasket, fuel suction gasket are new. I just got in hand the new Tii sender unit with )-ring and grommet for the end of the breather tube at the floor. I will add a seal at the return hose pipe and Loctite the screws on the gaskets ASAP.
 

Willem Tell

Well-Known Member
Site Donor $
Messages
340
Reaction score
315
Location
Zug, Switzerland
Well, I'd like to say that I fixed this, but in reality, only a slight improvement.
Thanks to Keshav and Eric I found all three nuts (8mm flange heads). The two on top and bottom of the hinge flange you can reach in and feel through the fuel door opening. The third harder to find one you can see through the hole in the rubber boot.
66872


I loosened all three nuts and tried rocking and pulling, but getting it centered wasn't the issue. It seems that the lower corner of the gasket closest to the hinge tends to lift off of the rim of the opening thus keeping the door from closing fully.

66874
66875


You can see from this photo above that the thin edges are cracking, and the lip of the gasket is pretty dry and stiff. That corner tends to lift up and prevents the door from closing fully. No idea how hitting the door caused it to shift.

If I could get the hinge to move in such a way that the bottom corner moved out and flush with the quarter panel, I think it would be OK.
66876


I thought to use a piece of 2-sided tape to fix the gasket in its proper position. Unfortunately, before I thought of that, I tried using a rubber conditioner to soften it, thinking it would fold over the lip of the sheet metal and stay in place better. It's a good conditioner and did it's job to make everything softer (and more slippery), but that made it impossible to get the tape to adhere to it.

This whole rubber boot assembly is pretty interesting. It's one piece that fits around the fuel door on the outside, and around the filler neck on the inside. The door hinge flange actually sits kind of "inside" the boot. The three screws welded to the quarter panel go through the boot and the flange sits on top of the rubber and is held in place by the three nuts. Hence you can't really move the hinge "out" as I would like to do.

I've been searching, but it seems this boot (p/n: 51715790080 is NLA; I got one old hit on eBay, but haven't found it anywhere. It would be kind of a complicated rubber casting, so no small wonder if nobody is producing it.

Here's where I'm at now (not so different). Just need another 3mm!
66877
 

Willem Tell

Well-Known Member
Site Donor $
Messages
340
Reaction score
315
Location
Zug, Switzerland
So, I had a chance to tackle this today... Man!
I can only imagine that they designed a relatively simple door hinge mount

67530


and then later thought: "Wait a second, we should install something to prevent fuel fumes from entering the trunk."

67531

67542


Clever as that might be, it does not translate into an easy-to-mount fuel door assembly! :mad:

Having assessed the situation, I figured some masking of the area was in order. In retrospect, I would add masking to the edges of the door itself, and double up (thickness and width) all around.

67532


The boot is quite flexible, so you can insert an 8mm socket and stretch it so that you can access the three nuts. I used a swivel head when I removed them, but later (when more despera... I mean experienced), I just used a straight extension and a straight hand socket drive, rather than a ratchet. It was better for feel, and applying force on the assembly.

I removed the rear nut first through the access hole, and then the two nuts closer to the opening. I thought I would get to them through the door opening, but it was actually more practical through the access holes.

At this point I rippe... I mean dismounted the rubber boot from the filler neck and from around the fuel door opening so that it was free. This enabled me to lift the hinge off of the studs..

Owing to the spring-loaded nature of the hinge assembly, and the very tight tolerance on the hinge holes relative to the studs, this thing does not exactly jump into your hands! The hinge tends to want to bind on the studs. It was necessary to use a plastic door panel tool to get under and lift them off. I would have used my wooden spatula, but it was on loan at the moment.

Here's what the fuel door assembly look like in hand:

IMG_1686.jpg
IMG_1687.jpg
IMG_1689.jpg


The assembly is spring loaded, which makes it very difficult to manipulate in place, so I wondered what would happen if I unseated the springs at the hinge mount:

IMG_1690.jpg

IMG_1691.jpg


This freed up the assembly to swivel , and while I thought I would install it that way and re-seat the springs later, that's not the path I followed.
The main reason I didn't go down this path was because I wanted to verify that the boot would seat properly around the lip of the fuel door, as this was what was preventing my door from seating fully. I could have verified that with everything removed.
With the boot fully installed, having a free-moving hinge was difficult to manage, so I re-inserted the springs into the hinge and tried it "the hard way".

I first installed the new rubber boot and ensured that it seated all around the fuel opening and onto the filler neck.
I then reinserted the springs into the hinge assembly and proceeded to install it pretty much as I removed it.
That was not an easy process, as the spring loaded nature of the hinge and the spongy new boot made it very difficult to get the hinge to seat on the studs enough to get the nuts started.
I finally got the front nuts started by using the straight nut driver (with masking tape on a 7mm socket to protect the paint) to apply pressure to the rear of the hinge to push it onto that stud. I then slipped my hand into the fuel door (with difficulty and many attempts) to get a forward nut started.
Then, by pushing the fuel door closed, the hinge would pivot and the rear stud was exposed enough to get a nut started using the straight nut driver with a bit of masking tape to hold the nut in the driver through the lower access hole.

Three hours later, I was pretty much where where I started:
IMG_1692.jpg


And with a little less paint:

IMG_1693.jpg


Knowing what I know now, if I were to step back and do this all over again, to start the process:
I would reach in here with a flat screwdriver or better, long needle nose pliers, and lift the two springs out of their hinge mounts. Move them to the outside of the hinge (left from this perspective; see photo above), so that the door can swivel freely. They are strong and stiff, but reasonably accessible, and I think it's possible, and the best path. That would leave the door free, and the spring pressure off of the hinge.

IMG_1694.jpg


I would then lift the boot off of the filler neck (the gas cap having been removed earlier). Don't ask me why I didn't do it, but you should tape over the gas filler neck do so that you don't accidentally drop one of the nuts into the tank.
Dismount the boot from the lip of the fuel door.
Now everything would be floating free around the hinge mount; it would be easy(ish) to access and remove the hinge nuts, and lift the whole assembly (boot and fuel door) off off the studs.
To re-install, I would keep the boot floating free and concentrate on getting the three hinge nuts started. If getting all three nuts mounted is not possible, focus on the rear stud; this is key to getting the assembly mounted. The door must be closed to access this stud.
Then, with everything loose, it might be best to re-seat the springs into the hinge at this point before seating the boot on the filler neck, and around the fuel door opening.

I will apply pressure to the fuel door when the car is parked, and I think with time it may deform the boot enough to seat fully.

Ironically, the fuel door and hinge assembly are probably some of the heaviest gauge metal on the car. I say "metal", because I think the door is steel, but the hinge seems to be a softer material like aluminum or pot metal, as it really binds to the mounting stud.
So I don't think we could "bend" it by accidentally bumping into it. Even though a person bumping into it would apply a significant force, I think it's more likely that the quarter panel would deform before the door itself would.

As a side note, it's interesting how cameras just don't know what to make of Turkis. No two exposures reflect the same color!
 

Attachments

  • IMG_1695.jpg
    IMG_1695.jpg
    60.7 KB · Views: 228

Markos

Well-Known Member
Site Donor
Messages
13,369
Reaction score
7,503
Location
Seattle, WA
Measure this distance from the outer edge of the spring hole to the door. I’ll do the same on my spare. I’m betting that you arrive at a smaller number. Consider how that would bend when you “prang” the door, and how it may result in an end that sticks out.

8FACB33E-8E6A-4824-B813-8570DACCCB46.jpeg
 

Willem Tell

Well-Known Member
Site Donor $
Messages
340
Reaction score
315
Location
Zug, Switzerland
Thanks Markos, I'll make the measurement. That would be really interesting if there would be a difference. that would mean a solution too!
 
Top