An apparently very often found problem at our E9s is the non working odometer, while speedo is still fine. I don't know, if this is already documented, if not, here comes the description of a DIY repair.
In the end, this is a quite easy fix, if you know what to do. In addition in Germany a saying would be, that it would help not to have only 2 left Hands !!!")
Of course in advance you need to have the gauge disassambled out of the cluster. This is probably the most difficult thing for the odometer fix. I don't describe this, because this should be more or less common step. (If not let me know, then I could do another DIY for the cluster disassembly)
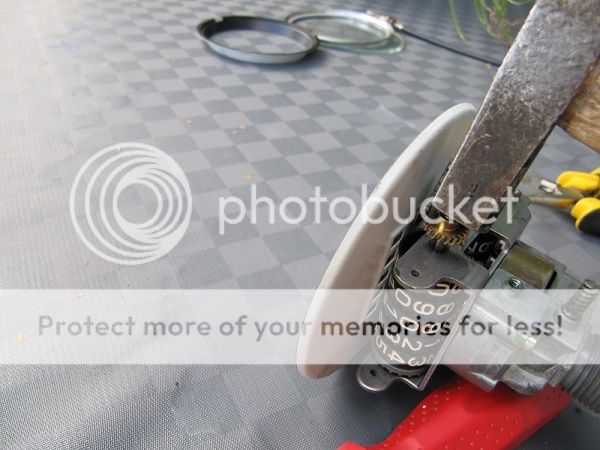
Once you have it out, to open it, you need to loosen the nut over the flex shaft entry and open the chromed ring, which surrounds the glass from the back side using a flat screw driver or something comparable.
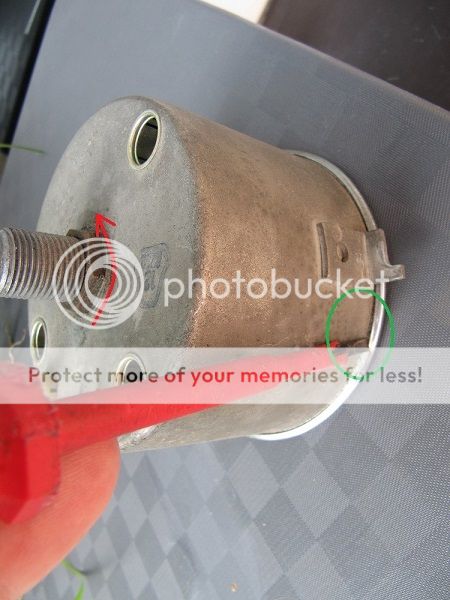
2/3 of the complete surround are sufficient to be able the seperate the chromed ring, the glass and the black inside part from the housing

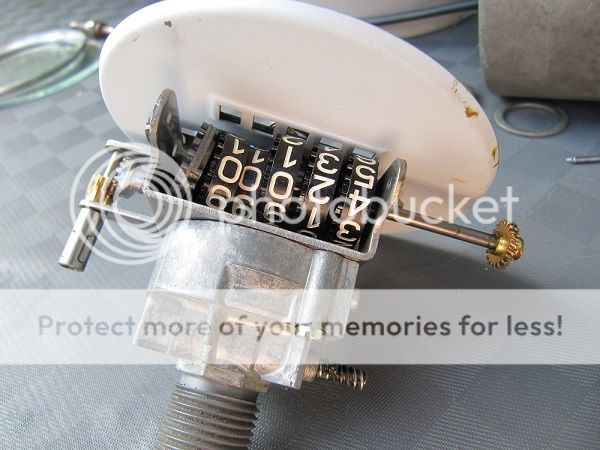
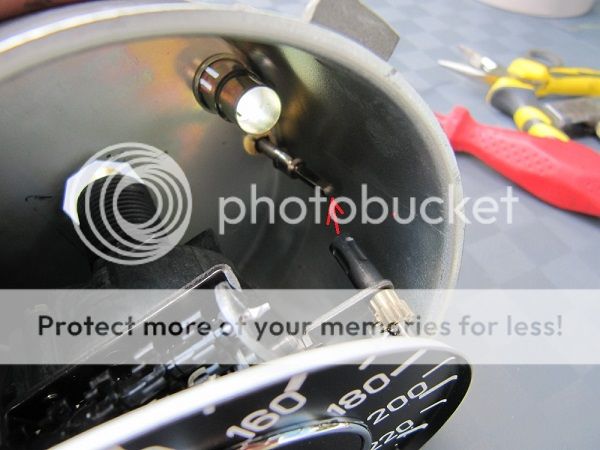
Right now you can take the complete mechanics out of the housing
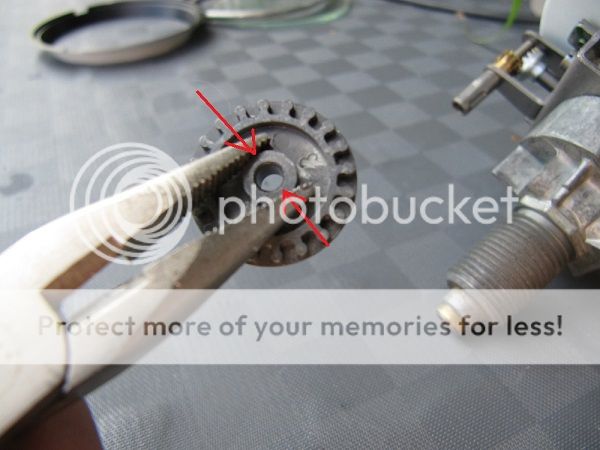
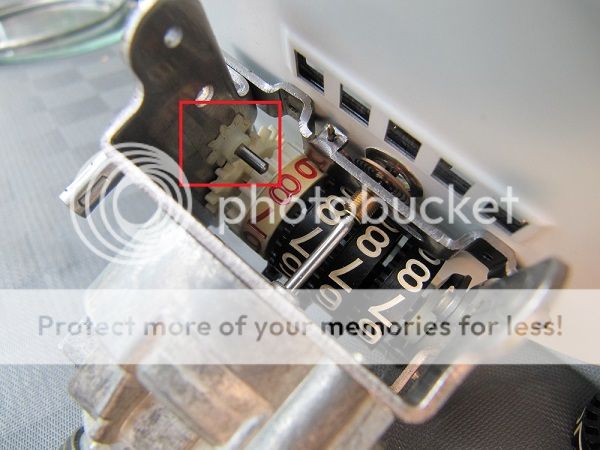
The damage of the km / miles counter is the gray coloured gear (marked with the red arrow), which is only pressed onto the shaft from the factory. The established connection is only based on a smaller hole in combination with a bigger shaft.
This connection is getting weak over the years (probably BMW didn't calculate the life time period for the E9s with about 40 years .....)
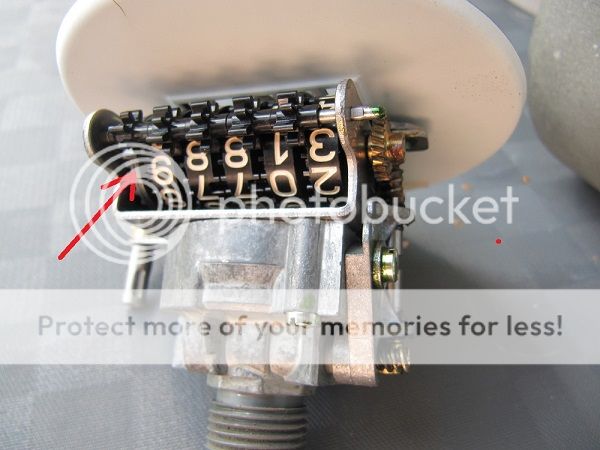
There's nothing else, which assists this connection like glue or whatever.
In the end the connection fails, which ends in a stopp of the counter, because the shaft doesn't turn the wheel anymore.
To repair or let's say reestablish this connection, you need to disassamble the mechanism a bit.
First I would recommend to loosen the small screw, which holds the worm gear drive.
Even if it's not really necessary for the repair, it helps later on for the test, if the repair worked out properly.
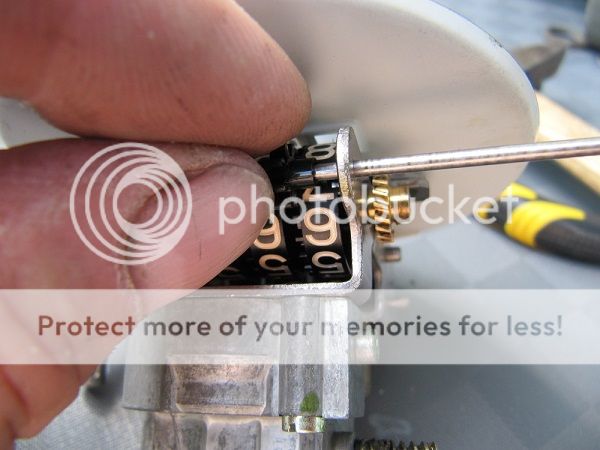
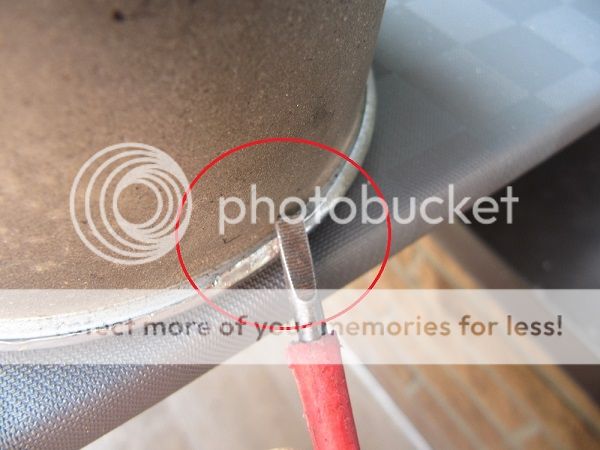
The access to the damaged wheel is now only blocked with the shaft with the 5 tiny wheels on top. This shaft has pressed ends to secure the shaft from self disassembly.
You need to remove this security from one end of the shaft to be able to pull it out of the mechanism. Take care not to lose one of the tiny wheels while pulling the shaft.
Due to the problem itself the damaged gear is already loose, it's fairly easy to pull this shaft. The 5 wheels with the numbers are complete identical, so the later following order to be mounted, doesn't matter.
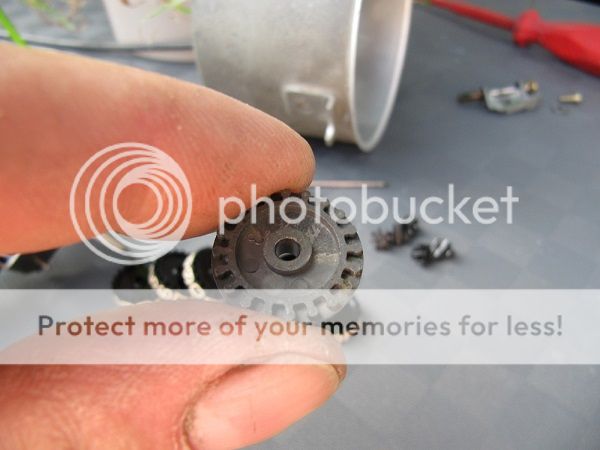
Here's now the villian. My first guess for the material from which it was made of, was plastic, but I'm rather sure, that this is made from aluminum instead.
With needle nose pliers can now the collar on both sides of the wheel can be pressed back to a smaller diameter under fairly high pressure.
To check how far the clamping force is restored just once push the wheel onto the shaft.
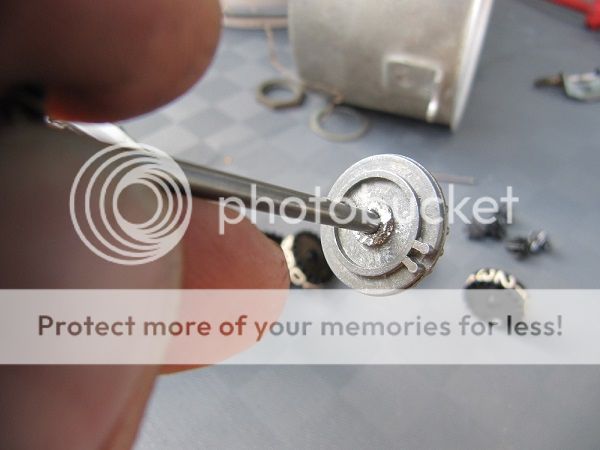
You can tell very quickly and clearly, how well you have performed this compression. Ideally, the wheel can no longer postpone purely by the force of your fingers at the end. You can see in this picture also why I believe in aluminum, because every now and then slip the clamp a bit and it takes a silvery background to the fore.
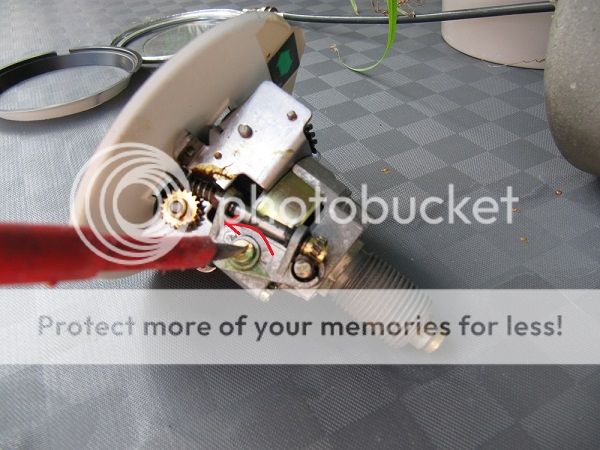
At the foolowing reassembly, please recognise the small gear on the intermediate shaft. It fits loosely on the shaft and if you hold the speedometers mechanism the wrong direction, it probably slips off and at worst case it disappears in a long haired living room carpet
So now first put back the discs with the numbers back in place onto the shaft. The first 4 went one by one with me, the 5th went in better in combination with the gray drive. If you have previously taken the wheel right back into shape it takes after the number 5 a small hammer to drive the shaft through the wheel. Once it's through the wheel, just align again the shaft that it is nicely centered in front of the hole and with soulful beats drive it through this hole of the housing until it's blocked from the brass wheel at the end of the shaft.
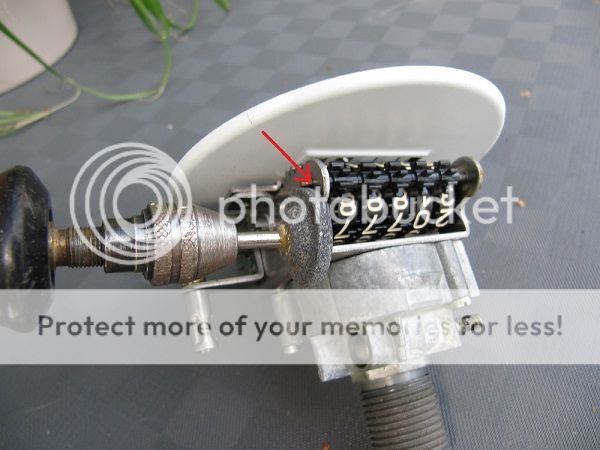
Subsequently, reassemble the upper shaft with 5 cogs .
This is somewhat tricky, since there also intermediate positions of the wheels with the numbers are possible. So make sure, the figures complete the section of the gauge face.
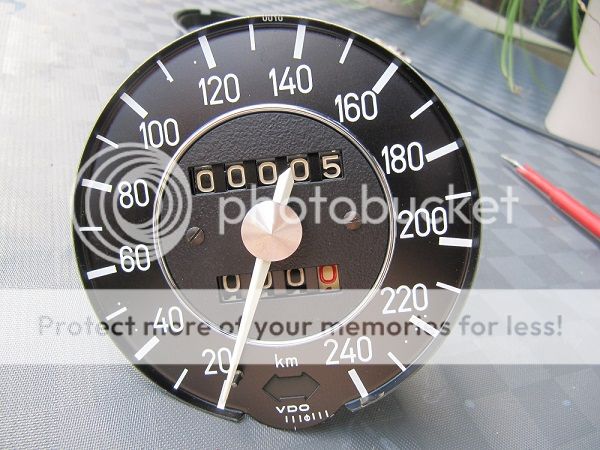
Here, the desired mileage is set.
If you have this shaft as desired successfully mounted, the machined end must be secured again. I just used a drop of superglue. Of course make sure that you let the stuff go out anywhere else and eventually the beautiful repair end up making even destroyed.
Now the wheel WITH the shaft and not ON the shaft should rotate in the ideal case.
Can you check by turning on the brass wheel. Then any previously dismantled shaft of the worm gear reassemble.
So repaired the mechanism can go now back into the housing. Be aware, that the flex shaft for the counters day distance reset needs to be inserted into the receptacle provided at the mechanics.
Now it's only necessary mounting the cover plate, just from behind and press it back with a suitable tool to the edge again.
Is quite soft and works without any major problems. Please do not use pliers here, because that will probably leave traces on the visible sides otherwise.
good luck
cheers
Ingo
In the end, this is a quite easy fix, if you know what to do. In addition in Germany a saying would be, that it would help not to have only 2 left Hands !!!
Of course in advance you need to have the gauge disassambled out of the cluster. This is probably the most difficult thing for the odometer fix. I don't describe this, because this should be more or less common step. (If not let me know, then I could do another DIY for the cluster disassembly)
Once you have it out, to open it, you need to loosen the nut over the flex shaft entry and open the chromed ring, which surrounds the glass from the back side using a flat screw driver or something comparable.
2/3 of the complete surround are sufficient to be able the seperate the chromed ring, the glass and the black inside part from the housing
Right now you can take the complete mechanics out of the housing
The damage of the km / miles counter is the gray coloured gear (marked with the red arrow), which is only pressed onto the shaft from the factory. The established connection is only based on a smaller hole in combination with a bigger shaft.
This connection is getting weak over the years (probably BMW didn't calculate the life time period for the E9s with about 40 years .....)
There's nothing else, which assists this connection like glue or whatever.
In the end the connection fails, which ends in a stopp of the counter, because the shaft doesn't turn the wheel anymore.
To repair or let's say reestablish this connection, you need to disassamble the mechanism a bit.
First I would recommend to loosen the small screw, which holds the worm gear drive.
Even if it's not really necessary for the repair, it helps later on for the test, if the repair worked out properly.
The access to the damaged wheel is now only blocked with the shaft with the 5 tiny wheels on top. This shaft has pressed ends to secure the shaft from self disassembly.
You need to remove this security from one end of the shaft to be able to pull it out of the mechanism. Take care not to lose one of the tiny wheels while pulling the shaft.
Due to the problem itself the damaged gear is already loose, it's fairly easy to pull this shaft. The 5 wheels with the numbers are complete identical, so the later following order to be mounted, doesn't matter.
Here's now the villian. My first guess for the material from which it was made of, was plastic, but I'm rather sure, that this is made from aluminum instead.
With needle nose pliers can now the collar on both sides of the wheel can be pressed back to a smaller diameter under fairly high pressure.
To check how far the clamping force is restored just once push the wheel onto the shaft.
You can tell very quickly and clearly, how well you have performed this compression. Ideally, the wheel can no longer postpone purely by the force of your fingers at the end. You can see in this picture also why I believe in aluminum, because every now and then slip the clamp a bit and it takes a silvery background to the fore.
At the foolowing reassembly, please recognise the small gear on the intermediate shaft. It fits loosely on the shaft and if you hold the speedometers mechanism the wrong direction, it probably slips off and at worst case it disappears in a long haired living room carpet
So now first put back the discs with the numbers back in place onto the shaft. The first 4 went one by one with me, the 5th went in better in combination with the gray drive. If you have previously taken the wheel right back into shape it takes after the number 5 a small hammer to drive the shaft through the wheel. Once it's through the wheel, just align again the shaft that it is nicely centered in front of the hole and with soulful beats drive it through this hole of the housing until it's blocked from the brass wheel at the end of the shaft.
Subsequently, reassemble the upper shaft with 5 cogs .
This is somewhat tricky, since there also intermediate positions of the wheels with the numbers are possible. So make sure, the figures complete the section of the gauge face.
Here, the desired mileage is set.
If you have this shaft as desired successfully mounted, the machined end must be secured again. I just used a drop of superglue. Of course make sure that you let the stuff go out anywhere else and eventually the beautiful repair end up making even destroyed.
Now the wheel WITH the shaft and not ON the shaft should rotate in the ideal case.
Can you check by turning on the brass wheel. Then any previously dismantled shaft of the worm gear reassemble.
So repaired the mechanism can go now back into the housing. Be aware, that the flex shaft for the counters day distance reset needs to be inserted into the receptacle provided at the mechanics.
Now it's only necessary mounting the cover plate, just from behind and press it back with a suitable tool to the edge again.
Is quite soft and works without any major problems. Please do not use pliers here, because that will probably leave traces on the visible sides otherwise.
good luck
cheers
Ingo
Last edited:


