Seeking closure

Peter Coomaraswamy

Well-Known Member
Site Donor $$
Messages
3,798
Reaction score
913
Location
Austin, TX
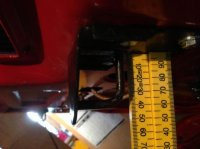
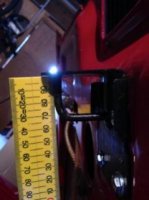
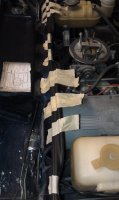
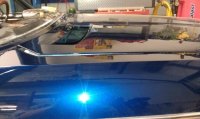
Of the hood that is! I believe I have everything on correctly, I read the threads posted on the torsion mechanism (although I still could have put something in wrong), anyhow, here is my issue with the hood; everything seems to align correctly and the hood moves up and down easily but I can't seem to get it fully closed. Up by the cowl there is about +/-1/2 inch where the hood just does not want to move down flush. I have new seals throughout the engine bay but they don’t seem to be the issue. Even when I adjust the latches as low as they can go and tighten the cable it still does not close all the way. When I bought the car the hood was ill-fitting so I don't have a base point. Somehow I have a feeling that I'm not the only one who has experienced this so any help would be greatly appreciated.

Thanks!
 
can not push down

It does not feel like anything solid is stopping it, It can't be pushed or held down but I will take some pictures and post tomorrow. Thanks all
 
Steve, do you think the threaded stops at the front could interfear with the rear? I'll look at that first thing in the morning-
 
Latch length

I Have a similar issue on my csl, I was wondering about the latch hooks, I know PO changed from racing style bonnet split pins, and bonnet sits high, is there a difference between e3 and 39 latch hooks? Loath to put much pressure on bonnet as it is aluminum. Peter, is it maybe the new seals if it does not feel solid?
 
does the locking mechanisim work and is the hood bracket fitting into the claw correctly?
 
Which ones?

These are from my bonnet.
Peter how do these compare to yours?
Anyone, do these look like e3 or e9 catch hooks?
 

Attachments

  • photo-1.jpg
    photo-1.jpg
    24 KB · Views: 176
  • photo-2.jpg
    photo-2.jpg
    11.9 KB · Views: 165
Last edited:
I recall somebody explaining that getting it flush is hopeless as the hood deforms and is no longer flat.
 
Unbolt the latches

Peter,

I would take the latches out of the equation. Unbolt them and see how the hood lays and whether you can push it flat into position like Chris mentions.

Next I would start pulling off gaskets one at a time (perhaps taping the underside of the hood) to see how it fits. I am assuming it fit prior to painting?

Perhaps the gasket on top of the firewall is too high, or, if the sheet metal at the ends of the firewall (where it cross atop the strut tower) have been replaced they may need shaving down a bit (I had this problem).
 
Solved

First, thanks everyone, I do understand that these are hard to get right, but as many have shown it can be done! Just for general info, the seal that goes over the sheet-metal betweenthe shock towers (Sven) was new, I had it on backwards in that I reversed the way the rubber bent- so it seals flipping forward, then I taped it down and the hood closed within an eighth of an inch. Now, provided the latches function correctly it should be able to close "darn near perfect"
 

Attachments

  • hood rubber.jpg
    hood rubber.jpg
    93.3 KB · Views: 175
  • gap before latching.jpg
    gap before latching.jpg
    93.3 KB · Views: 176
Two things I can add that could cause this problem.

One, IIRC the hinges are adjustable vertically, you need to have them just right. I would do this after removing the prop assembly, then you can check/adjust the second item below as you reassemble.

Two, if the bolt at the bottom of the prop assembly is too far forward or too far back in the slot (can't recall which), it will bind against the inner fender at full closed position. To check you may have to remove the prop assembly complete and see how the hood sits closed. Not a major effort, if someone else is doing it.
 
Got it!- Thanks, yet another thing I'll have to re-do. I have it sitting "good" now, but I'll need to get it perfect before she's ready for prime time. I think I'll check that fender clearance and I have a feeling that I'll have to move the hood around just a bit after I put a couple hundred miles on her and let the heat and the new rubber settle in. I'm sure the same will be true for the doors, though most of the rubber is original and in remarkably good shape.
 
Whether it be the hood, doors, deck lids and even gas doors any experienced body man always disconnects one half of the latching system and holds the panel closed manually on initial panel fit-ups. This establishes that the panel and its hinges are correctly aligned and that the panel can close fully, in another words it removes the latches from the equation. Once you establish that and reinstall the latches you know what to blame if you cannot obtain the same correct fitment you had initially. A word of warning, if possible always leave access to the latching system in case it jams, another words leave the grills out of our hoods, leave a tail light out when working on the deck lid and align your doors before installing the interior panels, it could save you some real grief. Spray lithium grease will not fix a broken lock assembly but it will keep it from sticking which very well may be its problem.

New rubber weather-stripping can be an absolute pain, it hasn't taken a set yet so it can be very hard to close panels fully. Silicone spray can be some help but unfortunately in many cases the only real cure is time with the panel's closed so the rubber gasket takes a set. The problem is further compounded by the fact that some reproduction weather-stripping may be slightly different from what was offered by the factory. Sometimes it may be possible to use slightly smaller weather-stripping from another car. I heard from a pretty reliable source that MGB trunk weather-stripping is a good slightly smaller replacement for our coupe’s firewall weather-stripping. GOOD LUCK, aligning panels can be frustrating for even seasoned body men. ~ John Buchtenkirch
 
I try to outline the latch position with a pencil or wax pencil before I disassemble so I know where it was. Most of the time it works.
 
Thanks John & Bob, I plan on taking her for her first 50-60 mile drive the weekend after this, I think I'll re-read this entire thread once she's back in the cave and make some adjustments then- I'll post some pics and I'll have some questions as well I'm sure.
 
Another question

I'm "Trying" to put the console back together, I have attached a picture and was hoping someone had some pictures/explanations/directions they could share. As you can guess, this is one of the first items I took apart, thus hard to bring back the memories.

Thanks!
 

Attachments

  • console.jpg
    console.jpg
    96.6 KB · Views: 138
There should be two steel angle legs attached (dangling from) to the underside of the shifter console. The bottom leg has a single hole that takes a wood screw into a small block of wood attached to the inside of the side panel (one on each side). The rear window switches need to be out in order to reach in and screw in the screw. A magnetic screwdriver tip helps.
 
Back
Top