Wood veneering

stcos85

Well-Known Member
Messages
148
Reaction score
63
Location
Melbourne
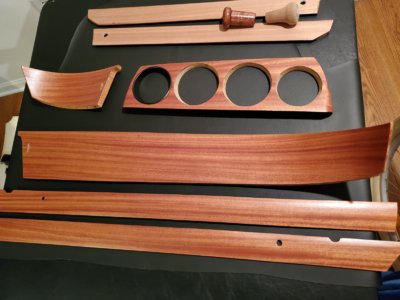
Does anyone know someone in or around the Melbourne, Victoria area that could reveneer my wood trim. I have the veneer and have done the flat door trims but need the curved pieces completed.

I know there are people overseas I can send them to but want to see first if there is someone more local
 

bavbob

Well-Known Member
Site Donor
Messages
3,369
Reaction score
1,580
Location
Boston, Ma
Just wet it and slowly bend it, that's what they would do. If you did the doors you can do the rest. That's my pep talk. The hardest part is the cluster and at the top where the bends are greatest but you only need to come around the corner a bit, the dash cowl covers all but the face.
 

Thomas76

Well-Known Member
Site Donor $
Messages
1,246
Reaction score
698
Location
Michigan, USA
I second Bob. You can do it. No fancy tools required, except a steamer for that instrument cluster. I used a clothing steamer, I think there's a hilarious write up on the forum here about someone using the steamer on a cappuccino machine..
 

stcos85

Well-Known Member
Messages
148
Reaction score
63
Location
Melbourne
been a bit slow as I was focusing on getting a subaru type r on the road and a 1950 chev truck
should have added I have done all the bits except the grab piece and the curved rear dash piece. Not sure how to tackle the grab piece with the wavy edge
 

e9john

Well-Known Member
Site Donor
Messages
154
Reaction score
71
Location
Rochdale, UK.
The "grab rail" is possibly made from a Pine core, veneered with walnut, I was able to make a "grab rail" out of solid walnut as I couldn't figure out how to veneer the core. I used a band saw, spindle moulder and woodworking handtools once I'd got the walnut piece cut to size. The outside (facing the driver) was veneered and the inside was just walnut stained if I remember it right but most of the veneer was already missing on mine. I reveneered all the wood in the car I'm very happy with it.


DSCN5822.JPG
DSCN5825.JPG
DSCN6142.JPG
DSCN6148.JPG
 

coupesport

Newish Member
Site Donor $
Messages
169
Reaction score
83
Location
Chicagoland, IL
This Foodsaver was great for me when I applied new veneer - and also freezing later batches of homemade Kielbasa!
Seriously, apply veneer on the substrate place in bag, vacuum seal for a few days. I did not have to do a grab rail though, but I believe this could do it if veneer is moistened a bit.
Really the hardest part of the re-veneer is stripping the old stuff off. Get and x-acto knife kit and plenty of band-aids!
 

Attachments

  • 1649211783089.png
    1649211783089.png
    393.1 KB · Views: 97
  • 20210615_080422.jpg
    20210615_080422.jpg
    284.3 KB · Views: 99

dave v. in nc

Well-Known Member
Site Donor $
Messages
3,032
Reaction score
1,206
Location
North Carolina, USA
This Foodsaver was great for me when I applied new veneer - and also freezing later batches of homemade Kielbasa!
Seriously, apply veneer on the substrate place in bag, vacuum seal for a few days. I did not have to do a grab rail though, but I believe this could do it if veneer is moistened a bit.
Really the hardest part of the re-veneer is stripping the old stuff off. Get and x-acto knife kit and plenty of band-aids!
Nice job!
 

Candia4441

Well-Known Member
Site Donor $
Site Donor $$
Messages
918
Reaction score
311
Location
California
This Foodsaver was great for me when I applied new veneer - and also freezing later batches of homemade Kielbasa!
Seriously, apply veneer on the substrate place in bag, vacuum seal for a few days. I did not have to do a grab rail though, but I believe this could do it if veneer is moistened a bit.
Really the hardest part of the re-veneer is stripping the old stuff off. Get and x-acto knife kit and plenty of band-aids!
I learn the trick this is the great idea why didn't I think before like you did I think you are smarter than me I paid $350 to buy a veneer bag this is wonderful I will try this tomorrow thank you so much
 

stcos85

Well-Known Member
Messages
148
Reaction score
63
Location
Melbourne
well i got them all done but small pieces were coming unstuck. I have now ended up taking them to a recommended guy in Melbourne who will do them professionally but I have one more question. should it be in satin or gloss varnish?
 

bavbob

Well-Known Member
Site Donor
Messages
3,369
Reaction score
1,580
Location
Boston, Ma
I hit this with pretty stringent paint and varnish remover and I would say mechanical is quicker.

I used 3M PSA backed veneer. You can wet it and shape it and it does not affect the peel and stick backing. I dont like standard wood glue near virgin wood as it will fill the grain and stop it from absorbing any stain. You don't need any vacuum as is evident by what you can do with water, bending and patience.

IMG_2855.jpg
 

adawil2002

Well-Known Member
Site Donor $$
Messages
5,186
Reaction score
3,049
Location
Brunswick, Maine
To veneer a steering wheel.
First make a template with blue painters tape for the front & back of the wheel. I have done 2 pieces on the front & 3 on the back.
Remove the tape & lay it flat on the veneer stock & cut out the tape template.
Remove the blue template tape & you'll have the correct pieces to veneer the wheel.
I used adhesive backed Mahogany. 2 pieces on the front & 3 on the rear.
I dampened the wood with water & bend it around the wheel & used strapping tape to bent the veneer
Did the front first & the back 2nd.
Finished with several coats of UV resistant polyurethane.
Veneering_01.JPG
Veneering_02.JPG
Veneering_03.JPG
Finishing_02.jpg
Restored_01.JPG
 
Top