Installation chrome trim on rocker cover

JensVdb

Active Member
Messages
60
Reaction score
13
Location
Belgium (Kortrijk)
Hi everyone,

After a long time I found some time again to work on my E9 project.
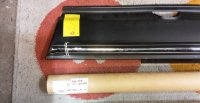
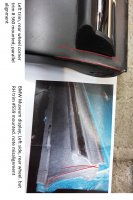
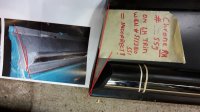
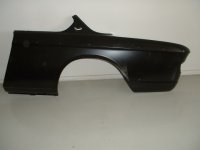
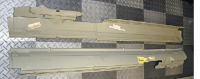
I want to install the chrome trim/rubber on my rocker cover, but does someone know the right steps to do this?

I assume the following:

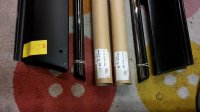
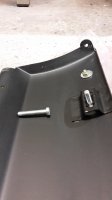
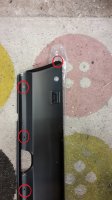
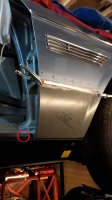
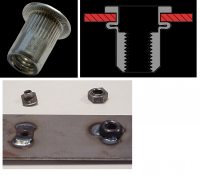
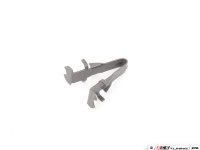
1. Put the white mounting clips in the rocker cover
2. Push the pin through to secure the clip
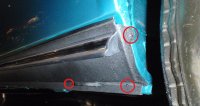
3. Click the chrome/rubber trim over the white clips

Just want to be sure. I don't want to ruin it so I have to buy new clips.

Thanks in advance!

Jens

IMG_0389.JPG
IMG_0392.JPG
IMG_0393.JPG
 

rsporsche

Moderator
Site Donor $$
Messages
10,685
Reaction score
3,713
Location
Atlanta, GA
no worries if you have to take off the clips (once on the rocker cover) = you drive the pins out the other way and then you can take them off.

when i put them on my rocker covers, i put a tall socket under the rocker cover to make sure that i didn't dent the cover while driving the pin thru the hole (flush with the top). if you dent the rocker, it won't show, but it could make it very difficult to get the rubber / chrome trim on.

once you have the clips on, you have to experiment getting the rubber / chrome trim on. as i remember, i started at the middle and clipped in on one side ... then worked it toward the end to get the 2nd side clipped in. you will hear the second click and it won't move ...
 

Dave L

Well-Known Member
Messages
130
Reaction score
0
Location
Orange County, CA USA
Where on earth did you buy the new rocker trim? I've been looking for that for years, it's never listed as an available part. (Unless I've been looking incorrectly all these years). My car didn't have it when I acquired it. Is there a link to a source?
 

rsporsche

Moderator
Site Donor $$
Messages
10,685
Reaction score
3,713
Location
Atlanta, GA
W+N has the trim listed as it did originally as 2 part numbers. now BMW lists it as 1 number (same both sides). i think the originals were very slightly different on the ends
 

eriknetherlands

Moderator
Site Donor
Messages
2,773
Reaction score
2,007
Location
Netherlands, Eindhoven area
The bright trim strips are indeed different. I purchased them both from walloth last year and got two distinct different trims. One clearly left hand, the other right.
Funny thing is that I was checking the pictures I have of the bmw museum, and there they are swapped! LH is mounted right side, and RH is mounted on the left side.. As a result the trims ends do not match the curve of the wheel arch!

I'll post some pics on tuesday.
Erik.
 
Last edited:

JensVdb

Active Member
Messages
60
Reaction score
13
Location
Belgium (Kortrijk)
It just doesn't seems to work with these clips. After a one hour try I gave it up...
Thinking about buying some M4 molding bolts like the ones on the end of the trim to get the work done properly.

IMG_0447.JPG
 

aearch

Well-Known Member
Site Donor $
Messages
4,116
Reaction score
589
Location
pleasant hill , ca
YES THEY ARE TUFF TO PUT IN
WHAT WE DID WAS SET A WASHER UNDER THE CLIP TO RAISE IT ENUFF
ALSO INSTALLED THE CLIPS FIRST TEN "SLID THE TRIM ONTO IT INSTEAD OF POUNDING IT ON
THAT WILL WORK
 

eriknetherlands

Moderator
Site Donor
Messages
2,773
Reaction score
2,007
Location
Netherlands, Eindhoven area
Jens, i was thinking the same thing. I really prefer metal over plastic. Do these m4 moulding bolts actually have a bmw part number? If not, then I'd be interested to know how you solve it. ( i tried to find the numbers, but the BMW drawings look....how shall i say it... like they are made by an engineer with a screw loose?)

I've already figured out which stainless hex head bolts with an xlarge flange I need to buy, so i can carve the matching diamond head shape out of them. But that's alota work for 12 bolts...

Happy to hear your thougths.
Erik
 
Last edited:

eriknetherlands

Moderator
Site Donor
Messages
2,773
Reaction score
2,007
Location
Netherlands, Eindhoven area
Jens, RSPorsche & Dave,

here the pics. (sorry for the orientation; they looked OK in windows...)
- yes there are two versions of the bright+rubber trim strip LH = 51 13 1 810 560 and RH = 51 13 1 810 559.
- they both have different ends.
- two pics with part and print show the car on display in the BMW museum next to my NOS trim & W&N Sills;
Compare the pics and see the example of the BMW museum car of how it looks if you get them wrong :)

Solving one thing, do I get to ask a question in return?
The black sills (from W&N) have on the inside two brackets spot welded on, one near front wheel and one near the rear wheel. I noticed that these brackets are effectively locating an M4 machine screw; the front fender has a matching hole there to screw it to. But the rear bracket; what about that? I cannot find any possibility to attach the M4 to anything there if i'm correct. The first pic shows the bracket at the front wheel. The rear bracket is located roughly 10 cm forward of the rear jacking point. Why is the rear bracket there there?
 

Attachments

  • sill trims and decorative strips.jpg
    sill trims and decorative strips.jpg
    502 KB · Views: 333
  • right hand sill, near front wheel.jpg
    right hand sill, near front wheel.jpg
    240.3 KB · Views: 321
  • Incorrect LH-RH trim on sill in BMW museum..jpg
    Incorrect LH-RH trim on sill in BMW museum..jpg
    303.6 KB · Views: 324
  • Incorrect LH-RH trim on sill in BMW museum 2..jpg
    Incorrect LH-RH trim on sill in BMW museum 2..jpg
    277.3 KB · Views: 395
  • Front bracket on Right hand sill.jpg
    Front bracket on Right hand sill.jpg
    179.6 KB · Views: 546
Last edited:

eriknetherlands

Moderator
Site Donor
Messages
2,773
Reaction score
2,007
Location
Netherlands, Eindhoven area
Jens, a bit of a high-jack of your thread, but you may also soon wonder about this:

the outer, black sill trim is attached with a bunch of self tapping screws. They screw into the bottom edge of the outer sill, under the door opening trim seal, and also inside the front and rear wheel arch.
Especially the screws in the bottom edge of the outer sill are a source of rust; they break the skin (paint), opening it up for H2O to do the rest.
Now, to qoute John Butchenkirch here: "A good body man would dip the screw in paint before installation", but if you want to clean your rockers every year its a bit of a messy job and there are a total of 11 or 12 screws per sill !

So i'd like a solution that is less rust promoting, and allows for easy access.

Has anyone considered improving on this point?
- Weld in M3 female threads on the inner sill?
- Use these threaded bushes that need to be "pulled -in" (google rivet-expert.com) in the inner sill?
- other creative solutions, other then just leaving off the trim (as my car was when i purchased it)?

my hesitation is the positioning of such elements is the following: the metal screws are kinda forgiving. if they are a mm off centre relative to the matching hole of the sill, then your screw will stil bite and hold. If you have a offset m3 female thread however, the bolt simply doesnt catch when stuck through the hole. Also the axis of the hole in the sill and axis of the thread must align. If you would go that route, all panels need to be perfectly aligned, ( including any rubbers that go between them?) before marking the positions of the soon-to-be-female-threads....

Erik
 

Attachments

  • PC050121 left rear - mounting points.jpg
    PC050121 left rear - mounting points.jpg
    607.9 KB · Views: 1,195
  • Sill trim -mounting.jpg
    Sill trim -mounting.jpg
    317.2 KB · Views: 315
  • sill trim attachment in door opening alternatives.jpg
    sill trim attachment in door opening alternatives.jpg
    1,018.7 KB · Views: 360
  • sill trim attachment alternatives.png
    sill trim attachment alternatives.png
    1.8 MB · Views: 329

aearch

Well-Known Member
Site Donor $
Messages
4,116
Reaction score
589
Location
pleasant hill , ca
why go to all that trouble when you can just set the screws in weatherstrip adhesive in the holes
thats what i did
 

eriknetherlands

Moderator
Site Donor
Messages
2,773
Reaction score
2,007
Location
Netherlands, Eindhoven area
Thanks Alen; just to check; you mean put a bit of weather strip adhesive op top of the hole, and push the screw through it, sealing around it as it goes in? I think that classifies as 'creative solution', (at least for me)

It also triggered me to think about the chrome strip attachment to the decorative sill, the intial question of Jens in this thead. Why no glue a standard hex bolt with its head to the inside of the trim strip?
Is anyone sure about what type of metal is in the rubber stip? It seems to be anodised aluminium to me; it's important, as not every structural glue adheres well to aluminium. Anyone can confirm?
 

Layne

Well-Known Member
Site Donor
Messages
292
Reaction score
73
Is anyone sure about what type of metal is in the rubber stip?

It is stainless steel.

I just did this job this morning... I did not have the M4 screws or know what they looked like until now, so I just used the plastic clips in the outer hole positions. I skipped the 3rd hole from each end, since I did not have extra clips. I would order 8 clips per side next time, but they are on tight, does not seem to make any difference. I anticipated some difficulty installing the trim from what I read here, so I coated the back of the rubber with dish soap in hopes of reducing the friction as the rubber spreads out as you flatten it down. The first strip went on with no trouble, but the second one required more force. I just used a C clamp at each clip location to force it down until I heard it lock into the clip. You could easily use 8 of the M4 bolts, or 8 clips, or any combination to install them. There is no difference in the channel on the back of the trim along its entire length. Probably 8 bolts would provide the easiest install and easiest removal later.

I coated the back of the sill covers and the sills themselves with this cavity wax. Could also apply it to the screws before installation instead of the mentioned paint. It has much greater rust prevention ability than paint. Of course I'm using stainless steel screws. https://www.amazon.com/KBS-Coatings...7R3Q/ref=sr_1_3?ie=UTF8&qid=1497288832&sr=8-3
 

Layne

Well-Known Member
Site Donor
Messages
292
Reaction score
73
How does this work? There's no access from the back to install a nut, is there?

front-bracket-on-right-hand-sill-jpg.27552
 

eriknetherlands

Moderator
Site Donor
Messages
2,773
Reaction score
2,007
Location
Netherlands, Eindhoven area
The screw in the back holds the rubber and stainless trims strip. The front screw holds the decorative sill to the lower part of the front fender.

Verstuurd vanaf mijn SM-G800F met Tapatalk
 

eriknetherlands

Moderator
Site Donor
Messages
2,773
Reaction score
2,007
Location
Netherlands, Eindhoven area
Oh, forgot the other answer: Access to the front screw is via the wheelarch.
Now i have also found a metal spring clip that actually snaps in place instead of the screw in my pic. I Found an image of it at ECS tuning online, not sure if such a clip is original though.
 

Attachments

  • Clamp 51441802141  51-14-05 ECS tuning 6 dollar need 4.jpg
    Clamp 51441802141 51-14-05 ECS tuning 6 dollar need 4.jpg
    10.7 KB · Views: 230
Last edited:

Layne

Well-Known Member
Site Donor
Messages
292
Reaction score
73
I was thinking more about the one on the rear. I suppose you might be able to reach the back side through the rear window regulator area, but that's certainly not convenient.

I saw the metal clips on W&N, but the detailed description of them said they were for the sunroof. Guess I should buy some. Installing the bottom edge screws on the rear portion tends to pull the upper part of the cover away from the body.
 

eriknetherlands

Moderator
Site Donor
Messages
2,773
Reaction score
2,007
Location
Netherlands, Eindhoven area
Hi Layne, the clip that is depicted in the BMW parts books cross references to this image from ECS tuning. BMW shows use at the front, and at the rear of the decorative sill.
In the front, it looks like this clip could work. there is a depression (half dome) in the lower end of the front fender.

Regarding the rear I strongly think there is an engineering mistake somewhere; If this clip 51441802141 is placed on the decorative sill at the rear wheel, then there is no matching hole in the rear quarter panel for the clip to bite. Neither OEM NOS replacement quarter panels (at least the vague pic I have of one ) nor patch panels from W&N show any hole there.... The inner sill does have a hole, but I'm not sure if it is in a location matching where the . However it would always require to remove the rear inner ('door' panel) trim next to the rear seats. quite an effort just to remove the sill cover.

and on a different mindset; I strongly prefer screws with soft washers near my paint over the sharp edges of this clip.
 

Attachments

  • Clamp 51441802141  51-14-05 ECS tuning 6 dollar need 4.jpg
    Clamp 51441802141 51-14-05 ECS tuning 6 dollar need 4.jpg
    10.7 KB · Views: 244
  • achterscherm 1000 euro links lekxpuntnl.jpg
    achterscherm 1000 euro links lekxpuntnl.jpg
    89.6 KB · Views: 240
  • OEM_BMW_3.0_CS_CSI_Rocker_Panels_for_sale.png
    OEM_BMW_3.0_CS_CSI_Rocker_Panels_for_sale.png
    274.9 KB · Views: 233
Last edited:
Top