sent you a PM ... will call you tomorrow when i am up there
You are using an out of date browser. It may not display this or other websites correctly.
You should upgrade or use an alternative browser.
You should upgrade or use an alternative browser.
What did you do to your E9 today?
- Thread starter adawil2002
- Start date
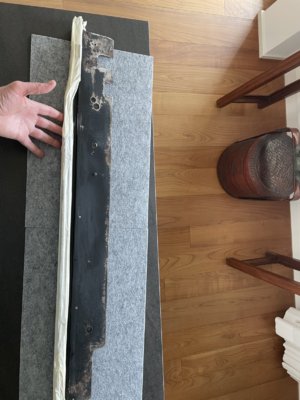
Added protection shield for fuel filter and rear brake proportioning valve.
RP
RP
See you tomorrow!
I gave up on the foam-crap. It seems I can’t cut the foam in a straight line.
I added the perforated look, B-quiet sounding the material to the under hood area. I I I used a lot of Bondo to cover those seams up on the outside edges of the hood.
It goes on the car tomorrow.
RP
I added the perforated look, B-quiet sounding the material to the under hood area. I I I used a lot of Bondo to cover those seams up on the outside edges of the hood.
It goes on the car tomorrow.
RP
Last edited:
you should slip some of that thermal insulation in the tranny tunnel to keep some of the heat soak from coming up into the cabin. or build a heat shield to help divert the heat.
on my hood, we used a self leveling seam sealer to diminish the seam slightly. look forward to seeing it tomorrow
on my hood, we used a self leveling seam sealer to diminish the seam slightly. look forward to seeing it tomorrow
Dayamn. I've been doin' it wrong for 35 years. Respect.

Last edited:
It's not mine anymore, but saw it off to a fresh adventure this afternoon. Hope the new owner gets involved here, he's new to E9s and will appreciate the support.

Nice exhaust system.............is that 2 1/4 Dia or 2 1/2 ?
Paul: Two 2" pipes from the exhaust headers into a 3" oval, into a 3" muffler/final exhaust.
The pictures don't do the system justice, the welds are artwork. Great vendor, Bluemaxx here in Cumming GA.
CSL177: This car "Two Step" (as in one step forward and two steps back) is sooooo far from stock...
Some of the junk I've done comes in from left field. And some, like the foam stuff, is beyond my skill level or patience to find parts.
And sometimes you throw-in the towel in an effort to just get it done. (Re, the Two Step name of the car.)
RP.
for anybody who is also facing this problem - try this stuff on ebay from classic 9 leathershop / hof designs in michiganI gave up on the foam-crap. It seems I can’t cut the foam in a straight line.
I added the perforated look, B-quiet sounding the material to the under hood area. I I I used a lot of Bondo to cover those seams up on the outside edges of the hood.
It goes on the car tomorrow.
RP
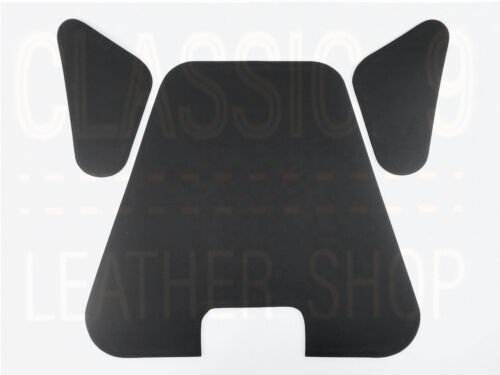
Aftermarket Hood Liner. Fits BMW E9 series 6 models from 1968 to 1975 | eBay
Find many great new & used options and get the best deals for Aftermarket Hood Liner. Fits BMW E9 series 6 models from 1968 to 1975 at the best online prices at eBay! Free shipping for many products!
www.ebay.com
99 bucks ... and well worth it.
Bam. Ordered.
Scott, thanks so much or your help.
RP
Scott, thanks so much or your help.
RP
My passenger door was giving me fits to latch fully. Unless I closed it with firm, but not hard constant pressure, it would bounce out of the latch receiver. I could latch it from the outside, but even I couldn't finesse it to close by pulling the handle from the inside. I looked like such a gentleman every time I helped my wife to get seated, and gallantly closed the door for her!
So I took the opportunity to address that latch, do a bit of refurb on the door, and get my window moving a little faster.
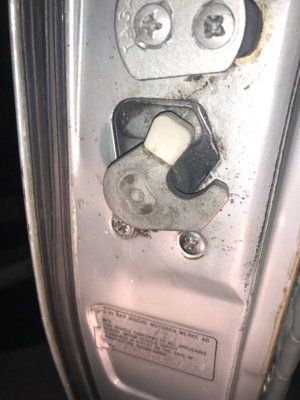
After much effort I learned that adjusting the latch receiver was not getting me anywhere. Thanks to a passing comment in someone's build blog, he mentioned adjusting the door handle mechanism... Eureka! This door handle mechanism was adjusted such that it was so tight on closure that just a touch of the door handle would trigger it open, thus explaining why my door would "bounce" out of the latch. I cleaned it up and replaced the felt. With adjustment, the door now latches well.


The felt on the door trim was toast, so i stripped, sanded, painted, and installed new felt.


My window was taking almost 11 seconds in both directions, up and down. On inspection, the grease was actually OK, clearly all cleaned and lubed as part of Oldenzaal's renovation process.

I cleaned out all of the tracks and re-lubed everything.
I removed the bearing slide and rail for cleaning and lubrication.
On reinstallation, I confess to over-torqueing the studs at the top of the rail. I pulled them loose from the bracket they are braised into. I drilled out the two stud seats and replaced them with M6 bolts. My friendly local mechanic tack-welded them in place for me (at no charge!).

Removed the regulator motor and replaced the grease with Kroll wheel bearing grease. This is the original Series II motor. With the motor mounted to the regulator, the time to travel lock-to-lock was 7.8 seconds.

After reinstalling everything and getting the window tracking smoothly without the regulator in place, I re-installed the regulator. I was able to get the window speed up and down to the same 7.8 seconds I had with the regulator free-wheeling, so without an E28 motor change, I figure that's as good as it gets!

All of my windows are now at about 8-9 seconds up and down, so until I am ready for the big E28 motor project (assuming I can find motors) , I am happy with the result.
So I took the opportunity to address that latch, do a bit of refurb on the door, and get my window moving a little faster.
After much effort I learned that adjusting the latch receiver was not getting me anywhere. Thanks to a passing comment in someone's build blog, he mentioned adjusting the door handle mechanism... Eureka!
This door handle mechanism was adjusted such that it was so tight on closure that just a touch of the door handle would trigger it open, thus explaining why my door would "bounce" out of the latch. I cleaned it up and replaced the felt. With adjustment, the door now latches well.The felt on the door trim was toast, so i stripped, sanded, painted, and installed new felt.
My window was taking almost 11 seconds in both directions, up and down. On inspection, the grease was actually OK, clearly all cleaned and lubed as part of Oldenzaal's renovation process.
I cleaned out all of the tracks and re-lubed everything.
I removed the bearing slide and rail for cleaning and lubrication.
On reinstallation, I confess to over-torqueing the studs at the top of the rail. I pulled them loose from the bracket they are braised into. I drilled out the two stud seats and replaced them with M6 bolts. My friendly local mechanic tack-welded them in place for me (at no charge!
).Removed the regulator motor and replaced the grease with Kroll wheel bearing grease. This is the original Series II motor. With the motor mounted to the regulator, the time to travel lock-to-lock was 7.8 seconds.
After reinstalling everything and getting the window tracking smoothly without the regulator in place, I re-installed the regulator. I was able to get the window speed up and down to the same 7.8 seconds I had with the regulator free-wheeling, so without an E28 motor change, I figure that's as good as it gets!
All of my windows are now at about 8-9 seconds up and down, so until I am ready for the big E28 motor project (assuming I can find motors) , I am happy with the result.
Attachments
steve in reno
Well-Known Member
I fought with mine for years and found out I was missing a part of the lock mechanism.My passenger door was giving me fits to latch fully. Unless I closed it with firm, but not hard constant pressure, it would bounce out of the latch receiver. I could latch it from the outside, but even I couldn't finesse it to close by pulling the handle from the inside. I looked like such a gentleman every time I helped my wife to get seated, and gallantly closed the door for her!
So I took the opportunity to address that latch, do a bit of refurb on the door, and get my window moving a little faster.
After much effort I learned that adjusting the latch receiver was not getting me anywhere. Thanks to a passing comment in someone's build blog, he mentioned adjusting the door handle mechanism... Eureka!
View attachment 124379
View attachment 124386
The felt on the door trim was toast, so i stripped, sanded, painted, and installed new felt.
View attachment 124380
View attachment 124381View attachment 124383
My window was taking almost 11 seconds in both directions, up and down. On inspection, the grease was actually OK, clearly all cleaned and lubed as part of Oldenzaal's renovation process.
View attachment 124387
I cleaned out all of the tracks and re-lubed everything.
I removed the bearing slide and rail for cleaning and lubrication.
On reinstallation, I confess to over-torqueing the studs at the top of the rail. I pulled them loose from the bracket they are braised into. I drilled out the two stud seats and replaced them with M6 bolts. My friendly local mechanic tack-welded them in place for me (at no charge!
View attachment 124389
Removed the regulator motor and replaced the grease with Kroll wheel bearing grease. This is the original Series II motor. With the motor mounted to the regulator, the time to travel lock-to-lock was 7.8 seconds.
View attachment 124384
After reinstalling everything and getting the window tracking smoothly without the regulator in place, I re-installed the regulator. I was able to get the window speed up and down to the same 7.8 seconds I had with the regulator free-wheeling, so without an E28 motor change, I figure that's as good as it gets!
View attachment 124385
All of my windows are now at about 8-9 seconds up and down, so until I am ready for the big E28 motor project (assuming I can find motors) , I am happy with the result.
in the pic it is the bright grey part that fits on the flip lever. It takes up the slack and aligns the door closure.
Attachments
Last edited:
That would do it!I fought with mine for years and found out I was missing a part of the lock mechanism.
steve in reno
Well-Known Member
That part was given to me by a previous member of our forum RANMAN.
Only the old timers on the site will remember him.
You will still have to close with authority (it is 50 years old). But door reveal and lock will be tight.
Just my experience and hope that it might help.
I have no idea of part # or description.
Only the old timers on the site will remember him.
You will still have to close with authority (it is 50 years old). But door reveal and lock will be tight.
Just my experience and hope that it might help.
I have no idea of part # or description.
you can buy these from w+n for 1.75 euro
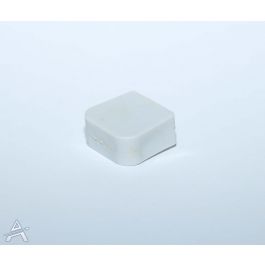
The "chicklet"