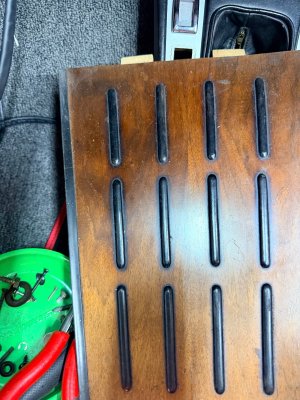
In the process of removing my side console panels obviously the floor came out too. It’s in OK condition. Is this type of thing hard to refinish? Looks like plywood with a veneer and the rubber pieces are sitting in routed channels in the plywood. The front end of it has a center split and the coloration changes from front to back likely from sun exposure.
You are using an out of date browser. It may not display this or other websites correctly.
You should upgrade or use an alternative browser.
You should upgrade or use an alternative browser.
Refinish console floor
- Thread starter e9Leveque
- Start date

the veneer is thin, be careful with sanding. the finish is basically clear on walnut veneer. you will find that trying to correct the split is not very easy, especially to keep the glue off of the outer surface.
All of what you said was my worry. I am thinking that it isn’t TOO bad and I may just leave as is. I am redoing the vinyl on the side panels which was in much worse condition. This one may be a pass
I'd say if it looks rough now you not out much to try a light "refresh". This method will help remove the uneven color and sheen, will make that grain pop again .
The finest steel wool you can find will scuff the surface of the varnish enough to help the new stuff stick without creating scratches that will show in the end. Light pressure is the key here. Clean it up with a tack cloth.
Rub on Teak oil with a cotton cloth and let dry, repeating the process will make it shine more.
You'll end up with a nice low sheen surface that lets that grain pop a little more.
Let me know if pics or material choices will help.
@Thomas76 that sounds do-able. I have teak oil for my cutting boards so just need to get some steel wool. Just to make sure I understand
1. Scuff surface lightly with steel wool
2. Teak oil
Any re-varnishing?
I also assume that I am removing all of those rubber pieces rather than masking them off, which likely would take more time.
1. Scuff surface lightly with steel wool
2. Teak oil
Any re-varnishing?
I also assume that I am removing all of those rubber pieces rather than masking them off, which likely would take more time.
At first glance I assumed those inserts were wood like the dash pieces.... My car doesn't have that shelf.
That might add a layer of risk to think about? I would be concerned about destroying the inserts (50 year old rubber), and potentially lifting/cracking the veneer while pulling up.
Maybe try the least visible one first to see how it goes?

Lighting isn't great in photo but these are the two products I experimented with, along with the original piece. Danish oil came in a little darker than I wanted so I went with teak. # of coats noted on paper.


Finished product is very low sheen but properly sealed.
No I did not revarnish. Pros say it's unnecessary, reapply oil every few years as needed. I'm going on 5 years now and it still looks like I just did it.
That might add a layer of risk to think about? I would be concerned about destroying the inserts (50 year old rubber), and potentially lifting/cracking the veneer while pulling up.
Maybe try the least visible one first to see how it goes?
Lighting isn't great in photo but these are the two products I experimented with, along with the original piece. Danish oil came in a little darker than I wanted so I went with teak. # of coats noted on paper.
Finished product is very low sheen but properly sealed.
No I did not revarnish. Pros say it's unnecessary, reapply oil every few years as needed. I'm going on 5 years now and it still looks like I just did it.
I forgot to mention I installed new veneer, so results may vary. ")
I'll check it out and let you know how it all goes. I will say that doing all of this interior work is like an ongoing crafts project - there's metal cutting, rubber-gluing, wiring, wood, vinyl refinishing, etc.
Enjoy the ride and take pictures of those moments. You may look back on it and wonder how ya ever did it.
My basement was full of parts, had no idea one small coupe could fill so much space.
My basement was full of parts, had no idea one small coupe could fill so much space.
just imagine having 2 of a lot of parts ...
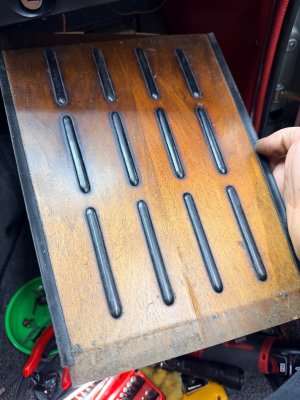
Some updates with pictures for anyone else going down this road. The rubber pieces came out easily, just push out from the back. They are quite robust so no issues with cracking or breaking. Along those lines, though, any recommendations for solution to rejuvenate some of these rubber parts?

