
Dead Pedal DIY

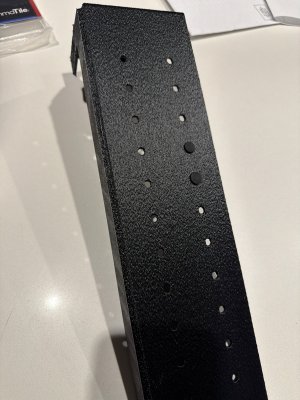
I made a second print adding in some 5mm holes through which I could put rubber plugs to address @rsporsche’s desire for some type of relief surface. Given my comments above about the crosshatching, though, have to say that the original Alpina pedal shown likewise doesn’t necessarily match any other style element in the car. Someone had suggested vertical striations like the clutch or accelerator pedal, which can be done but add a little complexity to manufacturing because then it’s not just a simple cut and bend but also needs some etching/scoring. Any thoughts on the rubber plugs to provide this relief? I just quickly made this as two vertical rows but would be easy to copy the Alpina pattern. I’m going to put this model in the car next time I have it near me to see how it fits since @Catbert had a nice solid alternative with the wood backing. If the model works may have one made from metal and bent, I’ll weld the corners and can powdercoat to see how it works out. I have a few weeks off between jobs in December so racking up some small projects to distract me from my megasquirt conversion.
 

Attachments

  • image.jpg
    image.jpg
    572.8 KB · Views: 14
Why not print a thin elastomeric layer with a pattern and apply it to the metal pedal? Or print the entire pedal including whatever pattern you want on the face?

I did the crosshatch pattern that matches the clutch and brake pedals, but I personally think vertical ribs like the accelerator pedal would provide a more symmetrical look.
 
i think you are probably correct Scott ... the balance of the vertical ribs on either side is symmetrical and would look very balanced. as i remember the e30 motorsport dead pedal was vertical ribs.
 
Why not print a thin elastomeric layer with a pattern and apply it to the metal pedal? Or print the entire pedal including whatever pattern you want on the face?

I did the crosshatch pattern that matches the clutch and brake pedals, but I personally think vertical ribs like the accelerator pedal would provide a more symmetrical look.
I think it comes down to the manufacturing process. A cast part has essentially any option you want in terms of design in metal. The part as I have currently designed it (either flat front or with holes) would be to use sendcutsend or equivalent that laser/waterjet cuts the part out of flat steel stock and then bends it along set cut lines to form the 3d version. It can’t do partial thickness cuts so no ribbing type of pattern could be made. I could metal 3d print it which opens up all of those possibilities as well but comes at a higher cost. Your idea of adding a rubber layer on to the flat front would work, at that point the question would be whether it’s cheaper/easier to have two parts made - the bent metal part and the elastomeric layer or to instead just go for the 3d printed version that could have the ribbing built in. I’ll run some cost analysis. I agree that a pattern matching the accelerator pedal provides the most symmetry. If it’s made black or dark gray there’s always the option of sanding down just the raised portion to provide a slight contrast, similar to the rounded tops of the Alpina pedal and replicating what some of us have done to our valve covers.
 
i think rubber is the correct material ... i think its better to apply it rather than cast a pattern or just cut holes as you need something to hold your feet if the pedal is flat. the Alpina pedal has raised grommet holes which will grab your feet ...
 
Would a raised rib pattern printed work? Or think it would still be a bit slick across the tops?
Sounds like you guys prefer the flat top with then something like this applied onto it. I wonder how clean the edges would look on this.
[
IMG_1730.png


At that point if it’s 3d printed then the answer would likely be to have a raised edge of this material’s height that is part of the pedal along its outer border and cut the rubber down to size and inset it securing it with glue.
 
Back
Top