1972 Bavaria - Full build and swap

e30strube

Well-Known Member
Messages
195
Reaction score
45
Location
Houston, TX
I've wanted to make a build thread for a looooooong time now as I started taking my car apart about 8 years ago. Full disclosure... the car is basically done already :) This will be a bit of a look back and this isn't the normal build.

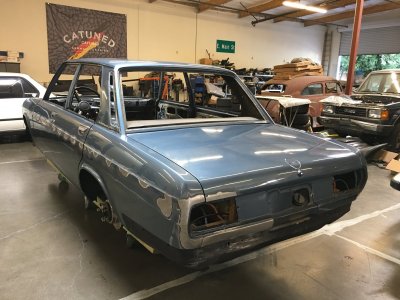
Some basics... this is a 1972 Bavaria that spent most of its life in California. I bought it and brought it to Texas about 10 years ago. What I did...

Mechanical
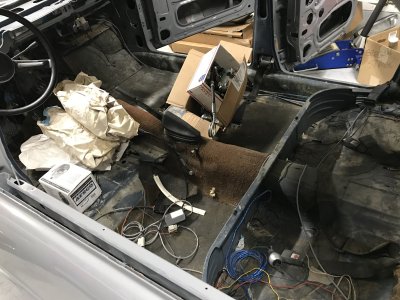
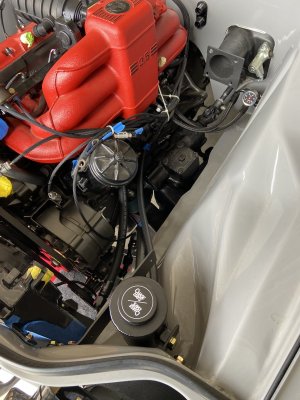
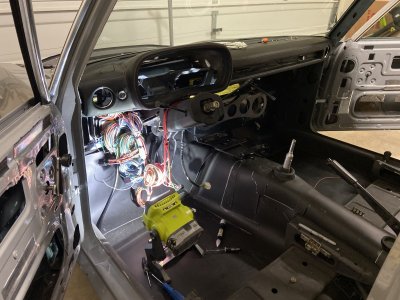
M30B35 swap, megasquirt with wasted spark, the factory 5 speed that came with the engine (1989 735i motor), custom driveshaft, e28 rear end and LSD, individual throttle bodies, high flow pump in the fuel tank to AN lines throughout, DW fuel pressure regulator, electric SPAL fans, E36 mishimoto radiator, American Autowire universal harness

Suspension
Airlift struts/bags, Accuair controls, Wilwood front brakes, e28 535 rears, 2002 booster, braided stainless brake lines

Body
Shaved trim and side markers, Audi Nardo grey

Wheels
Hayashi Racing / HRE Techno R, 501 (circa 1984), completely rebuilt, 17x8.5 and 17x9.5

Lots more that I'll touch on with the pictures.

This is how it sits today...
6.JPEG
 
Disassembly starting... the car had damage to the hood and the front fender, so replacements were found.


IMG_3420.JPG


IMG_4443.JPG


IMG_4546.JPG


Off to paint


IMG_9217.JPG


IMG_4795.JPG


IMG_5285.JPG


IMG_5406.JPG


"New" hood, trim holes welded in and sanding started.

IMG_5408.JPG
 

Attachments

  • IMG_5409.JPG
    IMG_5409.JPG
    308.4 KB · Views: 3
Initial reassembly... engine installed, but would come back out several times. A guest appearance by my son who was inspecting. This is where the build started snowballing into doing more "while I'm there".

IMG_7921.jpeg


I started cleaning up the interior to prep it for an application of Lizard Skin sound and thermal coating. This really made a difference in both, while also making the interior metal look great (even though it would just get covered up).

IMG_7955.jpeg


IMG_7968.jpeg


Full body harness removed... I found lots of broken wires and connectors. The American Autowire kit is behind the pile. More on that later.

IMG_8169.JPG


IMG_7970.jpeg


I used dry ice to remove the factory sound pads. This worked really well and no rust on the floor boards.

IMG_8013.jpeg


Starting the application of the Lizard Skin... simple protection all around the car. This stuff is really thick and has no overspray.

IMG_1608.jpeg
 

Attachments

  • IMG_7955.jpeg
    IMG_7955.jpeg
    355.4 KB · Views: 6
Last edited:
More pics of the interior... seam sealer and Lizard Skin.

IMG_1977.JPG


IMG_1983.jpeg


Kid Batman's approval...

IMG_1990.jpeg


Got the trunk also.

IMG_2240.jpeg


Doors go back on

IMG_2243.jpeg


I pulled the engine sometime in this period and started to clean it up and get it assembled.
 
Last edited:
A little out of order, but just before the interior work, I had the engine bay cleaned up even more.

This was "re shaving" the engine bay. I removed the factory rain tray and the firewall was completely smoothed, as was most of the engine bay. I also removed the factory latch system and would replace it... that solution comes later.

Before...

IMG_8395.jpeg


After...

IMG_9192.jpeg

IMG_9194.jpeg


IMG_0115.jpeg


With the engine out, I was able to clean it up. A fancy engine stand to help with the process also. This is pre clean....

IMG_8154.jpeg


Cleaned and primed...


IMG_8155.jpeg


And painted...

IMG_8157.jpeg
 
Initial engine assembly... initial because I would eventually change up the intake manifold and replace several of these pieces.

IMG_8206.jpeg


Engine back in for the last time.

IMG_2664.jpeg

IMG_2655.jpeg
 
You can see the door panels in the above pic... it was coming together while the engine was still out.

IMG_8835.JPG


IMG_8430.PNG


IMG_8521.JPG


IMG_8520.JPG


IMG_8743.JPG


Black, perforated head liner...


IMG_2605.jpeg


The wood pieces on the door panels will get re-veneered later.
 
This is a CRAZY set of photos! I have to say that although I’m not generally a fan of the slammed and heavily modded car look, you have done an impressive job with the machine here. I’ve never seen that type of engine bay rework and as someone currently “reattaching” all of the things that go onto the walls of the bay, I have to ask where those things are mounted. Engine looks brand-new as well, nicely done
 
Good transition into the engine build...

Test fitting the coolant hoses.
IMG_3227.jpeg


And the booster... I modified the pedal box to shorten the tube piece that comes in the engine bay. This gave plenty of clearance and would help later when I installed the individual throttle bodies.

58554018805__2E74D839-1686-4558-A34D-BF1AE1486DB2.JPG


The engine harness was redone and would be routed to a single firewall connector.


IMG_3370.JPG


IMG_3369.JPG


IMG_3494.JPG


Also started to mock up mounting the coil, as well as the heater core connections...

58864910638__A4BF1679-4B56-44D2-B709-43FC621DC4AC.JPG


58856432313__F0E43B44-A02A-4B87-AB52-51893B82FA12.JPG


IMG_3555.jpeg


IMG_3518.jpeg
 
Made a bracket and started actually mounting things...
58965468056__AE8B7C3C-2227-44CA-8B3D-FEEF815A1F50.JPG


59079167662__C8FF3A7D-070B-4CF9-ADC6-07C6F64B9047.JPG


IMG_3618.jpeg


Coming together... fuel pressure gauge mounted to the lines, an hoses running to the fuel rail, wiring mostly in place. I redid the fuel lines under the car as well... all new NiCp lines.

63105686051__103756EA-9349-462F-8787-93941C982417.JPG


IMG_3622.jpeg


Out of order again, but fuel line test fit...

IMG_5802.jpeg
 
Last edited:
I don't... I switched to an aftermarket AC/heat setup. In this case a Restomod air, recirculating unit. In hindsight, this required way more work than I expected and I don't know that I would do it again. Generally, a form over function situation with the air. You can see the factory mount for the AC/heat box.


IMG_5801.jpeg


IMG_3514.jpeg


This is behind the unit... you can see the ECU wires coming in, as well as the heater core connections on the left, and the AC lines on the right.

59080935941__DD20AA6A-E3B5-40D3-A868-B6D6E7F1DEDA.JPG


Driver side...

58718018353__A33B32BD-4819-4A70-92EC-DDC6D3289796.JPG
 
Back in the engine bay... mounting more stuff.

Coolant reservoir with a pretty simple bracket, power steering reservoir, and the electric fans. Dual fans fit better than a single larger unit.

IMG_6430.jpeg


63034945266__93597B17-E381-48BD-8D59-31E5C5CC5EFC.JPG


IMG_5453.jpeg


New hoses to the power steering reservoir. I used adapters to get AN lines from the factory steering box to the B35 pump, and then to the aftermarket reservoir.

63056239348__CD98B254-416E-4452-B786-2C9AF32CADAD.JPG


IMG_6969.jpeg
 

Attachments

  • 63086956720__2C001B75-7CBE-4CEC-9BFE-B919AB3374DD.JPG
    63086956720__2C001B75-7CBE-4CEC-9BFE-B919AB3374DD.JPG
    320 KB · Views: 3
Last edited:
Other end of the fuel system... I used a Holley high flow fuel pump as it came with a tank "sock" that seemed like it would help with the fuel pickup since there was no baffling, as well as a new fuel level sender in the factory pump location. The cutout was already there for the new pump, so that worked out pretty well. I had the fuel tank cleaned and then I repainted it before install.

63925741557__66BE5ADB-21ED-408D-9C9D-83997389F7B3.jpeg
 
Back inside the car...

I used new sound proofing/insulation throughout. Dash was also put in.

63297454309__54290F76-DEC8-4C97-97B4-E42F91EE1B9D.JPG


IMG_6684.jpeg


IMG_6814.jpeg


No final pics, but the entire interior was covered.

Starting the body harness. While the wires are fully labeled, getting the universal harness to tie into the factory switches for things like wipers, headlights, etc. took a while. The BMW engineers were not thinking "easy" when it came to wiring. I did get everything to work though.

63893462783__8DB59EE7-25DB-4F77-8725-2E91BDE23C1A.jpeg


63728301458__70F84257-227D-475C-A656-5E39CC7EB9E3.jpeg


63893955765__E714A8CB-7DF9-4896-B349-595F5BB65C3C.jpeg


Getting the ECU in. I used a Dakota Gauges fan controller (nice unit) and a distribution block for power.

IMG_9204.jpeg


Battery relocated under the rear seat. Circuit breakers installed as well. The Braille batteries are tiny.

IMG_9924.jpeg
 

Attachments

  • 63728301458__70F84257-227D-475C-A656-5E39CC7EB9E3.jpeg
    63728301458__70F84257-227D-475C-A656-5E39CC7EB9E3.jpeg
    337.9 KB · Views: 4
More wiring...

IMG_9184.jpeg


No pics of the lights going in, but they're Dapper Lighting LED lenses in the factory mounts. New wiring throughout.

And they work!

IMG_9183.jpeg


Getting the gauge cluster together.

69163909661__21AFB79C-CB82-4D67-83FC-2BCD3BEBF7EC.jpeg


Speed Hut gauges. I updated the idiot lights to LEDs. I made a mount and then attached it to the back of the factory cluster. I changed the wiring for the turn signals a bit in order to get it to work with the new fuse box and wiring. Incandescent bulb for the alternator light as I understand that one uses the resistance as part of the check.

IMG_0258.jpeg


70077838978__2BD9E728-339F-4C55-9858-35C7D00E2D8A.jpeg


70149262575__65BF1FCA-14C5-47F7-B283-9E06E078ECE6.jpeg


70149250622__52D13ACE-4414-4A51-B4B1-9B03977649D0.jpeg


Getting closer on the interior.

70517408314__5660AFCC-C6E5-4DBC-AB78-7849BCC74D4B.jpeg
 
Routing the rear wiring... lights, air suspension, fuel, etc.

IMG_1217.jpeg


IMG_1216.jpeg


IMG_1214.jpeg


Center stack... I wanted to use the factory console, but also add accommodations for gauges. I removed the vents and made the piece shown below. I did realize afterwards the ash tray would no longer work and had to come up with something for that.

IMG_1285.jpeg


IMG_1297.jpeg

A little texture paint and black, and it looked pretty much the same as the factory texture. Voltage, wide band O2 and oil pressure.

IMG_1338.jpeg
 
Last edited:
More interior stuff...

Getting the center console ready for speakers in the normal grill locations. I filled in the holes and then recut for the speakers.

IMG_2730.jpeg


I decided to go with a bluetooth controller for the "radio" instead of a normal headunit. This was for space and aesthetics.

IMG_2738 (1).jpeg


IMG_2989.jpeg


More texture and paint. New hazard switch as well. I'll use these grills as the front facing AC/heat grills.

IMG_2995.jpeg


I also made a panel to cover the old ash tray. I didn't account for the wiring for my AC controls (will show that later) and the gauge wiring.

IMG_2990.jpeg


Onto the carpet prior to console install... went in pretty easily. Was a little confusing as to what went where.

69377614835__C8936113-3BBB-46D6-AEDA-08EE9623B827.jpeg

IMG_1250.jpeg


IMG_1218.jpeg


IMG_1251.jpeg
 
Back to the engine bay... this was my solution to going from the pusher style gas pedal to a pull style cable on the B35. I used pieces from the OEM Bavaria, but modified them to mount the actual cable.
69551620840__3F6CD666-F9EF-4EFD-AD9F-CC129B172A70.jpeg


IMG_0154.JPG


69595169487__222F85C0-61B4-4641-90FD-60713DAE7E0A.jpeg


IMG_0233.jpeg


Then I shortened the brake booster rod to get it in place.

IMG_0153.JPG


I used an e21 clutch master cylinder due to the outlet location. I also made a bracket to mount the reservoir. This style kept leaking and I would eventually replace it. I also used a Wilwood adjuster. Brake lines are rerouted throughout to hide them.


70068096150__ED31A829-6209-4615-A3CF-C89E91E5156F.jpeg
 
Back
Top