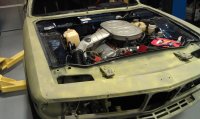
Since I took a ride the other day (no doors/hood/trunk) I figure this coupe is back on the road officially! I spent allot of time and $ on the suspension, replaced or rebuilt almost everything that moved and with the help of y'all, actually got the 5 speed in and I have to say, despite the wind noise the car handled beautifully, I had to re-adjust the toe-in, but the C.N. springs and Bilsteins and all the new bushings really made it ride like a dream. The car is etched and ready to go to the paint shop (almost) and I chose an upholstery shop today as well. Still need to figure out what seats to use but I thought I would attach some pics. Also, I found some "plastic paint" that I used on the hood and fender inserts- Really came out nice so I'll probably do the grill inserts too. I wiped them down with a light acetone to prep them. There was some talk about battery tie downs on another thread so I included a pic of what I came up with.
You are using an out of date browser. It may not display this or other websites correctly.
You should upgrade or use an alternative browser.
You should upgrade or use an alternative browser.
Almost there
- Thread starter Peter Coomaraswamy
- Start date


nimble_n_quick
Well-Known Member
Looks great - congratulations! What brand of plastic trim paint did you use?

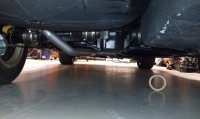
Exhaust installed
I thought I would post some pics and see if I can get some feedback regarding the exhaust I put on. Right after starting the engine for the first time in a year I took a quick ride around the block. All the suspension was great but it seemed to be a little lacking in power. I was running with just the header pipes. After putting the Flowmaster on I noticed a huge power increase, not to mention a mellow note- not too loud, not too soft. Can backpressure effect power that much in your all's opinion. Also, I did not want to put 3 mufflers on this thing so I came up with the attached configuration. Cost was 400.00 even (from the stock 2 header pipes back). Any thoughts/comments-please don't be shy.
Thanks,
Attachments


Peter,
Here is an article I found a while back about exhaust system issues when I was researching the design of mine. In short, some back pressure is desirable so that you keep good air velocity going through the pipes. Larger pipe equals slower velocity. There is a balance point between back pressure and flow rate. Also, the low/high pressures of the pulses moving through the pipe help the gases along.
http://www.mikekemper.com/elantra/diyexhaust/index.html
A single muffler only system seems like it would be very loud? Even CoupeKing's dual system has the option for a "carrot" that can be inserted into the rear muffler to quiet the sound even further. I have two mufflers and a cat. and the sound is just right (IMO).
Great article
Thanks Sven,
I thought I would mention about the loudness, I also thought a single muffler would be too loud but (and this is a matter of taste of course) I found it to be rather quiet even with the single unit. We did put flanges on the system so we can make modifications as necessary but I'm hoping not to have to. When I brought it back to the "cave" which is in a portion of the warehouse at work everyone thought it sounded as it should, impressive but quiet enough. Maybe when I'm done I'll do a youtube video. Can’t thank you enough for the article, I wish some of the kids in my neighborhood would read it!")
Thanks Sven,
I thought I would mention about the loudness, I also thought a single muffler would be too loud but (and this is a matter of taste of course) I found it to be rather quiet even with the single unit. We did put flanges on the system so we can make modifications as necessary but I'm hoping not to have to. When I brought it back to the "cave" which is in a portion of the warehouse at work everyone thought it sounded as it should, impressive but quiet enough. Maybe when I'm done I'll do a youtube video. Can’t thank you enough for the article, I wish some of the kids in my neighborhood would read it!
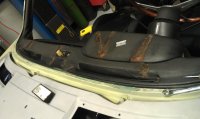
amature dash re-do
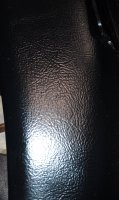
Usually every time I go outside the box on this car I end up doing things over again.. and buying a new part. In this case, the 1500.00 played a part, but more than that, the thought of pulling this thing apart after reading the post "the hardest jobs" made me want to try it another way. I think it came out well, so I thought I would post some pics. First you can see all the cracks so I cut them back to where the dash was level and filled in the cracks with expandable foam. Then used a blade to shape it back to the normal height. Then I got some good vinyl from a fabric store and went to town, lots of razor blades, glue and the all-important heat gun. I hope it lasts. Feel like I'm an expert at assembling the doors now too, window slides, locks, glass- and I only had to do everything twice . Paint should follow in the next 2 weeks!
Usually every time I go outside the box on this car I end up doing things over again.. and buying a new part. In this case, the 1500.00 played a part, but more than that, the thought of pulling this thing apart after reading the post "the hardest jobs" made me want to try it another way. I think it came out well, so I thought I would post some pics. First you can see all the cracks so I cut them back to where the dash was level and filled in the cracks with expandable foam. Then used a blade to shape it back to the normal height. Then I got some good vinyl from a fabric store and went to town, lots of razor blades, glue and the all-important heat gun. I hope it lasts. Feel like I'm an expert at assembling the doors now too, window slides, locks, glass- and I only had to do everything twice
. Paint should follow in the next 2 weeks!Attachments


Impressive - can you post some close up pics of how it came out? What kind of vinyl did you use?
Usually every time I go outside the box on this car I end up doing things over again.. and buying a new part. In this case, the 1500.00 played a part, but more than that, the thought of pulling this thing apart after reading the post "the hardest jobs" made me want to try it another way. I think it came out well, so I thought I would post some pics. First you can see all the cracks so I cut them back to where the dash was level and filled in the cracks with expandable foam. Then used a blade to shape it back to the normal height. Then I got some good vinyl from a fabric store and went to town, lots of razor blades, glue and the all-important heat gun. I hope it lasts. Feel like I'm an expert at assembling the doors now too, window slides, locks, glass- and I only had to do everything twice
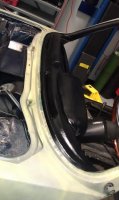
Posting better pics
Hi Steve,
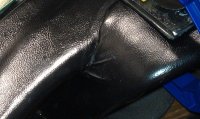
I have a couple of "in progress" pics and I'll take more tomorrow as I was working on the door guts most of today. I think it could be done perfectly if I had some instructions or more experience. Number 1 thing, use 3M adhesive, there's nothing better! and cover up everything or you'll spend half again your time trying to clean up the mess. Also, the heat gun was really helpful. If anyone wanted to try this I could give some pretty detailed instructions, but lets see what you all think when I get it completely finished.
Hi Steve,
I have a couple of "in progress" pics and I'll take more tomorrow as I was working on the door guts most of today. I think it could be done perfectly if I had some instructions or more experience. Number 1 thing, use 3M adhesive, there's nothing better! and cover up everything or you'll spend half again your time trying to clean up the mess. Also, the heat gun was really helpful. If anyone wanted to try this I could give some pretty detailed instructions, but lets see what you all think when I get it completely finished.
Attachments


more dashboard pics
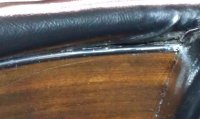
Steve, you wanted some more pics and info., so here is what I came up with today. There is one spot that I wish I got a little smoother but overall I think it was/is worth it, at least until I refill the coffers as this thing has been a drain (time and money), lots of fun though. As I said earlier I hope to bring it in for paint in the next 10 days and then I'll really be broke! I also plan on making it a daily driver, as one of my hero’s said-"what good is a car if you don't drive it- I built my cars to drive!" (Carroll Shelby). I also re poly'd the wood. I figure if I get everything else the way I want it I can always do the dash again- that would fit in with everything else I've had to do twice!
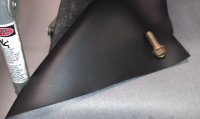
On the next post is more info on the vinyl I used. I think the best way to judge quality is by looking at the backing for a very tight weave. I could send you more than enough for about 20 bucks.
Steve, you wanted some more pics and info., so here is what I came up with today. There is one spot that I wish I got a little smoother but overall I think it was/is worth it, at least until I refill the coffers as this thing has been a drain (time and money
), lots of fun though. As I said earlier I hope to bring it in for paint in the next 10 days and then I'll really be broke! I also plan on making it a daily driver, as one of my hero’s said-"what good is a car if you don't drive it- I built my cars to drive!" (Carroll Shelby). I also re poly'd the wood. I figure if I get everything else the way I want it I can always do the dash again- that would fit in with everything else I've had to do twice!On the next post is more info on the vinyl I used. I think the best way to judge quality is by looking at the backing for a very tight weave. I could send you more than enough for about 20 bucks.
Attachments


503recheck
Member
front driveline disc
in your exhaust pics I noticed you are not running a traditional quibo but a flat driveline disc...doesnt that pull your driveshaft forward and stretch your center support ? I am at the point of converting to the 5 speed and hooking up the hydraulic clutch line. do you remember what clutch line you used(one piece or one piece rigid up to bellhousing bracket with flexible up to cylinder) and what you sourced the small rigid piece from? I have a new flexible part but it only reaches the bellhousing joint and is about 6 to 8 inches away from slave cylinder
in your exhaust pics I noticed you are not running a traditional quibo but a flat driveline disc...doesnt that pull your driveshaft forward and stretch your center support ? I am at the point of converting to the 5 speed and hooking up the hydraulic clutch line. do you remember what clutch line you used(one piece or one piece rigid up to bellhousing bracket with flexible up to cylinder) and what you sourced the small rigid piece from? I have a new flexible part but it only reaches the bellhousing joint and is about 6 to 8 inches away from slave cylinder
conversion
Hi Recheck,
Actually that is the correct guibo joint, not a flat disk although from the pics it looks like one. I can send some other pics if you want to see the exact layout- if you think it would help. Regarding the clutch- that was fun, I used a brake line sourced from a local auto parts store and connected the flexible line to the clutch master then used a solid tube from the slave. The bleed hole on the slave has to be on the bottom so the bending can be a little tricky, try measuring, bending and tightening the fitting before you mount the slave- It’s a little tight, but not too bad. You can get the rigid piece from any auto parts store and the tubing bender is very inexpensive if you don’t have one. I’ll send some pics later today.
Cheers