Becker Europa II Install on 3.0cs

UPDATE:
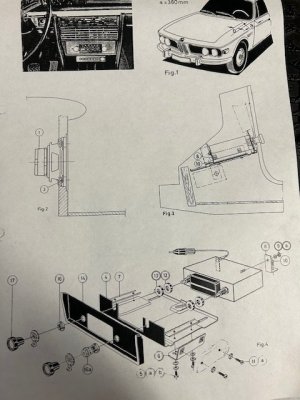
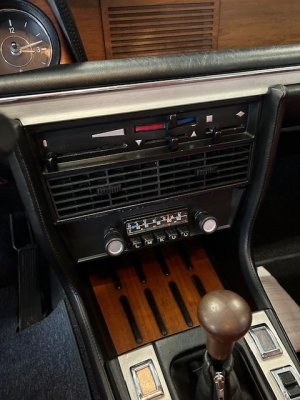
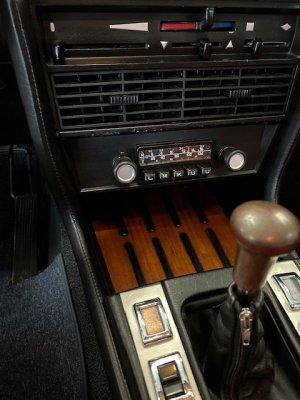
I contacted Christof (Chris) in Germany and purchased the Blaupunkt install kit from him. It arrived yesterday. I see very clearly how everything comes together and that I need to widen the opening for the radio dial to fit through. All no problem. Everything fits together very nicely.

My question to all is: how is the radio secured to the tray and then how is the radio/tray connected into place in the opening below the dash air vents? (Remember, I do not have an A/C car). Do I need to drill holes for screws to connect to the brackets from the foot-wells of the driver and passenger sides (ie, from the outside inward?)? Thanks for any guidance from those who have done this....
 
...

My question to all is: how is the radio secured to the tray and then how is the radio/tray connected into place in the opening below the dash air vents? (Remember, I do not have an A/C car). Do I need to drill holes for screws to connect to the brackets from the foot-wells of the driver and passenger sides (ie, from the outside inward?)? Thanks for any guidance from those who have done this....
My car is non AC and whoever installed the radio used an L shaped metal bracket to hold the radio supported to the surface above it. It had no trapezoidal metal front panel like you will have. I added such a front panel that was custom made here in the US. I prefer that L bracket to drilling holes on the sides...

See: https://photos.app.goo.gl/F77yaongMFhnALjt7
 
@Arde. Thanks for the suggestion.....I have created an L-bracket and have it in place on the negative terminal on the radio and attached to the metal plate the radio sits on. I will attach the ground wire to this post when I get the radio in place...

The issue I'm struggling with is how are the side brackets attach to the opening since there is noting holding the radio and the tray in place (see Fig 4 below). I am very leery about punching holes in the sides of the console from each foot-well, although that's exactly what the directions appear to suggest. Is this the way the factory or the Dealerships installed the radios? See item #11 in the schematic.....any suggestions?
 

Attachments

  • IMG_0579.jpg
    IMG_0579.jpg
    68.5 KB · Views: 87
  • IMG_0580.jpg
    IMG_0580.jpg
    89.7 KB · Views: 92
Last edited:
@Arde. Thanks for the suggestion.....I have created an L-bracket and have it in place on the negative terminal on the radio and will attach the ground wire to this post as well...
Exactly.

The issue I'm struggling with is how are the side brackets attached to the opening since there is noting holding the radio and the tray it sits on in place. I am very leery about punching holes in the sides of the console from each foot-well....any suggestions?
I have no side brackets or have not attached them. I found that the trapezoidal shape wedges the radio into place (cannot go any lower) and that is sufficient to hold it place. No drilling holes in my E9, I am not a dentist...
 
Exactly.


I have no side brackets or have not attached them. I found that the trapezoidal shape wedges the radio into place (cannot go any lower) and that is sufficient to hold it place. No drilling holes in my E9, I am not a dentist...
I agree but look at the directions I was given with the installation kit....
 
I have no words of wisdom, my radio is a Blaupunkt and is resting on the support plate with some 3M strip caulk. The side brackets I turned upside down and each have two front screws through the sides of the center console and in the back, I fitted a piece of poplar similar in shape to the particle board that rests way in the back and covered it with the same veneer that I used for the console, doors etc.

Guess I am trying to say you have to think out of the box.

IMG_4391.jpg
IMG_4392.jpg
IMG_4393.jpg
 
I have no words of wisdom, my radio is a Blaupunkt and is resting on the support plate with some 3M strip caulk. The side brackets I turned upside down and each have two front screws through the sides of the center console and in the back, I fitted a piece of poplar similar in shape to the particle board that rests way in the back and covered it with the same veneer that I used for the console, doors etc.

Guess I am trying to say you have to think out of the box.

View attachment 175082View attachment 175083View attachment 175084
Thanks BavBob. I came to the same conclusion last night so I went to Home Depot and bought 4, 2" angle irons and covered the outer edge and the inner edge with two-sided super-duper sticky tape. Then I set the radio where I wanted it and wallah, its in place at the slight upward angle needed so that the front fascia is flush with the bottom of the air vent above....all good for now. I suspect the tape may not last, but we'll see.

Best part of all: No holes, no drilling, no screws. Not as solid as I'd like, but it's in place and everything works as it should so, a 95 out a 100 overall.
Thanks all for your feedback & guidance/suggestions....
 
Pics?
I have had no problems with the heat versus the strip caulk but I am waiting for it.
 
Thanks BavBob. I came to the same conclusion last night so I went to Home Depot and bought 4, 2" angle irons and covered the outer edge and the inner edge with two-sided super-duper sticky tape. Then I set the radio where I wanted it and wallah, its in place at the slight upward angle needed so that the front fascia is flush with the bottom of the air vent above....all good for now. I suspect the tape may not last, but we'll see.

Best part of all: No holes, no drilling, no screws. Not as solid as I'd like, but it's in place and everything works as it should so, a 95 out a 100 overall.
Thanks all for your feedback & guidance/suggestions....
Well done, a floating radio is better than solid...
 
I have no words of wisdom, my radio is a Blaupunkt and is resting on the support plate with some 3M strip caulk. The side brackets I turned upside down and each have two front screws through the sides of the center console and in the back, I fitted a piece of poplar similar in shape to the particle board that rests way in the back and covered it with the same veneer that I used for the console, doors etc.

Guess I am trying to say you have to think out of the box.
Ditto on getting creative about it!

My center console was (still is) in pretty bad shape. It didn't have the rear cross member - the piece (visible in the third photo at back of console) that holds it together at the rear and keeps things from just sliding off the back of the console floor. Because of this I made a rear crossmember and while I was at it I made a panel to mount my Becker Europa II.

There's a gap between the bottom of the vents and the top of the radio mount. I probably could have made it more flush if I'd, 1) been more patient, and 2) developed better wood working skills. My console was already a mess with lots of screw holes through it including ones that were conveniently in the more or less correct spot to screw into the radio bracket I made. Since they were already there that's the route I took without thinking about it.

I think the console material is more like melamine than particle board. Either way, it's 50 years old and not particularly strong anymore. I think trying to attach things by screwing into the wood from the inside might not be a very longterm solution even if you weren't worried about making the holes. It's pretty easy for the wood to start disintegrating and then have the screws just pull out.


IMG_1481.jpg
IMG_2698.jpg
IMG_2699.jpg
 
And now I see that you've already taken care of it...nice! You probably already know this, but there are Bluetooth modules available that plug into the back of your Europa II. I bought one and am quite pleased with it. The radio still works when you want to use it, and when in Bluetooth mode the volume and tone controls work just as they do when using the radio. I went with this one that just receives Bluetooth. They make a version with a mic, but I figured it's too noisy in the car for hands free to work very well.

Screen Shot 2024-01-12 at 1.01.44 PM.png

The PO of my first E9 had put a nice stereo in it and the installers did a really great job not destroying the car. They made copies of the kick panels and mounted front speakers in them. Not the most ideal location, but not horrible either. The best part about it is absolutely no new holes in sheet metal or interior panels. I still had the original kick panels if I ever wanted to ditch the speakers.
 
I installed my Europa ll on the factory style radio plate.I used Velcro to stick it to the plate and had a sheet of paper between the radio and plate to position it. If I want to remove it, I can slide a stiff piece of plastic or cardboard between the velcro to break the seal. This was quite a while ago...memory is vague about it sadly.
IMG_1793.jpeg
 
Back
Top