I've seen this question come a few times over the past years so I though it could be helpful to others to gather our combined wisdom on this topic here.
I will be expanding this thread with pics and explanations during my coffee breaks and boring meetings, so it ain't finished yet.
Members may recognize their own pictures, as I've harvested from all over the forum.
I've lifted my coupe in a lot of different way during my own resto. Also I've seen quite some interesting things fly by over the forum.
Below is my combined knowledge which means it's just my take on things.
I invite others to share their findings so that this thread will improve itself + combine different views.
E3 inputs welcome; but i have no experience myself.
While working on your car, what is THE best location to lift your car?
It depends a bit on what you want to do with it (full resto or change a wheel), but there are a few things to follow, and a few things not to do.
You run the risk to damage yourself, or worse; your car.
Recommended lifting points in the FRONT
Pic 1. Lift the car by the frame rails in the front, with a wooden plate/rubber block to spread the load + a t-shirt to protect your paint.
Pic 2. Another option is on left and right on the subframe (blue circles).
Pic 3. The BMW tech manual also allows lifting by the center of the subframe, but not for early models with subframes having flat (not corrugated) mid sections.
Recommended lifting points in the REAR
For the rear also a few options:
(1) support under the rear subframe mounts; the large cylindrical rubber dampers.
(2) likewise, you can also lift the ends of the subframe as it is screwed directly to the rubber damper.
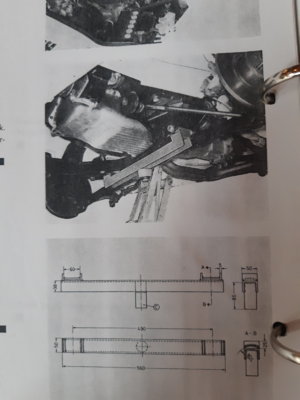
(3) The Tech manual also describes lifting by the differential, using a wooden block with a cutout for the oil drain plug.
(4). Under rear trailing arm as in the repair manual
Pics of lifting the FRONT:
1. Rubber pad under frame rails, in the left bottom corner. See the white T-shirt? It's on a rubber block under the frame rails.

2: Front subframe, using the horizontal steel cylinders.

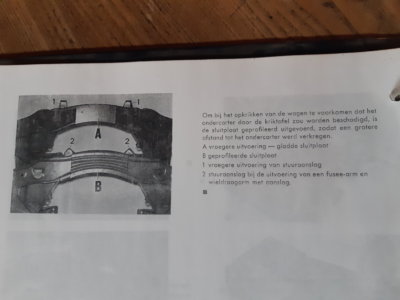
3. 3rd option: Under center of your front subframe, but only if your coupe has a corrugated part as (B), as used on later build years . Here a screenprint of BMW's Tech manual:

If your front subframe does not have a corrugated section, like (A) in pic above, then do not use that as a lifting point; it may bend.
Pics of lifting the REAR:
1. Under rear trailing arm as in the repair manual. Optionally using a wood block under the rear trailing arm:


2. Under the rear subframe itself, just next to the torsion bar attachments; here also with a wooden block to prevent scratches.

3. (under the differential, as instructed in BMW tech manual)

4. Under the rear trailing arm (pic from BMW's own tech manual)

My personal favorite up front: the frame rails.
Pro: It doesn't damage anything if done well! It works even for a complete car (maximum mass). Suitable not for only that wheel change, but also for massive resto work.
Con: be careful to spread the force on the front frame rails with a wooden plate or rubber block. If you use just a jack or axle stand on it, the edges of it will make a depression into the frame rails.
If you have the engine still in the car, but sans interior, rear axle and an empty rear boot/trunk, then the car is really noose heavy. It is then really important to place the support as far forward on the frame rails, close to where it curves upward. Place it too far rearward (more then 15 cm from the curve), and you will tip the car forward on it's nose, falling off your supports. (I could lift the rear end of my car with just a pinky, that's how I learned; it was a close call!)
Picture: this is how far forward you can place the lift point on the front rails:

Do not:
1 Do not lift the car by the lower edge of the sill. The structural part of the inner sill is covered with the black decorative steel cover; it curves under and around the car's inner sill. If you put a jack under the lower edge of the sill, you will just squash the decorative sill and intermediate sill until it is pressed against the lower edge of the inner sill. You will be able to lift the car that way, it is strong enough, but you will have the following permanent squash mark. In the pic below you can see where the mouse pointer is, that the line isn't straight anymore. This is very common on cars handled by non-experts:
I wouldn't want my coupe to be lifted like this:

Because it results in this:

Don't lift here, lift there:

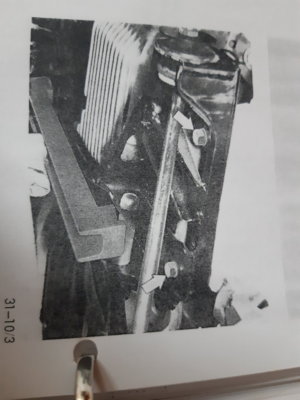
2. Do not lift the car by the middle of the thrust rods, but use the rear, round end of the thrust rod, at the big nut. If you pick the car up, with the lifting pad in the middle, these will bend under the load. Here's a pic of the parts of my car, how it was when i bought it. the bottom one is bend.

3. Do not lift the car by the two 8*8 cm (3 by 3 inch) square box-like sections under the front floor close to the wheel. There is no thick metal above these square boxes. These plates were used by Karmann to haul an empty body through the production line. If you would lift a car by these points, I *think* (but not sure //// EDIT Sept 2023...keep reading! ////) that your floor will develop a dent upward and twist the front tip of the sill.
I wouldn't dare doing it myself, neither have I seen examples of it going wrong, but I've read that people asked if that would be OK as a lifting point
Edit Sept 2023: Now we know what happens if you do use that square box for lifting...First pic show how they placed the lift ing pad under the square metal plate. On the second pic one can clearly see the dent made in left side of the floor (at the top of image):


4. Do not lift your car the by factory sill lifting points, front or rear. Although they are factory, and thus must work on a fresh car, these points are generally considered to be "un-trustable" as the internal structure behind may be rotten. You will only know after lifting if they were strong enough... If you're confident that you have rigid sills they should work however. Picture here is my own car with half rusted sills, but still strong enough to lift my fully equipped car.

But what if the lifting points identified above are rusted out and you want to repair exactly those area's ?
- You can suspend the rear of the car by it's rockers (sills) in the rear, but only with the rear fenders (quarter panels) removed. This allows you to work on the rear axle reinforcement under the rear seat. Without the skin on, the inner sill is the only plate that creates the lower sill edge. As it is 1,5 mm thick, it's enough to lift an empty shell (proven in my car; see picture below with wooden beam across) If the skin would be there, you would squash the lower edge of the rear fender/skin up onto the inner sill edge.
- likewise, with a removed front fender or middle sill (or section of it), you can lift the car by it's front inner sill . This allows you to work on the frame rails. However i would dare that only with an empty shell, not with the engine in.
- you can suspend the rear of the shell on the diff mount. As this is not very stable (single point only), make sure the support in the front is as wide as the tires or the sill. Carefull for the shell to tip left or right. I've done it to be able to work on the rear sill ends, but do use a back up to catch the body if it drops of the diff support you are using (e.g. a stack of 3 rims)
Pictures: 1. with a wooden beam running Left to Right under the middle of car; it is only lifting the edge of the vertical inner sill.
Pic 2: Under rear diff mount; see the standing wooden block on a steel cage in the right side of image.


And you will know if your frame rails are rusted out when this happens: Here the lift managed to lift the rust, but not the car.

(Image from http://www.e9-forum.de/viewtopic.php?f=9&t=27450&sid=feefda3cc386248b0f973e57ff324cac ; where the owner described it happening)
Side note:
Coupe's are quite flimsy. Lifting your car will mean that it will bend. If your car has lots of rust, it has even less stiffness: your doors won't open anymore while in the air. When replacing your sills, you will have to brace it r to prevent sagging/bending. Don't weld in new sills when it's making itself a banana; the doors will never ever shut nicely.
Remember: it is not a cool hobby if you die under there.
I will be expanding this thread with pics and explanations during my coffee breaks and boring meetings, so it ain't finished yet.
Members may recognize their own pictures, as I've harvested from all over the forum.
I've lifted my coupe in a lot of different way during my own resto. Also I've seen quite some interesting things fly by over the forum.
Below is my combined knowledge which means it's just my take on things.
I invite others to share their findings so that this thread will improve itself + combine different views.
E3 inputs welcome; but i have no experience myself.
While working on your car, what is THE best location to lift your car?
It depends a bit on what you want to do with it (full resto or change a wheel), but there are a few things to follow, and a few things not to do.
You run the risk to damage yourself, or worse; your car.
Recommended lifting points in the FRONT
Pic 1. Lift the car by the frame rails in the front, with a wooden plate/rubber block to spread the load + a t-shirt to protect your paint.
Pic 2. Another option is on left and right on the subframe (blue circles).
Pic 3. The BMW tech manual also allows lifting by the center of the subframe, but not for early models with subframes having flat (not corrugated) mid sections.
Recommended lifting points in the REAR
For the rear also a few options:
(1) support under the rear subframe mounts; the large cylindrical rubber dampers.
(2) likewise, you can also lift the ends of the subframe as it is screwed directly to the rubber damper.
(3) The Tech manual also describes lifting by the differential, using a wooden block with a cutout for the oil drain plug.
(4). Under rear trailing arm as in the repair manual
Pics of lifting the FRONT:
1. Rubber pad under frame rails, in the left bottom corner. See the white T-shirt? It's on a rubber block under the frame rails.
2: Front subframe, using the horizontal steel cylinders.
3. 3rd option: Under center of your front subframe, but only if your coupe has a corrugated part as (B), as used on later build years . Here a screenprint of BMW's Tech manual:
If your front subframe does not have a corrugated section, like (A) in pic above, then do not use that as a lifting point; it may bend.
Pics of lifting the REAR:
1. Under rear trailing arm as in the repair manual. Optionally using a wood block under the rear trailing arm:
2. Under the rear subframe itself, just next to the torsion bar attachments; here also with a wooden block to prevent scratches.
3. (under the differential, as instructed in BMW tech manual)
4. Under the rear trailing arm (pic from BMW's own tech manual)
My personal favorite up front: the frame rails.
Pro: It doesn't damage anything if done well! It works even for a complete car (maximum mass). Suitable not for only that wheel change, but also for massive resto work.
Con: be careful to spread the force on the front frame rails with a wooden plate or rubber block. If you use just a jack or axle stand on it, the edges of it will make a depression into the frame rails.
If you have the engine still in the car, but sans interior, rear axle and an empty rear boot/trunk, then the car is really noose heavy. It is then really important to place the support as far forward on the frame rails, close to where it curves upward. Place it too far rearward (more then 15 cm from the curve), and you will tip the car forward on it's nose, falling off your supports. (I could lift the rear end of my car with just a pinky, that's how I learned; it was a close call!)
Picture: this is how far forward you can place the lift point on the front rails:
Do not:
1 Do not lift the car by the lower edge of the sill. The structural part of the inner sill is covered with the black decorative steel cover; it curves under and around the car's inner sill. If you put a jack under the lower edge of the sill, you will just squash the decorative sill and intermediate sill until it is pressed against the lower edge of the inner sill. You will be able to lift the car that way, it is strong enough, but you will have the following permanent squash mark. In the pic below you can see where the mouse pointer is, that the line isn't straight anymore. This is very common on cars handled by non-experts:
I wouldn't want my coupe to be lifted like this:
Because it results in this:
Don't lift here, lift there:
2. Do not lift the car by the middle of the thrust rods, but use the rear, round end of the thrust rod, at the big nut. If you pick the car up, with the lifting pad in the middle, these will bend under the load. Here's a pic of the parts of my car, how it was when i bought it. the bottom one is bend.
3. Do not lift the car by the two 8*8 cm (3 by 3 inch) square box-like sections under the front floor close to the wheel. There is no thick metal above these square boxes. These plates were used by Karmann to haul an empty body through the production line. If you would lift a car by these points, I *think* (but not sure //// EDIT Sept 2023...keep reading! ////) that your floor will develop a dent upward and twist the front tip of the sill.
I wouldn't dare doing it myself, neither have I seen examples of it going wrong, but I've read that people asked if that would be OK as a lifting point
Edit Sept 2023: Now we know what happens if you do use that square box for lifting...First pic show how they placed the lift ing pad under the square metal plate. On the second pic one can clearly see the dent made in left side of the floor (at the top of image):
4. Do not lift your car the by factory sill lifting points, front or rear. Although they are factory, and thus must work on a fresh car, these points are generally considered to be "un-trustable" as the internal structure behind may be rotten. You will only know after lifting if they were strong enough... If you're confident that you have rigid sills they should work however. Picture here is my own car with half rusted sills, but still strong enough to lift my fully equipped car.
But what if the lifting points identified above are rusted out and you want to repair exactly those area's ?
- You can suspend the rear of the car by it's rockers (sills) in the rear, but only with the rear fenders (quarter panels) removed. This allows you to work on the rear axle reinforcement under the rear seat. Without the skin on, the inner sill is the only plate that creates the lower sill edge. As it is 1,5 mm thick, it's enough to lift an empty shell (proven in my car; see picture below with wooden beam across) If the skin would be there, you would squash the lower edge of the rear fender/skin up onto the inner sill edge.
- likewise, with a removed front fender or middle sill (or section of it), you can lift the car by it's front inner sill . This allows you to work on the frame rails. However i would dare that only with an empty shell, not with the engine in.
- you can suspend the rear of the shell on the diff mount. As this is not very stable (single point only), make sure the support in the front is as wide as the tires or the sill. Carefull for the shell to tip left or right. I've done it to be able to work on the rear sill ends, but do use a back up to catch the body if it drops of the diff support you are using (e.g. a stack of 3 rims)
Pictures: 1. with a wooden beam running Left to Right under the middle of car; it is only lifting the edge of the vertical inner sill.
Pic 2: Under rear diff mount; see the standing wooden block on a steel cage in the right side of image.
And you will know if your frame rails are rusted out when this happens: Here the lift managed to lift the rust, but not the car.
(Image from http://www.e9-forum.de/viewtopic.php?f=9&t=27450&sid=feefda3cc386248b0f973e57ff324cac ; where the owner described it happening)
Side note:
Coupe's are quite flimsy. Lifting your car will mean that it will bend. If your car has lots of rust, it has even less stiffness: your doors won't open anymore while in the air. When replacing your sills, you will have to brace it r to prevent sagging/bending. Don't weld in new sills when it's making itself a banana; the doors will never ever shut nicely.
Remember: it is not a cool hobby if you die under there.
Attachments
Last edited: