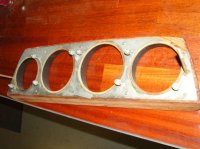
Black instrument surrounds

pmansson

Well-Known Member
Messages
877
Reaction score
31
Location
switzerland and sweden
I needed to remove them on one instrument holder in order to treat the wood.
In the process of applying shrink paint, I had 8 of these surrounds in for the same treatment. I now have 4 of them (as the other 4 are in Sweden).
Anyway, when trying to fit them prior to applying glue, I found that they barely fit at all. Most are either too large or too deep preventing the folded edge to seat firmly against the wood.
With Murphy on my side, I suppose that the 4 that I do not have at the moment are the ones to fit this particular instrument cluster/holder.
These cars really are handbuilt....!!!

Anyone else had issues when refitting these parts????
 
Did you get paint on "outside" of bezels?I had mine powder coated and neglected to instruct them not to paint surface that touches wood.Paint was enough to keep bezels from fitting,had to use wire brush to remove paint.Now they fit.Had several sets from different years and did not notice any difference in bezels or wood dimensions.
 
There are two sizes. The two larger ones are for the spedo and the tach. The two smaller ones are for the clock and fuel/water temp gauges. There is a metal plate behind the wood instrument cluster. See the picture below. The back edge of the black surrounds need to fit snugly into that metal plate NOT just on top of it. It can be maddening trying to push that surround into that metal plate whith the wood cluster installed in the dash. As long as you have two of each size it should not really matter whether the ones you have came from that particular wood cluster. Hope this helps.
 

Attachments

  • SNC13011.jpg
    SNC13011.jpg
    93.2 KB · Views: 402
round hole round hole...

I just checked one bezel in two wood pieces, and the fit seems to be very consistant. Above two posts ring true for me. Dave V. in NC USA
 
Thanks Andre. No paint on outside of bezels. Yes, there are 2 sizes (central and outer instruments). What I didn´t know was that their ends should sit well into the metal plate and NOT just on top of it.

I just checked this on 2 panels, with bezels but without instruments (that I had in my spares dept) and now fully understand the issue.

How on earth do I squeeze the inner edge into the metal plate cutouts, even with cluster on a table without instrument in place??? Using feeler gauges perhaps.

I can understand that it is more or less impossible with the cluster in place. The shortcut would be to grind off a few millimeters on the inner edge of the bezels...
 
Snapping the bezels into the back metal plate is what's actually holding the bezels in place. If you start grinding, then you will need to glue the bezels to the wood. If you decide to start grinding I would suggest you grind the edges of the metal plate and not the bezels as they are fairly tin and delicate. A Dremel is perfect for that job.
 
Thanks again Andre.
Knowing myself, I will probably do it properly (i.e. remove the cluster).

What do you mean by snapping the rim into holes of the metal backplate?
I can envisage shoehorning it in place with a feeler gauge of suitable thickness, but snapping....? Can they not be snapped into place with the cluster and instruments mounted?

Obviously easer done on a table with the instruments out, and a good light, and a cold beer!!

The tan, paper? seals are in place. I glued them onto the metal backplate.

Grinding the back plate with the cluster in place, calls for turning the instruments and pushing them back to avoid damage with the Dremel....
I might consider this option, if I cannot "snap" them in place...
 
The Bezel has to be pushed in so that the end snaps in to the metal hole. It has to be aligned perfectly to do this by hand. It is obviously better if you have the whole wood cluster out from the dash. You cannot "shoehorn " it with anything. You will bend the bezel then you'll be up a creek, fjord, in Sweeden.
 
Back
Top