I am in need of advice.
I purchased my 3.0 cs of 1973 roughly 2 years ago ad have driven it ~8000 km's since. It has given me no real problems, so i'm about to tackle some rust this winter to make it even better.
Floors and rockers are quite ok, but there just this one place that i don't know how to tackle.
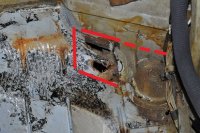
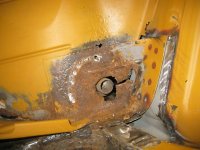
The area that has me puzzeled is under the rear seat, where the left and right attachement points of the rear subframe are.
The floor is rusted through, but the reinforcement plate's seem to be solid, see attached photo.
2 questions;
-are there NOS/replacement parts for this, or do I have to chop up another body for this?
- I was wondering if i could replace the part from the underside, without removing the reinforcement brackets? Should I make a little jig, keeping the reinforcement brackets and attachment points firmly in place, while taking out the rear subframe, and welding all from underneath the car?
Bodywork is still quite new to me, so any tips, tricks & hints are welcome.
I'm not taking on the whole body, but what I fix, I wanna fix well.
Advise on 'howto' is welcome.
Regards, Erik.
I purchased my 3.0 cs of 1973 roughly 2 years ago ad have driven it ~8000 km's since. It has given me no real problems, so i'm about to tackle some rust this winter to make it even better.
Floors and rockers are quite ok, but there just this one place that i don't know how to tackle.
The area that has me puzzeled is under the rear seat, where the left and right attachement points of the rear subframe are.
The floor is rusted through, but the reinforcement plate's seem to be solid, see attached photo.
2 questions;
-are there NOS/replacement parts for this, or do I have to chop up another body for this?
- I was wondering if i could replace the part from the underside, without removing the reinforcement brackets? Should I make a little jig, keeping the reinforcement brackets and attachment points firmly in place, while taking out the rear subframe, and welding all from underneath the car?
Bodywork is still quite new to me, so any tips, tricks & hints are welcome.
I'm not taking on the whole body, but what I fix, I wanna fix well.
Advise on 'howto' is welcome.
Regards, Erik.