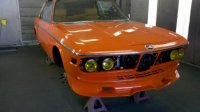
Build Process Picture Set

rb1971

Well-Known Member
Messages
531
Reaction score
2
Location
Bay Area, USA
For a while I have been promising (threatening?) to do a complete write-up of my car restoration. It was a ton of work, and we did a lot of small things and a couple of big things that I think will be interesting to the group.

Unfortunately life finds a way of intervening, and I don't see any way to do justice to the project at least until the end of the year, but I thought folks might be interested in a link to flickr that has a lot of the pics from the entirety of the build process.

It was great fun to be involved in doing this, the people that I've worked with could not have been better, and I can't say how much I have appreciated all the help from people on the board and folks like Dan (CoupeGuy) and Carl and Ben down at La Jolla.

I also owe some folks info about various things on the build - please feel free to shoot me another PM or ask here and I will do my best to answer. I know for example someone asked about our air intake system - there should be some pics of that setup in here.

http://www.flickr.com/photos/25295657@N00/sets/72157627708348117/
 
John,

That is one great coupe! Love the HREs. I've got one nit to pik, the car looks it looks like it is riding a bit high; otherwise, it looks flawless. I was the one who asked for the pics of the intake for ideas on my (ongoing) project. It looks like you used the factory air intake but fabricated a custom box that mounts behind the left headlight. Is this correct? How big of an opening did you cut? How did you mount the custom box? Was there any other mods required? Are there more pictures of this area/work. Thanks. My project is finally close to being done. I had to turn my coupe over to a gentlemen that Don Lawrence recommended who will finish it up.


Walter
 
Wow, that took dedication. Are you a Pro or hobbyist? Great work.
 
Just a question, did you phosphoric acid dip it like Don in the UK did (see link below) and I did here on the west coast of the USA?
If not how did you remove rust and clean in the seams and in all closed compartments? Plus inside the roof post, inside the rockers, inside the front frame and the tight stuff like inside the door post, under the hood and trunk lid plus much more?
Just curious how they told you to do it?

Don’s coupe acid dip in the UK
http://www.e9coupe.com/forum/showthread.php?t=8523&page=2
 
GTS Classic Seats

May I ask you to descibe your experience with GTS Classics and the whole interior restoration? The seats look great! Did you supply your own material? How was the install? Would you recommend it?

Thanks!
 
Walter- I will grab a few more pics of the air intake. Basically, we created a pressurized box between the engine and the front panel, then have a hole about 3.5" in diameter that allows a connector to a pipe that brings cold air from inside the front of the wheel well. The car now has a front air dam, and we are considering plumbing to the air intake built into that. But maybe not, might make sense to leave it as is.

Nicad- Not a pro, but know several great mechanics and body men.

d-ace- I don't care for the acid dip process. We started with a reasonably solid body (one of the reasons I didn't get a sunroof car), media blasted that down to bare metal, then replaced a lot of the components that were not quite up to my standards (e.g. the quarters). We also opened the closed bits and repaired where necessary, and added rustproofing material inside the compartments to prevent future issues. Plus a lot of the major rust areas (floor panels, trunk floor) were wholesale replaced and upgraded as part of the reinforcement of the chassis generally. There are tons of pics on this process, which probably took about 5-6 months.

mh01919- Stefan at GTS was a pleasure to deal with. His seats are very attractive and comfortable (plus you can get them heated - cheaply!). One caution is that the brackets he originally supplied were not right - probably for a 2002 instead of an E9 - but he took them back and sent me replacements no problem. I went with a nice caramel leather out the materials he suggested, and bought additional material to recover the rears, which was done locally. My local shop also replaced the headliner with a nice suede. As an aside, the whole inside is also dynomatted for sound and heat reduction.
 
Your firewall/front fender work was identical to what I did on mine. I bought a pinch spot welder so I didn't have to plug weld the sheet metal parts. I am not sure that it is better, but it looks more original.
 
What type of primer and paint did you use on the underside?
 
I understand your point of view about the sunroof and 5-6 months to do the work if not more plus not doing patchwork and replacing panels, excellent. Although it is difficult to understand your subtle opinion on acid dipping,” I don't care for the acid dip process” sounds a bit uninformed.
What was the problem?
After the body is completely submerged in acid final and end result is extensive cleaning of the body including all seams and closed compartments. Plus it is the only way to really know what you have for sound metal with all rust removed everywhere. Shops are well aware a media blaster even a soda blast will only clean what you can point the gun at although use it because that is all they have in-house especially in California. It takes a specialized high-end restoration shop that does this kind of phosphoric acid dipping work not just an auto body collision repair shop and they are getting hard to find now days.
 
I don't care for the acid dip process” sounds a bit uninformed.
What was the problem?

Environmental hazards? Plus it was just unnecessary for my car.

I know you have religion on this point and I'm not interested in a prolonged discussion. If anyone car find any rust on my car I'll give it to them.
 
What type of primer and paint did you use on the underside?

I believe it was Rhinoliner (or if it wasn't that brand, it was the same idea). Primer was as-recommended by the vendor - I can't remember right now what it was.
 
Added a bunch more pics that I thought were already in the photo stream, as well as a few pics today now that the car has had its spoiler added and painted.
 

Attachments

  • securedownload.jpg
    securedownload.jpg
    22.5 KB · Views: 273
How long did that take to do? Great photo documentation. .
 
How long did that take to do? Great photo documentation. .

The spoiler took about a week of work to form fit to the body and a day in the paint booth. The project started last May and was generally drivable by this July (~14 months) - including a few months of prep work and part collection, 5-6 months of body work (disassembly, problem identification, problem rectification and paint) and about 3 months to put everything back together on the final car. But of course it's never really done.
 
Last edited:
That car looks like tons of fun. The rear ST sway bar - which hole did you use? Looks like the centre hole, which is what I have on mine, but I'm At least 50hp under what you run with.

Very nice car,

Doug
 
OK, just added a bunch more photos that my wife took and had on her computer. Taken the first week I was on the road back in July. She has a great eye, this is one of my favs.

6228313797
 
“Environmental hazards?”
It’s a car, it is an environmental hazards, that sounds like the “EPA” and one reason why we have water base paints that only last about 10 years here in California now days. You know after and acid tank it goes in a neutralizing tank for 3 days mind did then pressure washed.

Your paint job does look good, no doubt.

Restoring cars to some is a religion; I have seen cars done this way in acid starting with American mussel cars to Mercedes-Benz Gullwing’s and many Porches since the 1960’s. Anyone that would like to get up to speed restoring this way and save yourself some time cleaning everything to bare metal check out one of the real restoration shop on the west coast that does this every day >> http://www.metaldipping.com/process.php?PHPSESSID=c9ed7b50018dcc05f3c41200de755fd8
 
nice pipes!

Can you describe what you used for your exhaust system, how you went about it and how it sounds? Looks very cool! I love the color! Nice work
 
Can you describe what you used for your exhaust system, how you went about it and how it sounds?

Sure thing. There's a thread I started a while ago on this (see below), but pretty early on in the process when I decided to do a full super modified approach, I decided to go with a racing fuel cell. This led to tubbing out the trunk (and removing the spare tire). The side-bar good news here was that both we were able to increase the structural rigidity with stringers where the spare tire and fuel tank normally sit, and it solved the clearance problem that the original coupes had that led to the relatively restricted exhaust.

The whole system was a custom build by an exhaust specialist recommended by Remus. The hangers are actually real BMW equipment (E46 M3 if I remember correctly). Originally it didn't have resonators, but that was way too loud even for a weekender.

http://www.e9coupe.com/forum/showthread.php?t=9144
 
Back
Top