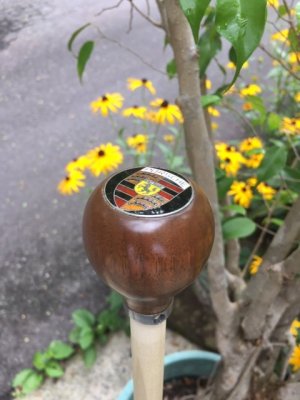
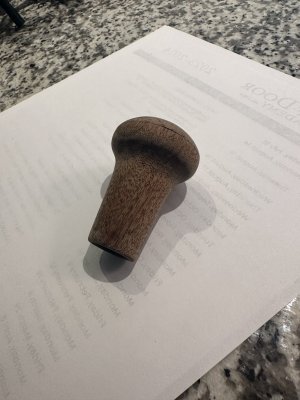
I know you're out there and have seen your work - how do you suggest I refinish this wood knob? The top laquer is about to rub off to expose the wood and I would like to bring it back to satin. Thanks.

You are using an out of date browser. It may not display this or other websites correctly.
You should upgrade or use an alternative browser.
You should upgrade or use an alternative browser.
Calling all woodworkers - shift knob refinish
- Thread starter Stevehose
- Start date
Dave V is your man!
I know you're out there and have seen your work - how do you suggest I refinish this wood knob? The top laquer is about to rub off to expose the wood and I would like to bring it back to satin. Thanks.
View attachment 162950
Being such a small thing I would do like with old furniture,
first try 0000 steel wool to smooth the surface, then use a sealer, apply with brush, let it dry, again sand with steel wool put another layer, dry, and finish with steel wool, or a cloth with some polishing compound, for extra shine you can use a rotational tool
laquer in spray would be difficult to apply and avoid drops
I would hand sand it down.
Then choice of oil or paint. I've got no experience with oils; perhaps others do.
If you choose to paint, I would choose a 2k satin clearcoat. 2k because hand sweat + UV is quite agressive for paints. Spray light coats to avoid drips. A first or intermediate layer cannot be too thin, only the last layer can.
Better 4 light coats then 1 with drips.
To get an even coverage, you might want to place the knob on a stick allowing you to easily spin it while painting it.
Might even mount it on a cordless drill and rotate at a low speed while painting.
We want to see results once done!
By the way, I've seen a few of these knobs; yours seem to have a solid cap on top. Is that original?
I've also seen massive single piece knobs; not sure if they are (prriod) correct or not. Any insights?
This was a knob with a tired, mostly worn finish, that I just sanded, IIRC, with 220 and then probably 280 grit dry paper...color will depend on how bleached the walnut under that top coat is.
On this one, from a 356, I think I wet (water and paper towel, or maybe I just licked it...every wood guy has done it ..) it to see what the color would look like..It didn't need any stain, so...I finished sanding on a dowel rod, as shown. (I masked the logo and bottom in this case), and just started (as Erik just said) spraying light coats (probably 4 or 5) of Minwax satin polyurethane, following their recommended dry times between coats) while rotating the dowel. Always spray the can upside down until clear air to ensure the nozzle stays clean after each application, of course. Rattle-cans have come a long way as to how well the spray nozzles patterns apply product...
I may have rubbed this knob with Meguire's headlight polish, Plastix, after a week or so of curing...gives a nice luster. Need a higher sheen?...use a hand buffer. This knob is Bjoe's on this forum now...if you need a witness.
On this one, from a 356, I think I wet (water and paper towel, or maybe I just licked it...every wood guy has done it
I may have rubbed this knob with Meguire's headlight polish, Plastix, after a week or so of curing...gives a nice luster. Need a higher sheen?...use a hand buffer. This knob is Bjoe's on this forum now...if you need a witness.
Attachments
Well my 2 cents.
1) There is a product by "Klean" called after wash, consistency of water, at HD. Pour some into a cup, use 0000 steel wool to dip, then sand off the old varnish. Wipe with paper towels as you go to get off the old stuff. This stuff is a stripper but more mild but still use gloves and do outside. This will minimize any actual wood from being sanded.
2) If you use poly, do as Dave said but USE OIL BASED poly. Also oil-based stain if you chose to alter the color. The water based stuff just does not hold up. I sand with 0000 steel wool between coats. I actually only use one coat because I like some of the grain to stand out, don't like many coats so it is totally slick .
3) Alternative is to use the USC SprayMax 2k clear coat that I and Stan have used on our Bus wheels. Same thing, spray and sand between coats.
4) The lick maneuver, well I do it too.
5) You may be tempted to use some poly used on boats like the Helmsman stuff from Minwax since it holds up better to UV light. The stuff is so hard that it cannot tolerate temp swings, it will just start to crack and peel.
1) Sound similar to the old Homer Formby stuff? That's a good alternative to sanding, especially for a knob with no logo.
2) Thumbs up, yes.
5) I know a friend had his coupe wood done (beautifully) in a highly figured cherry, then the topcoat was a catalyzed lacquer, which is very hard, alcohol resistant, etc....but just as Rob says about the boat finish product, it cracked everywhere, not long after installed in his coupe. Heartbreak...
Well I went ahead and did this before the expert advice chimed in, I rubbed off as much of the old varnish as I could with iso alcohol then very lightly sanded the rest off with 400 grit.

Then several coats of thinned satin poly (I used water based - wish I hadn't but we'll see if it holds up) and held upright on a screwdriver while brushing. I bought the knob NOS (yes @eriknetherlands it has a cap and they came that way, also the manufacturer shaping marks to round it out are evident) and you could always "feel" the grain, it wasn't entombed in thick varnish so I kept that aspect - protected but still tactile. Good enough for now and moving on to the myriad of other projects I've created for myself:

Then several coats of thinned satin poly (I used water based - wish I hadn't but we'll see if it holds up) and held upright on a screwdriver while brushing. I bought the knob NOS (yes @eriknetherlands it has a cap and they came that way, also the manufacturer shaping marks to round it out are evident) and you could always "feel" the grain, it wasn't entombed in thick varnish so I kept that aspect - protected but still tactile. Good enough for now and moving on to the myriad of other projects I've created for myself:
Attachments
If that doesn't hold up, resand and try this: mix equal parts linseed oil and tung oil, warm slightly and blend in a small amount carnuba wax. Apply liberally warm to the wood.
Let soak overnight, rub off excess, buff.
Buddy of mine uses this on his firearms to finish and maintain wood stocks.
Let soak overnight, rub off excess, buff.
Buddy of mine uses this on his firearms to finish and maintain wood stocks.
That top layer of veneer is pretty thin so I wouldn't apply anything that could soak into the veneer wood cap and upset the old glue holding the cap on. I have one where the veneer cap has come off and it's quite thin. A wonder they went through the trouble of turning the knob to create that small lip so the veneer cap could be used.
I believe these are the correct shift knobs for CSL's ....
I believe these are the correct shift knobs for CSL's ....
If all else fails you might ask Elihu at https://www.customwoodshiftknobs.com/ to a solid one.


