Dash & evaporator housing question ?

John Buchtenkirch

Well-Known Member
Messages
650
Reaction score
7
Location
Glen Cove, Long Island, NY
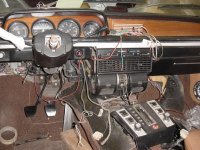
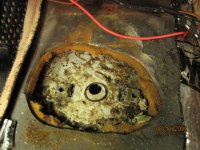
Surprise, surprise, I found a small rust hole in the top of the transmission tunnel :-| after the automatic was dropped !

!1abc44.JPG
Apparently there was no drain hose on the evaporator housing so some of the water ended up on top of the tunnel. Does anyone know if it’s possible to lift that evaporator housing up a ½” or so without pulling the dash & breaking AC connections so I can slip a piece of sheet metal under it for a heat shield ? Then I could weld in a proper patch.
!1abc45.jpg
!1abc46.jpg
If not I will hit it with Navel Jelly & paint and pop rivet in a temporary patch, a hole that small certainly isn’t a structural problem. Is there enough of a neck protruding from the bottom of the evaporator housing for me to slip on a drain house by pushing it up from the tunnel ? I’m waiting for parts being shipped from California so now is a good time to take care of this little problem. Other than that I have made some progress :):) by installing the Bavaria pedals and steering column top half without the slush box indicator. Thank you :-D for everyone’s help. ~ John Buchtenkirch
 
A/ C area

John,

The a/c drain just has that grommet. I'd make sure it's clear with an awl.

I'm 99% sure it's not possible to raise the thing since you're likely to break that drain seal and it's bolted serveral different ways to other parts that are bolted as well.:cry:

I would double check the left side of the case and make sure the cover is in tact.

On the patch- this is one time I'd say use panel adhesive from below even for old school guys. Just for everyone else- clean the area well 1/2 out, trace the hole, cut your patch at least 1/2 out, flange it, panel adhesive, jack with block of wood to hold in place, finish, and undercoat.

Good luck....
 
Thanks for reminding me about panel adhesive, it wasn’t even invented back when I was a heavy man (structural collision specialist) so not having used it, I don’t generally think of it. The rubber grommet attaches to evaporator housing or to the floor ? Bart called me about an hour ago and said we should pull the housing out of the Bavaria to see how the drain is set up, does anyone know if the Bavaria & the coupe share the same evaporator ? ~ John Buchtenkirch
 
A/C

The a/c is the same for both cars.

That rubber is just sitting there. Sealed by compression. By breaking the seal, I just meant disturbing it.

The box is bolted to the firewall. The fresh air panel is bolted to the dash. Not a quick job for such a small patch.

Yep, I'm not one to think about panel adhesive , but it's watertight. It works.
 
John,

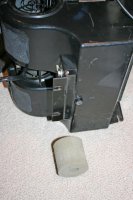
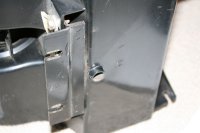
Here are a couple of photos of the bottom of the AC housing. The new seal I received from MobileTradition is the large foam thing at the bottom of the photo. It compresses and is a bit sticky, but does not seem like a very good solution (open cell foam absorbs water). I am considering another option of making a short section of flanged pipe that would cover the 1/2" diameter of the drain and stick down into the tunnel. This path for the condensate also seems like it could let in air (gases) from below regardless of the drain/seal solution.
 

Attachments

  • ACwithGasket.jpg
    ACwithGasket.jpg
    68 KB · Views: 139
  • ACDrain.jpg
    ACDrain.jpg
    44.8 KB · Views: 139
timely topic

This is almost exactly where I am with my ongoing (and going and going....) A/C conversion in my CSi. Thanks for reminding me to check out the drain hole. And no, you'll never be able to lift up the evaporator to do any work, I just installed mine and there is like ZERO extra clearance. Maybe slip in a piece of sheet metal

Not to hijack but how are the side panels of the console attached? Are the screws screwed directly into the tunnel or are there clips attached to the tunnel then the panels are screwed to the clips?
 
So the only way to check/clear this hole with the evaporator in place is with a coat hanger or such from below the tranny or is this even possible?
 
A/C, drain, panel attachment, and cleanout.

Guys,


Sven- if that grommet that you have is open cell , I wouldn't recommend using it. I'd go find a rubber grommet as in used for wiring harnesses. For the sticky part, I'd use a product called permagum, used in commercial refridgeration to assemble air conditioners and drain pans. I've never seen it get hard. Comes in a small box or rolls.

Bwana- that plate on the floor has four tabs, each has a hole for a sheetmetal clip for those black screws. The front switch panel has the same.

Alignment and new stereo- my former problem- the sides droop down at the dash brushed aluminum strip and there's an annoying gap, and sometimes squeak/ rub/ screw up the vinyl on the top edge.

The plate or bracket- it's a bit of a trial and error, but what happens is that plate or arms bend down. bend them back up, and cut a wedge if needed to hold them whereby the panel stays up properly.

The little sheetmetal body clips ( Speaker clips) have to be tight on the tabs or arms. Beginning at the bottom front screw- use and awl and align that clip back to the panel hole or the panel will slip down again. Then the one above that, and finally the rear. The right side has a bolt in that location.

Shifter area, blocks of wood either side- look where the shifter top plate screws down inside and make sure the metal clips are firmly attached by the ****ty little screws or go one size larger if they've wobbled out. Across the front edge, there's another metal bracket holding both sides together. If your panel gap back at the top at the dash isn't quite right- shim that plate up. Double check that the two screws that hold the top shifter plate closest to the hand brake fit and firmly holds down the top shifter plate/wood.

Get your stereo wired up including anything you might do in the future and move the wiring around to the side so all you have to do is take off one side for access.


Steve- yep that's it. Maybe a can of air and a long piece of vacumn hose. The box is fiberglass/ composite so I've never heard of rust or gunk. Tight but possible.
 
Last edited:
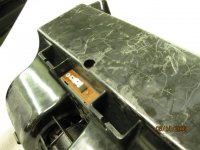
This is what I found when I re-did my AC. Who ever restored the car for the PO decided to cut off the nipple at the bottom of the housing. So, water was never getting to the outside.

As you can see in the pic's I opened up the drain hole in the floor and inserted a small funnel to the outside. Cut it off above flush. Gluded it in place. Gluded a rubber washer over the top. Then Dyna Matted around the area. On the bottom of the housing I glued a step rubber washer that would fit into the funnell. No issues so far. I hope this will work for a long time !!


Good luck,
Steve
 

Attachments

  • 9-13 011.jpg
    9-13 011.jpg
    58.4 KB · Views: 131
  • 9-13 012.jpg
    9-13 012.jpg
    77.5 KB · Views: 128
  • 9-13 014.jpg
    9-13 014.jpg
    44.1 KB · Views: 128
  • 9-13 019.jpg
    9-13 019.jpg
    45.7 KB · Views: 137
  • 9-13 020.jpg
    9-13 020.jpg
    44 KB · Views: 128
Question for John

The red button on the shifter plate- "go baby go?" Juiced e9?:mrgreen:
 
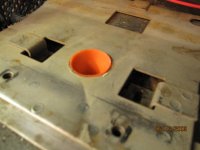
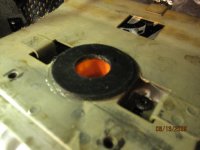
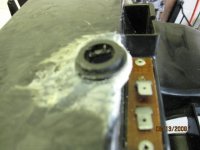
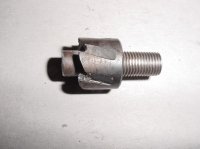
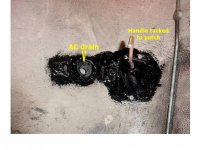
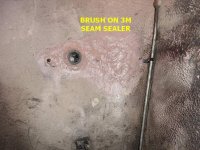
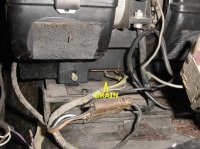
I ended opening up the 3/8” hole for AC drain to 7/8” with a hole saw with a special center I made from an old bolt. A short piece of 5/8” heater hose slipped over the drain nipple in the evaporator housing and was glued on with silicon. I made an oversized sheet metal patch for the hole which I attached with 3 stainless rivets. I tacked on a welding rod for a handle to maneuver the patch thru the hole in the floor and to line up the rivet holes. Everything was painted before assembling. The final step was to seal all cracks & openings with 3M brush on seam sealer. I don’t consider it a legitimate repair (it’s not welded in) but it will get me by till I re-paint & fully restore the car some day. It did save me from pulling the evaporator box :-D:-D:-D.

I did cut and fold back the interior sound deadener to see how localized the rust was and I agree with someone’s observation that the water must be held by the foam ring like a sponge, I’m very lucky, the rust hasn’t seemed to travel. My actual evaporator core only measured 1 1/8” up from the metal floor, something to keep in mind if you’re going to use a coat hanger to clear your drain. The red button I was asked about is actually a red light for an old burglar alarm. ~ John Buchtenkirch
!1abc47.jpg

!1abc48.jpg

!1abc49.jpg
 
always a good idea to test your thermocouple before you install- I get a laugh out the hysteris of those old units.
 
Back
Top