thehackmechanic
Well-Known Member
I have a pair of Recaros that I installed last month. I had bought and installed a set of home made adapter brackets from a poster on this forum, but they were too tall and the seat angle was wrong, so I went back to basics.
The original seats on my '73 3.0CSi have holes that are 13 3/8" apart front-to-back and 19 1/2" apart side-to-side. The holes on the bottom of the Recaros are 10 1/4" front-to-back (using the two holes that are the farthest apart) and 16" side-to-side.
If you work it out, that means that any adapter bracket has to move the holes 1.75" outward from the Recaros, and then have properly spaced holes downtrack to accept the sliders.
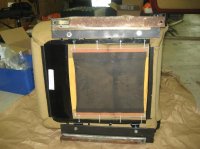
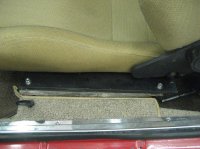
I took some 3/16" aluminum stock and cut two 3" by 15" pieces. I scribed lines down each piece that were 1.75" apart and equally set in from the sides. On one scribed line I punched two marks 13 3/8" apart, equally set in from the edges. On the other scribed line I punched two marks 10 1/4" apart, again, equally set in from the edges. I then drilled holes larger than they needed to be to afford some play. I painted the brackets black, bolted them to the bottom of the seat, then bolted the sliders to them. In the photos, you can see that the back of the bracket is longer than it needs to be because of course I measured wrong and was long by an inch (at least I wasn't short by an inch).
It works perfectly. As other folks have reported, the base of the Recaro is tilted unnaturally back, so you need to lift the back of the seat slightly to level it out. I used extra long metric bolts to thread into the base of the seat and shimmed it with 1/4" washers (the hole size, not the thickness) between the seat and the bracket. I'd put in a few washers, then drive the car around the block to test how the seat angle felt. The magic number was 12 washers, which raised the back of the base of the seat about 0.7".
At some point I'll take some black touch-up paint to the nuts, bolts and washers to make them blend into the black of the brackets.
This is a very easy thing to do. Grab those Recaros if you find them, and make your own brackets.
--Rob


