I am in the middle of restoring my front door window regulator and entering the rabbit hole of "while I'm here". Part of that is doing everything possible to reduce the various noises the door makes either when closing or even when driving.
First Chris mentioned that there are 3 grommets that keep the door latch rods from banging around inside the door.
Then there is the obvious grey or beige plastic cover that over the door latch on the outer end of the door.
Finally, in this older thread https://e9coupe.com/forum/threads/not-a-restoration-3.7847/ Stevehose brings up that there is a plastic sleeve that is supposed to goes over the rod going to the inside door latch handle.
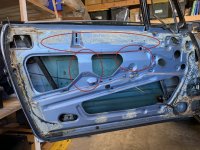
After doing some knocking around to see what else was vibrating, I noticed that the inside door skin has several areas that are thin and vibrating. See pic. Many people put some sound proofing on the outer door skin but I am thinking of placing a few pieces of Dynamat behind the areas outlined below. Behind, so their thickness would not get in the way of the door card. I know that several prefer the spray on stuff to eliminate the possibility of dynamat falling off but these will be smaller pieces and I am doing a thorough prep with acetone so it should last a good while. These would obviously be placed in areas where they would not impede with anything. Has anyone else done anything to that inside door skin?
First Chris mentioned that there are 3 grommets that keep the door latch rods from banging around inside the door.
Then there is the obvious grey or beige plastic cover that over the door latch on the outer end of the door.
Finally, in this older thread https://e9coupe.com/forum/threads/not-a-restoration-3.7847/ Stevehose brings up that there is a plastic sleeve that is supposed to goes over the rod going to the inside door latch handle.
After doing some knocking around to see what else was vibrating, I noticed that the inside door skin has several areas that are thin and vibrating. See pic. Many people put some sound proofing on the outer door skin but I am thinking of placing a few pieces of Dynamat behind the areas outlined below. Behind, so their thickness would not get in the way of the door card. I know that several prefer the spray on stuff to eliminate the possibility of dynamat falling off but these will be smaller pieces and I am doing a thorough prep with acetone so it should last a good while. These would obviously be placed in areas where they would not impede with anything. Has anyone else done anything to that inside door skin?