Door window installation

pmansson

Well-Known Member
Messages
877
Reaction score
31
Location
switzerland and sweden
I had everything in the door out except the large, chrome vent window frame.
Cleaned everything down to bare metal, and used appropriate oils and greases for various parts. I now have the window back in place with loose adjustment plates at the rear, esp the black rail that runs from near the door lock, slanting down and forward.

I also changed the U-shaped felt at the front of the door window (and the vent window rubber seal). The new felt makes the window movement very hard by hand (the window mechanism with motor and gearbox goes in tomorrow).
The tightness might also be due to the fact that I haven´t adjusted the rear black rail, but as it is still not fully tightened it shouldn´t affect the movement of the glass (easier if anything?).

Any tips/hints from the board to make the remaining job easier and the result better.....?
 
Hi Peder,

Don't forget the plastic stop at the top of the rail, that stops the glass when closing. It prevents it from going too high in the rail, and may cause destruction of the glass when closing (if not properly adjusted)-with the rear fender.
And BTW, never slam the door while adjusting !!!!
 
All I can advise you is that getting all of the window components aligned is a big, big job. When I painted my coupe last year, I had everything out, including the chrome piece that supports the vent window, and front window track. I did not replace the "U" shaped felt that the window slides in.

If your window is tight in the front track, you will need to solve that problem before proceeding. Is it tight because the new felt is too thick? Or, might the glass be binding somewhere else, or not properly aligned with the "U"?

Basicly, I worked from the hinge side of the door back to the lock side, trying to get things to move smoothly as I added more components. Don't bother installing the window motors & lift arms until the window is moving very easily - the motor doesn't have enough power to overcome a stiff window.

Part of the challenge is that you are trying to accomplish two things: install the window channels so that the glass moves easily, and aligning the vent window + main window so that they fit tightly against the rubber seals. Of course, as you make adjustments that improve one of these, it will degrade the other.

Good Luck!
 
Thanks,
I deliberately did not remove the large, chromed vent window holder as I know how hard this is to reinstall correctly (and there was no need to remove it).

The issue now seems to be the new U-shaped felt which is too tight on the glass, making it hard to move up and down. Sofar I got it all the way up, by pushing hard from underneath. I thought I would leave it for a few days and see if the glass itself can open it up a bit...??

I got the small rubber piece at the top nicely installed (it stays and doesn´t fall forward(backward really)). Good joint against the felt.

Perhaps some teflon grease/spray in the felt channel would help??

I haven´t installed the window regulator with motor and gearbox yet. I think the motor is actually quite strong and would be able to move the glass up and down. I´ll wait a few days anyway.
 
I am advancing slowly. With oil and grease on most parts in the doors, it is a very messy job, besides being difficult and time consuming.
The rear, slanting, black rails are now in place, still with somewhat loose settings.
These cars must have taken such a long time to build. Serial production: yes, but at what pace....?

Somebody I know well remembers having heard that a very high percentage of the cars were sent back from dealerships to BMW or Munich as there were too many faults, esp with body alignment (read doors in particular). Apparently BMW never made much money on these cars, which proves the point as they were exceptionally expensive. They were just about twice as expensive as a Jaguar E-type in the early 70s !!!! (in Europe at least).

I cannot understand why the small gearbox, that mounts onto the window regulator, has 2 mounting points well arranged with a collar on the box that seats properly into the holes on the regulator, while the 3rd screw (the recessed Philips screw) leaves the collar sitting on top of the flat surface on the regulator...? I makes the gearbox slant !!

A previous owner had done away with the thin alu frame around the electric motors.
God knows what purpose it has, but I am now locating a set.

The vent window rubber seal was quick and easy to install.

The vent window opening mechanism is always tricky, as it is made of a very poor alloy at the point with the most stress. I managed to break one in the process (but have a bag full of them). I installed newly rechromed frames with old glass (as new glass doesn´t fit 100%. It actually leaves 2 corners slightly open as the glass cutters haven´t gotten it right).

No more than 2 hours a day is what I limit my efforts to !!!
 
These cars must have taken such a long time to build. Serial production: yes, but at what pace....?

I had the same thought as I was assembling my doors. Sure, the guys on the assembly line had the benefit of experience and perhaps some jigs to align the window assembly. But still, there are a lot of pieces, and many adjustment points. How long did it take to assemble these cars?
 
It´s an ongoing process. In Sweden and Switzerland we have a couple of months every year when these sweet cars prefer to stay in a garage....quite different to your year round comfortable weather in CA.
That gives me the opportunity to work on the "to do list". I have done some work in the doors before, but only once have I taken 90% apart. That was in the mid 80s on my father´s old Chamonix 2800CS. In fact I installed tinted glass all around at that time.

The current project is my Granatrot met. CSi, where the windows have been very slow for far too long. I took the opportunity to rechrome the long parts to which the squegee rubber parts are mounted. Rechroming of the vent glass surrounds is necessary on most of the coupes as the manufacturer of that particular part used a cheap (probably without copper bath before chromium bath) process back in the early 70s. I have found that the chrome on these is never on par with the (large, outer) vent window frames.

The lock mechanisms were covered in a yellowish, very stale stuff that might have been some sort of grease many years ago. Performed more like glue by now. I cleaned them thoroughly and applied engine oil to all moving parts. In fact they are oily all over the place now and move very freely in all directions.

A broken screw blocked one of the four mounting points for the window regulator. That took some work to sort out.

2 small, plastic rings in the lock mechnism were missing or broken. They hold the links to the locking pin and door opener and prevent noise when closing the door, as well as avoiding the slight slack in movement.

Rust preventing "creep" oil was also applied in all angled corner sections.

It´s just nice to know that everything is in good shape and working properly.
I don´t record the time spent.

I still haven´t fully sorted out the door glass mounting. It´s still far too stiff and I don´t know exactly where the problem lies. Drivers door is worse than passenger door.
 
I need help

If you look in the 5th posting above, by myself, and the 3rd paragraph about the gearbox not mountin flush with the regulator, this really beats me.
The result is that the gearbox is tilted/not flush with the regulator plate. This means that there is no room for the manual assistance via the plastic cogwheel...

I have checked the parts book to see if the front and rear gearboxes have different numbers, whereby the front ones would have no collar on the mounting point for the recessed Philips screw (mounted though the hole in the arm of the regulator), but they are all the same. The collar diameter is 8mm and the hole for the Philips screw is 6mm.

I am going mad about this. It would seem that I have missed something but I cannot find out what. The gearbox can only mount in one way on the regulator.

Has anybody got a regulator out of the car, with the gearbox mounted, in order to check on this. Please..........
 
Hi peder,

Getting my car back-normally- this week.
All I can do is-inside panel removed- taking as much pics as needed.
Could you do so to compare (via pm) ?
 
Has anybody got a regulator out of the car, with the gearbox mounted, in order to check on this. Please..........
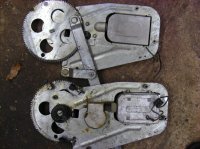
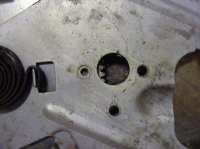
Do these pictures help?
 

Attachments

  • DSCN6807.jpg
    DSCN6807.jpg
    96.6 KB · Views: 145
  • DSCN6808.jpg
    DSCN6808.jpg
    97.6 KB · Views: 123
  • DSCN6810.jpg
    DSCN6810.jpg
    93 KB · Views: 120
  • DSCN6811.jpg
    DSCN6811.jpg
    92.7 KB · Views: 130
New Pictures

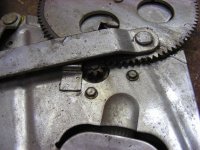
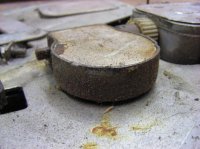
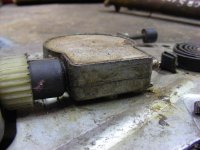
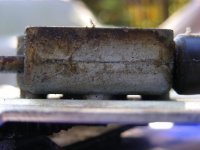
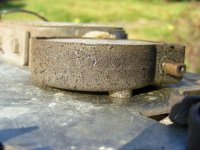
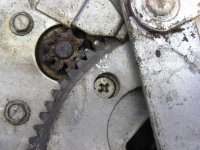
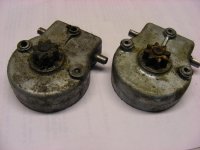
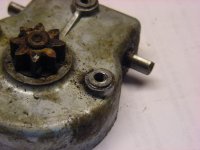
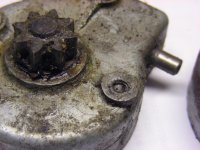
Here are some more pictures to show the fit of the gearbox to the regulator frame.

The second shows the gearbox sitting on its 3 little legs above the regulator frame.

The first shows the leg that is attached by the screw that is under the big gear wheel on the regulator frame.

The third shows the fit of the screw head under the big gear.

(The order of the pictures got shuffled after I attached them!)
 

Attachments

  • DSCN6823.jpg
    DSCN6823.jpg
    87.4 KB · Views: 105
  • DSCN6825.jpg
    DSCN6825.jpg
    95.7 KB · Views: 102
  • DSCN6831.jpg
    DSCN6831.jpg
    98.1 KB · Views: 104
The gearbox mystery

Thanks Bill,
we are getting very close to the problem.
My issue is that the collar of the 3rd mounting point of the gearbox (the one which is tied to the regulator via the recessed Philips screw), does not fit in the hole of the regulator.

To put it in a different way; one of the 3 holes in the regulator (for attaching the gearbox) is 2mm smaller than the other 2 holes.....Therefore the collar of the gearbox (for the recessed Philips screw) does not sink in as they do with the others. This makes the gearbox tilt and not seat as firmly as the other 2.

Do you see my point?
If you take the gearbox out (beware of the spring forcing the arm in one direction) and check the size of the holes, you might discover what beats me.....(one hole is 2mm smaller. 6 instead of 8mm if I recall correctly).

Peder
 
OK, I understand the problem now.

On the regulator frame, the hole for the screw is smaller than the other two. See second picture - the lower right leg on each gearbox.

On some gearboxes, the little leg that the screw goes into does not have a collar. See second, third and fourth pictures

I only had 3 spare gearboxes handy and only one of those did not have the collar on all 3 legs. I had not previously realized there was any difference between gearboxes.

In your position, I think I would file down the third leg that the screw goes into. In other words, make it look like the fourth picture. (the hole has some grease in it).
 

Attachments

  • DSCN6836.jpg
    DSCN6836.jpg
    92.7 KB · Views: 108
  • DSCN6838.jpg
    DSCN6838.jpg
    89.4 KB · Views: 110
  • DSCN6839.jpg
    DSCN6839.jpg
    88.4 KB · Views: 106
  • DSCN6840.jpg
    DSCN6840.jpg
    91.2 KB · Views: 109
Last edited:
Wow and thank you

I have a plastic bag with 6-7 gearboxes, cleaned and with fresh grease, ready to use. All of them have the collar on all 3 mounting points. Therefore I haven´t thought about them being different, although I have checked the part number, and there is only one for all 4 postions....
But why did Fritz do it this way? With a larger hole the stability would have been even better.
So I have 3 choices: enlarge the hole or file down the collar.......
You/I learn every day. This board is so good and useful.
Thank you Bill !!
 
I have a plastic bag with 6-7 gearboxes, cleaned and with fresh grease, ready to use.


You/I learn every day. This board is so good and useful.
Thank you Bill !!
I learned too!

I also learned that my spare gearboxes are not with the spare motors - wonder where they went?

When you work on these cars it really makes you wonder what the original assembly process was like. For instance, how did the assembly workers get the can motor rear window regulator assemblies into the car? Lots of fiddling involved.
 
The last handbuilt car that BMW made. And they apparently never made any money on them, and that´s for a car which cost twice as much as the Jaguar E-type....

I suppose they fit the sardine style motors, with cogwheel, clutch and gearbox into the regualator, mounted the window glass, and then inserted this into the rear side window slots. Then came the task of aligning the glass with the door glass and not leaving any space between the rubber seals and glass.....It´s a very time consuming exercise.

And keeping track of different gearboxes with the same part number.....(with 2 or 3 collars on the mounting bases).


A question to all: do you get the door window to fall down by its own weight with the regulator out of the door...(but with the rear, slanting guide in place of course).

I find that if I adjust to allow for a "free fall", the glass will be too loose at the top when in the closed position. I.e. the glass will move back and forth too much. So I tighten up via the slanting guide, but at the cost of free movement/free fall of the glass. A compromise is called for in my view.
 
3 months later: the door window glass moves OK in the new U-shaped felt channels. I think silicone was the trick besides letting them sink in (in closed position).

Question now is: how tight should the rear, black, slanting channel be secured (forwardswise). I still haven´t put the door panels back, so I can see and check what´s going on. With the window half open, activating the motors causes the top of the glass to move either forward or backward depending on direction.
One would want to see the glass move in parallell with the door, without any tilting/slanting action.

The answer is probably: try various settings and see what happens. I seem to have done this 20 times already but......
 
Back
Top