Dreaded ignition switch screw is out, need help!

JIMC

Member
Messages
32
Reaction score
0
Location
Aurora, Colorado, USA
After many hours of searching I finally found the screw. I had to rotate the switch quite a bit along with rotating the cylinder lock before it appeared in the gap in the surrounding boss.

The plastic cap on the ignition switch end had decided to detach along with the 3 springs and 2 little metal pieces.

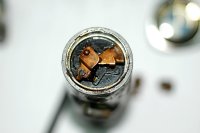
Now I need to know how it all goes back together along with crimping tips, I have this pic but where do the springs go?

Thanks,
Jim C
72 3.0CS Euro
Automatic with 2 Webbers
 

Attachments

  • ign switch.jpg
    ign switch.jpg
    68.3 KB · Views: 152
If it is old enough to fall apart it is too old to put back in.......

Don't waste your time unless you are a certified watchmaker.
 
To crimp, look closely at the following positions in your picture:

12:30

4

8.

Just the lip gets peened over in those locations. I've never had one completely apart so my recommendation is that there is a spring action on the plastic that pushes outward. Second there is the action from start to run. Clean up those contacts with CRC or similar. Maybe you'll get luckey.

Maybe post the other parts and I'll give it a shot at trying to put the puzzle back.
 
Dimples.

Hi Jim,

I can confirm that what you are attempting is possible. I did this exact job two months ago and the car has started every day since then. If you'd like, I can elaborate on any of the following points, but let me offer them in brief for you consideration here:

-It looks like you've assembled the copper pieces and the three springs correctly. If I remember, you have to load the three springs into the three holes in the black plastic part (shown) and then put the two copper pieces in on top. Consider taking the two copper pieces off real quick and taking a photo of what's underneath. The crowd here might appreciate having that for future use.

-The crimping you mention is the next step, and it requires finesse. Doing it wrong can shatter the next part that goes in, which is a bakelite (plastic) disk with contacts and wires embedded in it. Only chumps crack the disk. (Speaking however as a chump myself, you might be able to recover it with super glue and plastic filler. Anyhow, damaging the disk / contact part should be avoided at all cost).

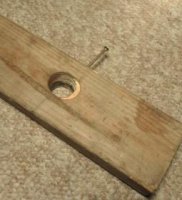
-As 61P describes, you need to dimple or peen the metal at 12:30, 4, and 8 (as shown in your photo) against the aforementioned bakelite disk. This squeezes the whole assembly together. This is how the factory made it. You will need to apply a force to those same locations precisely and firmly, and the metal ring will need to bend. In order to do this, I made a tool and I am including its picture. If anyone can't see the picture, kindly tell me. My tool is simply a 2X4 with a hole cut through it and a screw run in through the side. Step 1 for using it is to insert the whole key cylinder into the hole. Step 2 is to align the assembly such that the screw aligns with the place you need the dimple to go. Step 3 is to slowly and carefully turn the screw, applying a pin-point force to the place where the metal meets bakelite. Repeat for as many dimples as are needed. 3 would be the minimum number.

Let us know how your progress is going!
 

Attachments

  • Screen shot 2012-10-10 at 6.43.38 PM.jpg
    Screen shot 2012-10-10 at 6.43.38 PM.jpg
    12.6 KB · Views: 112
It's a little bit of a crimp. Just at the edge. Gently. I've redone mine twice and still on the original.

I've thought of a small amount of clear two part epoxy. Just a dab on the three points as an added precaution. So far, I haven't had any problems which first show up as the key action but no starter. In a pinch, just drop the bottom cover and push while turning. It might get you back to the barn.
 
You are more brave than me. I had Carl rebuild mine for a relatively small price compared to the possibility of having to do that job twice.
 
Ignition switch update solved with photos

Thanks to all that replied, wouldn't have had the courage without you!

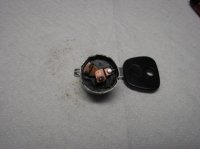
My particular 72 Euro automatic had 4 springs ( see pic ) , I had originally found 3 and combed the carpet for the 4th some may have 3.
Strongly suggest using one of those magnetic bowls to keep these parts in.

Take ignition switch out, I had to rotate the switch until the tiny screw appeared then it was easy with a jewelers screwdriver, this part took me weeks as I thought it would be immediately visible.

Put all 4 springs in round depressions, I used a pencil tip.

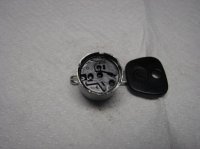
The 2 switch parts only go in one way, look for the feet on the bottom and the slots in the lock.The plastic part with wires matches up with metal part, look for a locating tab on the plastic and a notch in the metal barrel, this will also align with the dimples on the plastic part.
Now I have to secure the 2 pieces together.
Thanks to Blinkling and 61 Porsche for their help!

Jim
 

Attachments

  • ignition lock 015.jpg
    ignition lock 015.jpg
    26.4 KB · Views: 99
  • ignition lock 006.jpg
    ignition lock 006.jpg
    27.7 KB · Views: 90
Back
Top