We finally got some rain here in Boston, so I decided to do some inside work and polish up a couple of the waist trim strips.
I did the same job last year (on the other side of the car) and found a way that is a lot quicker and easier. (On the negative side, it does involve the use of a toxic chemical)
Last year, I spent a lot of time wet sanding, starting as rough as 220 grit, mainly to remove the anodizing, but also to smooth out the numerous nicks and scratches that existed previously. Of course, starting at 220 requires that you progress your way up the ladder, 320, 400, 600, to 800. After 800, you could think about polishing if you use a wool pad and cutting polish. Previously, I used a pedestal buffing wheel with rouge and compound sticks, but thats for the professional shops. I now use 3" buffing wheels and a cordless drill.
The new way:
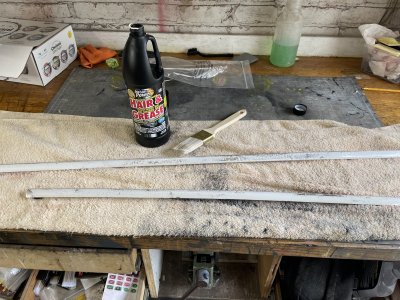
1. Strip off the anodizing:
I used a lye formula purchased from a very large orange home supply chain. Apply it liberally and let the solution soak on the metal for 7-8 minutes. You'll know it's working when it starts bubbling. After 8 minutes or so, quickly wash of the metal, and give it a good flush to stop the chemical action.
2. Smooth out the major scratches
Give it a good scrub with gray (fine) or white (finest) scotch brite pads to knock down any deep scratches. In my case, I'm not striving for complete perfection and elimination of all scratches. If that's your goal, use 4 or 5 grades of scotch brite pads, working progressively up, and use a soapy water spray for lubrication.
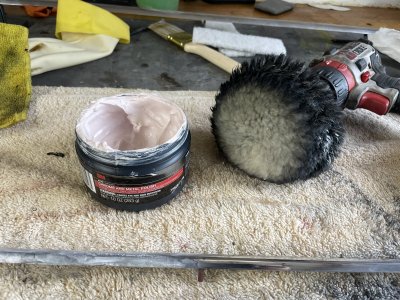
3. Compound/buff
I used 3M Chrome and Metal Polish (#39527) along with a 3" wool cutting pad. A smaller amount is more effective than too much. I keep the buffer at least an inch away from the ends of the metal. That's where the buffing wheel has a tendency to grab the metal and bad things happen. Focus on one section at a time, usually about 1"- 2".
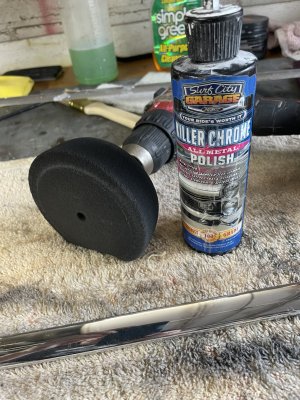
4. Final Buff
Before the final buff, I cleaned the metal with spray of isopropyl alcohol and a fresh paper towel. This is cleans off any of the old buffing compound and gives you a fresh surface to work on. A black foam pad that came with a 3" polishing kit from some big on-line retailer was most effective for bringing out a final shine. I chose the Killer Chrome polish mainly due to it's promise of protection and less for it's ability to bring up a shine.
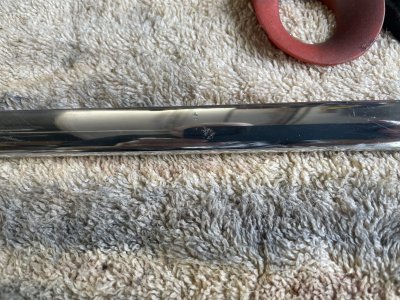
All told, it took me less than an hour to do do 2 pieces. Last year. it was 2 hours for each piece. The shine for this method (compared to last years) was definitely improved. I was not striving for perfection, and there are some small amounts of nicks and scratches left, they are definitely minimized and less notable given the increase in shine.
This was a quick and general tutorial. I'd be happy to answer any more specific questions or cover anything I may have missed.
I did the same job last year (on the other side of the car) and found a way that is a lot quicker and easier. (On the negative side, it does involve the use of a toxic chemical)
Last year, I spent a lot of time wet sanding, starting as rough as 220 grit, mainly to remove the anodizing, but also to smooth out the numerous nicks and scratches that existed previously. Of course, starting at 220 requires that you progress your way up the ladder, 320, 400, 600, to 800. After 800, you could think about polishing if you use a wool pad and cutting polish. Previously, I used a pedestal buffing wheel with rouge and compound sticks, but thats for the professional shops. I now use 3" buffing wheels and a cordless drill.
The new way:
1. Strip off the anodizing:
I used a lye formula purchased from a very large orange home supply chain. Apply it liberally and let the solution soak on the metal for 7-8 minutes. You'll know it's working when it starts bubbling. After 8 minutes or so, quickly wash of the metal, and give it a good flush to stop the chemical action.
2. Smooth out the major scratches
Give it a good scrub with gray (fine) or white (finest) scotch brite pads to knock down any deep scratches. In my case, I'm not striving for complete perfection and elimination of all scratches. If that's your goal, use 4 or 5 grades of scotch brite pads, working progressively up, and use a soapy water spray for lubrication.
3. Compound/buff
I used 3M Chrome and Metal Polish (#39527) along with a 3" wool cutting pad. A smaller amount is more effective than too much. I keep the buffer at least an inch away from the ends of the metal. That's where the buffing wheel has a tendency to grab the metal and bad things happen. Focus on one section at a time, usually about 1"- 2".
4. Final Buff
Before the final buff, I cleaned the metal with spray of isopropyl alcohol and a fresh paper towel. This is cleans off any of the old buffing compound and gives you a fresh surface to work on. A black foam pad that came with a 3" polishing kit from some big on-line retailer was most effective for bringing out a final shine. I chose the Killer Chrome polish mainly due to it's promise of protection and less for it's ability to bring up a shine.
All told, it took me less than an hour to do do 2 pieces. Last year. it was 2 hours for each piece. The shine for this method (compared to last years) was definitely improved. I was not striving for perfection, and there are some small amounts of nicks and scratches left, they are definitely minimized and less notable given the increase in shine.
This was a quick and general tutorial. I'd be happy to answer any more specific questions or cover anything I may have missed.