Engine Bay Lamp 63311362711

ScottAndrews

Well-Known Member
Site Donor $
Messages
559
Reaction score
285
Location
Petaluma, CA
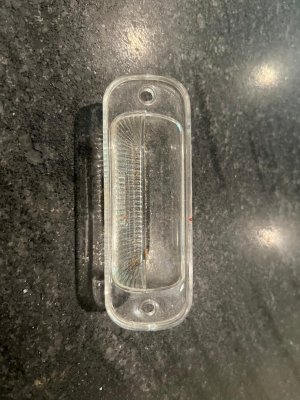
I have been trying to locate a replacement engine bay lamp for my E24. This appears to be the same as the one used in the E9. Seems to be NLA...

Since I had one in semi-serviceable condition, I decided to try making a copy. I did a little filling and repair on my original (it was by no means pristine!), and made a silicone mold. Here is the mold process. I'll let you know how it comes out after I try casting the new one in clear epoxy...

IMG_4656.jpeg


IMG_4657.jpeg


Cheers,
Scott
 
Last edited:
We'll see how they turn out...

After doing some additional research on this. I think I'll make a new mold using a more repeatable setup. My mold really does not form the thin edge of the lens very cleanly, so the new one should fix that.

I also need to clean the old part better, and probably polish it before making the mold, so I can get a better finish.

Most of the videos on this make use of at least a vacuum chamber to de-gas the mold material and the casting epoxy, and some also cure the epoxy under pressure. I get the vacuum part. Not sure what the pressure pot does...

I have a new appreciation for the complexity and care required to fabricate new clear plastic parts!
 
Last edited:
  • Like
Reactions: Dlc
A good first effort. Mold needs work, and clearly (or maybe not so clearly), I need to eliminate the tiny bubbles with vacuum and pressure to get a more optical finish. I'll start by cleaning and polishing my original, and then make a better mold, and cast using a different resin for thinner parts.
IMG_4663.jpeg

IMG_4665.jpeg
 
Excellent and quite cool. I recall someone making the rear window molding attachment (that plastic piece) with melt-able thermoplastic beads.
 
A good first effort. Mold needs work, and clearly (or maybe not so clearly), I need to eliminate the tiny bubbles with vacuum and pressure to get a more optical finish. I'll start by cleaning and polishing my original, and then make a better mold, and cast using a different resin for thinner parts.
View attachment 204740
View attachment 204741
Yes, putting your mold with the new material in a pressure vessel will squeeze the bubbles and reduce them considerable, depending on the pressure. I've always thought this could lead to future issues as the compressed bubbles with exert an outward force through the casting's lifetime, but have no data on this possibility. Degassing with a vacuum camber first is a must of course.
 
Yes, putting your mold with the new material in a pressure vessel will squeeze the bubbles and reduce them considerable, depending on the pressure. I've always thought this could lead to future issues as the compressed bubbles with exert an outward force through the casting's lifetime, but have no data on this possibility. Degassing with a vacuum camber first is a must of course.
Seems to be the proper process though. I think the pressure causes whatever gases are left after vacuuming, to re-dissolve back into he plastic, and prevents them from re-forming during the cure.

That said, the first piece was remarkably good given that I did none of this. Just mixed and poured...

The piece has gotten more clear as the cure proceeds in open air.
 
You might consider using a very light cloth to make the part stronger. Basic epoxy is brittle and will likely crack pretty easily. If you use a very light cloth, like 4 ounce it will disappear when you put it in the mold with the epoxy. Cloth of 4 ounces or less wets out clear. With some careful shaping and snipping of the cloth it won't stick out of the mold and other than the fact that the part is stronger you won't know it's there.
 
i would research acrylics / plastics used in taillights or blinkers. its obvious that your mold is pretty good (for a first piece) ... you just need a clearer / optical plastic
 
i would research acrylics / plastics used in taillights or blinkers. its obvious that your mold is pretty good (for a first piece) ... you just need a clearer / optical plastic
I think the issue there is a combination of the specific plastic used, and the combined drawing out of gasses in the liquid phase, and the compression of the work in the mold/curing phase. I suspect the cloudiness of the piece is a result of a) the wrong epoxy (some are better than others for thin pieces), and b) not outgassing the material. I also rebuilt the edges of the original where they were bit ragged.

There are some very informative videos on YouTube where guys make beautiful repro tail light lenses using this process.

I'm starting at a bit of a deficit since my original is not perfect, but having partly rebuilt it using bonds, my plan is to polish it inside and out so I can get a smooth surface...
 
I was looking online for a newer lamp to use as the mold basis. I found that there are a couple NOS units for sale on eBay ($125 or so).

However, I noticed that my original is a Hella unit, while the two available online have OLSA cast into the lens. Can anyone enlighten me about which of these is correct?
 
Saw this on the W-N site.Looks like it has the W-N logo cast into it, so perhaps theyare doing re-pops themselves. Anyone have any experience with these?
Screenshot 2025-07-02 at 7.09.55 AM.png
 
Scott, i have what looks to be a NOS clear lens that i am planning to use for my trunk light. if you want to borrow it to make a cast, happy to lend it to you. needs to be washed.
 

Attachments

  • trunk light 1.jpg
    trunk light 1.jpg
    173.5 KB · Views: 18
  • trunk light 2.jpg
    trunk light 2.jpg
    159.7 KB · Views: 12
  • trunk light 3.jpg
    trunk light 3.jpg
    162.8 KB · Views: 14
Back
Top