Engine rebuild-lots of questions

Peter Coomaraswamy

Well-Known Member
Site Donor $$
Messages
3,789
Reaction score
903
Location
Austin, TX
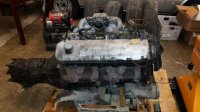
Hi All, well, it's time to start the rebuild on the 3.5 engine out of the 2/81 Euro 635 CSi. Back in the day when I routinely rebuilt V8's it was no problem, you could get the correct pistons, rings and bearings from any auto parts store and bringing the block and crank, rods to any machine shop was pretty standard stuff.

At this stage I am not really sure where to start. I would like to build a thread and possibly make a video but from reading other threads there are different pistons (skirt length) and allot of variables to deal with, so when starting to rebuild the M30/M90 (still not sure what to call it) where is the best place to begin?

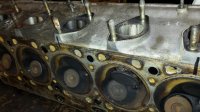
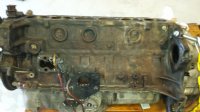
I have the block stripped down, so how would the masters of the forum proceed? Any suggestions would be most appreciated!
 

Attachments

  • engine2.jpg
    engine2.jpg
    95.3 KB · Views: 178
  • engine3.jpg
    engine3.jpg
    91.6 KB · Views: 171
  • engine4.jpg
    engine4.jpg
    100.7 KB · Views: 176
  • engine1.jpg
    engine1.jpg
    89.6 KB · Views: 184
  • engine5.jpg
    engine5.jpg
    84.1 KB · Views: 178
Document the disassembly sequence with notes on how to prevent damaging parts. List what parts should just be replaced without checking for wear. Things like timing chain, tensioner, and gears, oil pump chain and gears, water pump, thermostat, etc. Some early oil pumps should be replaced. What to check for wear, and how to check it. Choices for grinding the crank, rebuilding the connecting rods, balancing, cylinder boring, bearing replacement. Sources for parts. What has to be sent to a machine shop for work. Special notes, like send the upper timing chain cover to the machine shop with the cylinder head. Otherwise they might cut the head, and then the timing cover won't fit. Special assembly tools needed. Reassembly sequence and checks. Starting for the first time.
 
First step

Finding a motor for these cars seems to be a little confusing and I think in the future we will be faced with rather dirty engines coming from older cars or junk-yards etc, so it helps to have a power washer around to get most of the gunk off. Once you have the engine out I like to have it on some type of rolling platform, even if it's just something you put together at Lowe's. Also, get at least 1 box of rubber gloves. Why clean? You get to see what's broken allot quicker and that can help you create the junk pile from the save pile. I like to have lots of boxes around for the bolts and brackets and it makes it easier to find. This should be a fun thread because I have no idea what I'm doing... but as my grade-school math teacher (Sr. Mary Bosco) told me "it's not important to know the answer, it's important to know how to get the answer"... Ahh words to live by!

So, any parts that you know you are going to re-use go into the priority pile (such as this shifter platform- which is going to Drew).

You never know what someone else may need so I like to save everything- at least initially.

On subsequent posts I'll go over the preliminary dismantling, the head bolt removal sequence, etc. I hope you find it interesting- if not funny as you'll all probably be laughing at me.

Also, I will try to get a definitive guide on the best blocks to use and how to identify them. Many like Don know this stuff so well they don't even think about it but I do know a little about engines and I'm way confused so maybe my school-boy explanations will help someone :)
 

Attachments

  • thread1.jpg
    thread1.jpg
    97.8 KB · Views: 159
  • thread2.jpg
    thread2.jpg
    97.3 KB · Views: 158
  • thread3.jpg
    thread3.jpg
    96.6 KB · Views: 150
  • thread4.jpg
    thread4.jpg
    95 KB · Views: 151
  • thread5.jpg
    thread5.jpg
    98.8 KB · Views: 148
  • thread6.jpg
    thread6.jpg
    94.4 KB · Views: 147
Internal inspection

While I wait for a couple things here at work I thought I would add a little to the thread- and I will have to jump back at some point and see if I can get some other forum members to collaborate on exactly what the safest way to find the engine that you want- but I digress;

First up, taking off the head, The intake should come off if you have the engine out of the car because it just makes things easier. I do recall seeing people remove the head while the block is in the car and the intake on, but if you can, remove it. The exhaust manifolds can stay on because they are small and it may be easier to take them off when the head is on the bench.
Valve cover off, fan/pulley off, thermostat housing and water pump off- toss water pump. Top front cover off, remove cam sprocket (4 ten mm. bolts) keep parts only to match up new ones. Chains, guides, sprockets should all be new, even if you don't rebuild the block.

See picture for head bolt loosening sequence (start in center exhaust side, then up then over & down- you get it). I do save the bolts, but not sure if I'll reuse them.
Picture 3, examine the head to see if it can be resurfaced. There are typically dimples that you'll be able to see (you can see where I marked mine) this can also be felt while the head is on. This head looks like it was cut down to its maximum so it will probably be trashed- but I will check that with higher powers.

If the dimples are there and you want to reuse the head you'll have to look into the water inlets and see if they are clear. Also,
Picture 4 shows the exhaust valve condition, which is not too bad, but burnt valves can indicate other problems with the head and possibly the block and/or pistons.
Picture 6. shows wear on the timing chain tensioner, not bad but it will be replaced, you can see how pointed the sprocket teeth are- they should have flat spots on top, but these look like sharks teeth.

The clean parts are really a pleasure to work with once it's time to re-assemble.
Shot 9 is the #6 piston hole, it still has the cross-hatch/hone marks but if you look in the thrust area (3 o'clock) you can see some wear. I will bring the block to a machine shop that has experience with these engines and get their take.

This block could need a full reconditioning but machinists who have experience with these engines will tell me more- and I'll pass that along.
 

Attachments

  • head2.jpg
    head2.jpg
    99.1 KB · Views: 154
  • head4.jpg
    head4.jpg
    94.1 KB · Views: 151
  • head3.jpg
    head3.jpg
    100.4 KB · Views: 148
  • head1.jpg
    head1.jpg
    94.5 KB · Views: 152
  • head5.jpg
    head5.jpg
    97 KB · Views: 143
  • head6.jpg
    head6.jpg
    96.1 KB · Views: 150
  • head7.jpg
    head7.jpg
    101.3 KB · Views: 143
  • head8.jpg
    head8.jpg
    97.5 KB · Views: 148
  • head9.jpg
    head9.jpg
    91.4 KB · Views: 142
  • head10.jpg
    head10.jpg
    102.9 KB · Views: 143
Last edited:
timing chain and sprocket

I'm refreshing the timing chain& guides on a 110k mile M54 (2001 530i) The crank sprocket looks a lot like the picture on one vendor's website, and the teeth are rather pointy. Only the slightest hint of a flat. Also, it is curious that my sprocket has even/odd teeth, ie. in one
orientation, the new chain fits around the sprocket fine, but move it one link and it looks like the chain is over stretched. Same thing with the old chain. No such issue on the
cam sprocket.

The good news is that the sprocket slides off the crank nose easily, no puller required.

Could you try this on your motor and report back?

Thanks,

Stuart
 

Attachments

  • timing_chain.jpg
    timing_chain.jpg
    88.3 KB · Views: 131
Crank sprocket

When removing the crank sprocket from the shaft I needed a puller; it was not really stuck that much but I did not want to pry against anything and I had the correct puller within easy reach. Interesting about the teeth on the sprocket, I will have a look at mine tomorrow and report back.
 
As an E24 owner I can tell you that the forum is similar to here...lots of substance and knowledge. Post/search there also if you have not already.

http://www.bimmerforums.com/forum/forumdisplay.php?237-1976-1989-(E24)

Peter,

You can look here as well. These engines were in 5 series cars for many years.
Lots of info. So you could use a 85 535i to look up parts. Of course you need to know what block and head you have but just an example. You won't find E9 to look this up.

http://www.mye28.com/

Most of the components for the M30 series of engines are still available from places like Autohaus and Pelican and many others.
Performance parts are getting harder to find.
Try this if you are looking.
http://www.bmw2002.com/mm5/merchant.mvc

If you are in a major city many machine shops have seen these motors for years and will be familiar with them and the cylinder heads.
A good block can be taken to a machinist and put in their parts steamer/cleaner and come out looking new.
New freeze plugs are recommended.
Depending on mileage you may be able to replace the bearings with new and still be within wear tolerance. Takes some precise measuring to determine.
Here again a machinist can help you.

If you know any shops or mechanics you are friendly with there is a company called World Pac and they can get gaskets and bearings and maybe rocker arms and stuff like that at great prices.
 
FYI-
Several of the M90 parts are tagged 'Euro Only' by BMW.

I have a '79 635csi/m90 grey market car and am currently refurbing my engine.

BMW will want proof of ownership before they release any euro-only parts.
---the m90 headgasket falls into this category, my local dealer indicated the HG that i ordered recently was the only one in usa at the time.

BTW- that old sage's adage holds true with my engine refresh project....
"It'll take 3 times longer than you think it should, and cost twice as much as you budgeted."
 
Quick thanks!

For the information below, I will use it all as I figure out how to move forward. Right now I'm looking for a machine shop with experience. I could have a well known builder do this for me but I want to do it myself, not only because of the cost but also because the more time I spend working on my cars the less trouble I am likely to get into:)

Since I posted the above note Terry Sayther got back to me and recommended a shop in San Antonio, Jerry Janke Racing Engines, he's open on Saturday which means I may be able to avoid traffic :) I will do my research with the help listed below and report back after having these guys inspect the block-
 
Last edited:
Aluminum finishing options

So, I'm cleaning up all the parts I will be reusing on the engine and I soaked the covers in some "stuff" and I don't like the way it came out but at least it's clean. What are the reasonable options to bring these pieces like the front cover and valve cover back to nice new-original condition if such is possible.

Thanks
 

Attachments

  • engine cover1.jpg
    engine cover1.jpg
    96.5 KB · Views: 128
  • engine covers.jpg
    engine covers.jpg
    97.5 KB · Views: 127
Bead blasting removes the oxidation and brings back stock finish. Then I use Colinite Metal Wax to keep it that way.

So, I'm cleaning up all the parts I will be reusing on the engine and I soaked the covers in some "stuff" and I don't like the way it came out but at least it's clean. What are the reasonable options to bring these pieces like the front cover and valve cover back to nice new-original condition if such is possible.

Thanks
 
Blasting can make it a bit more porous, Speedway tumbles parts and then coats in clear ceramic. Amazing original looking finish that you clean wipe with a Kleenex.
 
Back
Top