You are using an out of date browser. It may not display this or other websites correctly.
You should upgrade or use an alternative browser.
You should upgrade or use an alternative browser.
Fitting 123 ignition
- Thread starter ChrisB
- Start date
Please use Search Option. There is plenty of 123 ...
There are positive and antipathetic voices.
It is also worth to ask Uncle Google for help: https://123ignition.com/manuals/123manual_TUNEPLUS.pdf
or directly call to the Manufacturer.
There are positive and antipathetic voices.
It is also worth to ask Uncle Google for help: https://123ignition.com/manuals/123manual_TUNEPLUS.pdf
or directly call to the Manufacturer.
As I recall it is fairly straightforward. Engine at TDC #1 and distributor matches (no physical advance on the distributor).
I hope you have better luck than with regards to oil intrusion up from the engine.
I hope you have better luck than with regards to oil intrusion up from the engine.
1. Put engine at TDC, if unfamiliar with this process then best to confirm by pulling valve cover and observing cam lobes pointing "down" on cyl #1
2. Install the distributor per the manual so the rotor points towards 7:30 pm or so. I heat-shrunk the wires before this to keep a clean look. Find a GOOD ground point. No ballast resistor is used, use a Bosch red coil or similar.
3. Wire your dist cap per the manual so that #1 plug will be over the 7:30 mark when installed.
4. Take some needle nose pliers and bend at the middle the 2 cap snap clamps so that they clamp onto the cap tighter to hold it in place snuggly (another flaw in the design).
5. Advance the dist a little by turning counter-clockwise.
6. Start the engine. If it doesn't catch then advance in small increments until it does. If it starts to backfire then confirm you're not 180 degrees off TDC.
7. Once running, take a timing light and match the flywheel timing to your software curve if programmable, or if a non-adjustable 123 curve is used then see which curve is selected by the microswitch and then look up the corresponding idle advance degrees in the manual and match that. These need to be physically matched with a timing light. Make sure you are timing the correct flywheel ball. Then tighten the 123 down.
8. If using a programmable curve and say you want your idle to be 950rpm with 10 degrees idle advance, then set the data points to 10 at both 850 and 1050 to keep slight fluctuations in idle rpm from causing advance to increase or decrease. This will prevent the engine from hunting up and down at idle rpm.
9. If using vacuum advance, don't activate it until the above is working. If not, then cap the vac port.
10. Read the 123 oil intrusion thread to be aware of any future issue. Save for this issue which I am trying to solve, it is a great piece of tech.
If you want a sample programmable curve to start with, let me know.
Last edited:
Manual for installing the distributor can be found here: https://e9coupe.com/tech/autobooks/autobooks_manual.pdf
See page 50...
See page 50...
ray_in_savannah
New Member
Hey Steve, for step #2 will 7:30AM work also, or would that be 180 degrees off?1. Put engine at TDC, if unfamiliar with this process then best to confirm by pulling valve cover and observing cam lobes pointing "down" on cyl #1
2. Install the distributor per the manual so the rotor points towards 7:30 pm or so. I heat-shrunk the wires before this to keep a clean look. Find a GOOD ground point. No ballast resistor is used, use a Bosch red coil or similar.
3. Wire your dist cap per the manual so that #1 plug will be over the 7:30 mark when installed.
4. Take some needle nose pliers and bend at the middle the 2 cap snap clamps so that they clamp onto the cap tighter to hold it in place snuggly (another flaw in the design).
5. Advance the dist a little by turning counter-clockwise.
6. Start the engine. If it doesn't catch then advance in small increments until it does. If it starts to backfire then confirm you're not 180 degrees off TDC.
7. Once running, take a timing light and match the flywheel timimg to your software curve if programmable, or if a non-adjustable 123 curve is used then see which curve is selected by the microswitch and then look up the corresponding idle advance degrees in the manual and match that. These need to be physically matched with a timing light. Then tighten the 123 down.
8. If using a programmable curve and say you want your idle to be 950rpm with 10 degrees idle advance, then set the data points to 10 at both 850 and 1050 to keep slight fluctuations in idle rpm from causing advance to increase or decrease. This will prevent the engine from hunting up and down in idle rpm.
9. If using vacuum advance, don't activate it until the above is working. If not, then cap the vac port.
10. Read the 123 oil intrusion thread to be aware of any future issue. Save for this issue which I am trying to solve, it is a great piece of tech.
If you want a sample programmable curve to start with, let me know.

... Does Ed at 123ignitionUSA make a grooved shaft for the M30? This item alludes to it....
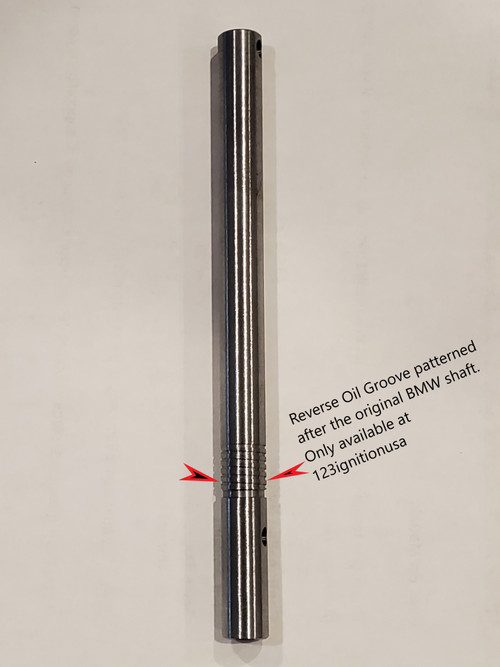
BMW - Shaft, Bushing and Seal rebuild Service 4 and 6 cylinder models
Your US Distributor of electronic ignition distributors for classic cars 123ignition
 123ignitionusa.com
Cheers,
Ray
Go back to the FAQ!!Hey Steve, for step #2 will 7:30AM work also, or would that be 180 degrees off?
Yes, I had it and put the plain one back in - see the 123 oil leak thread for my latest exploits there.Does Ed at 123ignitionUSA make a grooved shaft for the M30? This item alludes to it....
ray_in_savannah
New Member
Ooof. Obviously your motor oil is too thin. I suggest running this instead of your fancy thin synthetic.
(P.S. for others reading: don't do this!)
(P.S. for others reading: don't do this!)
Thanks Steve, appreciated1. Put engine at TDC, if unfamiliar with this process then best to confirm by pulling valve cover and observing cam lobes pointing "down" on cyl #1
2. Install the distributor per the manual so the rotor points towards 7:30 pm or so. I heat-shrunk the wires before this to keep a clean look. Find a GOOD ground point. No ballast resistor is used, use a Bosch red coil or similar.
3. Wire your dist cap per the manual so that #1 plug will be over the 7:30 mark when installed.
4. Take some needle nose pliers and bend at the middle the 2 cap snap clamps so that they clamp onto the cap tighter to hold it in place snuggly (another flaw in the design).
5. Advance the dist a little by turning counter-clockwise.
6. Start the engine. If it doesn't catch then advance in small increments until it does. If it starts to backfire then confirm you're not 180 degrees off TDC.
7. Once running, take a timing light and match the flywheel timimg to your software curve if programmable, or if a non-adjustable 123 curve is used then see which curve is selected by the microswitch and then look up the corresponding idle advance degrees in the manual and match that. These need to be physically matched with a timing light. Then tighten the 123 down.
8. If using a programmable curve and say you want your idle to be 950rpm with 10 degrees idle advance, then set the data points to 10 at both 850 and 1050 to keep slight fluctuations in idle rpm from causing advance to increase or decrease. This will prevent the engine from hunting up and down in idle rpm.
9. If using vacuum advance, don't activate it until the above is working. If not, then cap the vac port.
10. Read the 123 oil intrusion thread to be aware of any future issue. Save for this issue which I am trying to solve, it is a great piece of tech.
If you want a sample programmable curve to start with, let me know.
Steve, could you clarify a couple of points please..1. Put engine at TDC, if unfamiliar with this process then best to confirm by pulling valve cover and observing cam lobes pointing "down" on cyl #1
2. Install the distributor per the manual so the rotor points towards 7:30 pm or so. I heat-shrunk the wires before this to keep a clean look. Find a GOOD ground point. No ballast resistor is used, use a Bosch red coil or similar.
3. Wire your dist cap per the manual so that #1 plug will be over the 7:30 mark when installed.
4. Take some needle nose pliers and bend at the middle the 2 cap snap clamps so that they clamp onto the cap tighter to hold it in place snuggly (another flaw in the design).
5. Advance the dist a little by turning counter-clockwise.
6. Start the engine. If it doesn't catch then advance in small increments until it does. If it starts to backfire then confirm you're not 180 degrees off TDC.
7. Once running, take a timing light and match the flywheel timimg to your software curve if programmable, or if a non-adjustable 123 curve is used then see which curve is selected by the microswitch and then look up the corresponding idle advance degrees in the manual and match that. These need to be physically matched with a timing light. Then tighten the 123 down.
8. If using a programmable curve and say you want your idle to be 950rpm with 10 degrees idle advance, then set the data points to 10 at both 850 and 1050 to keep slight fluctuations in idle rpm from causing advance to increase or decrease. This will prevent the engine from hunting up and down in idle rpm.
9. If using vacuum advance, don't activate it until the above is working. If not, then cap the vac port.
10. Read the 123 oil intrusion thread to be aware of any future issue. Save for this issue which I am trying to solve, it is a great piece of tech.
If you want a sample programmable curve to start with, let me know.
Ballast deletion, I have red/black to the bottom, white(41) and green to top. Ive read various options here.
Your point 7, match to software curve, so far all I’ve done is set 22deg on strobe and set mark on flywheel central at 2500. Is this all that needs doing before playing with curve, the manual with the dizzy is poor at best.
Can you suggest a curve for injected car?
Much appreciated Chris.
-Ballast - please post a pic of your wire connections.
-Which 123 do you have - programmable via Bluetooth/computor, or the one with the multi position switch under the cap?
I can then answer your questions and post a curve for you.
-Which 123 do you have - programmable via Bluetooth/computor, or the one with the multi position switch under the cap?
I can then answer your questions and post a curve for you.
Here you go, white wire seems to head off towards engine loom, labelled 41. Mines a fairly early car (mid72) not sure it’s on later cars.-Ballast - please post a pic of your wire connections.
-Which 123 do you have - programmable via Bluetooth/computor, or the one with the multi position switch under the cap?
I can then answer your questions and post a curve for you.
Programmable Bluetooth Dizzy.
Appreciated
Attachments
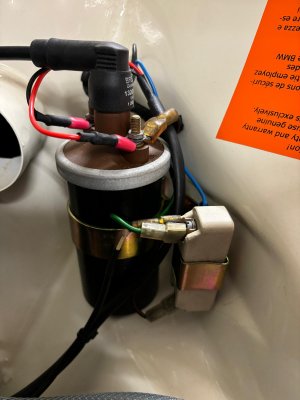
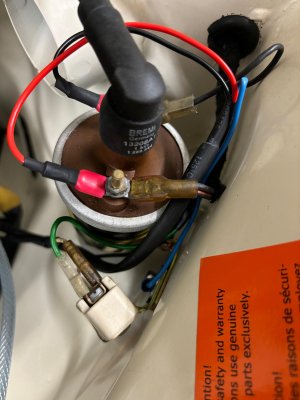
Right now your 123 is getting less than 12v because of the ballast. The green wire is +12v. The white wire is pulling 12v from the green wire. At the + coil terminal, the black/red is your feed from the starter to give full 12v when cranking. The black wire attached with the black/red wire is from the other end of ballast resistor. Remove the black and black/red wire combo from the + coil terminal, take the double spade from the ballast resistor, along with the white and green wires, and install on the + coil post along with the + 123 terminal. You can then tape off and hide the black & black/red wires. Now you will get full 12v for the 123 and while cranking.
Here is a stock CSi curve set to the upper limits of spec. You can then play with this once running if you want to but this should work well.

Here is a stock CSi curve set to the upper limits of spec. You can then play with this once running if you want to but this should work well.
Last edited:
If you have a dial back timing light, set it to read 12 degrees and check for the TDC ball on the flywheel at idle, adjust the 123 as necessary to get the ball to line up. If you don't have a dial back light, then strobe it at 22 degrees at 2500 rpm and turn the 123 until the Z ball lines up.Your point 7, match to software curve, so far all I’ve done is set 22deg on strobe and set mark on flywheel central at 2500. Is this all that needs doing before playing with curve, the manual with the dizzy is poor at best.
Last edited:
As Stevehose says, the dial back timing light makes it easy. The first setting on the my curve is 20° at 1000 RPM. Set the timing light back 20° and it should match up with the mark on the crank at 0. If not, rotate the 123 until it does. Probably don’t have to rotate it very far.
All done thanks, make sense now.Right now your 123 is getting less than 12v because of the ballast. The green wire is +12v. The white wire is pulling 12v from the green wire. At the + coil terminal, the black/red is your feed from the starter to give full 12v when cranking. The black wire attached with the black/red wire is from the other end of ballast resistor. Remove the black and black/red wire combo from the + coil terminal, take the double spade from the ballast resistor, along with the white and green wires, and install on the + coil post along with the + 123 terminal. You can then tape off and hide the black & black/red wires. Now you will get full 12v for the 123 and while cranking.
Here is a stock CSi curve set to the upper limits of spec. You can then play with this once running if you want to but this should work well.
View attachment 189933
All done thanks, I used a db light at 12 deg.If you have a dial back timing light, set it to read 12 degrees and check for the TDC ball on the flywheel at idle, adjust the 123 as necessary to get the ball to line up. If you don't have a dial back light, then strobe it at 22 degrees at 2500 rpm and turn the 123 until the Z ball lines up.
Unfortunately it still doesn’t run right, this job was part of trouble shooting an erratic idle and misfire (on another thread) under load and higher rpm she runs great.
Thanks for your help.
Vac leak.All done thanks, I used a db light at 12 deg.
Unfortunately it still doesn’t run right, this job was part of trouble shooting an erratic idle and misfire (on another thread) under load and higher rpm she runs great.
Thanks for your help.
Yes, my thoughts from the start, just can’t find oneVac leak.