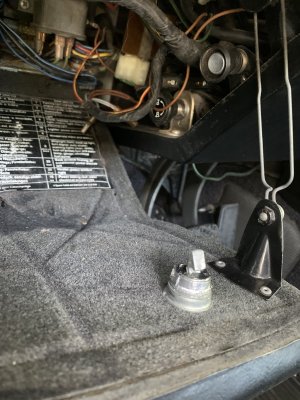
I cannot find a post on this but trying to figure out how to get the latch for the hood compartment door to latch. Had some work done and I think it might have gotten put back together wrong. Can some one send me a picture of what the set up should look like? Its been messed with so much I want to start out right?
You are using an out of date browser. It may not display this or other websites correctly.
You should upgrade or use an alternative browser.
You should upgrade or use an alternative browser.
Help with hood compartment latch
- Thread starter Wobdog
- Start date
CTD
Well-Known Member
Does this help?

Is this taken from right or left. I am assuming from open door facing interior
Looks like from column side, it is right behind/under the light switch. You can see the lid’s loop bracket at bottom right, turn pic CCW 20 degrees.
CTD
Well-Known Member
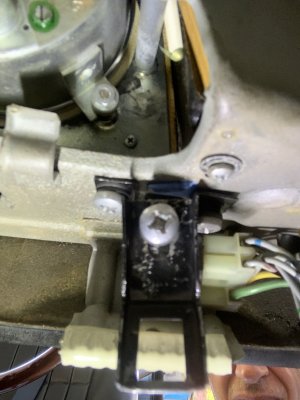
I removed the under steering wheel panel and took a picture from the column towards the fender. Indeed, counterclockwise a bit.
I can't help much other than to sympathize. For me, this was a real 3D puzzle. I would first get the door to fit the opening before even installing the striker. Loosen the hinges and get the door centered in the opening with the same spacing on both sides, flush with the sides top to bottom. Then attach the striker and start fooling (up, down, right, left, in, out). A little movement makes a lot of difference.
Hopefully someone here has found an easier way.
Hopefully someone here has found an easier way.
CTD
Well-Known Member
That is why the picture I took was with the under steering column cover removed so I could see what I was doing.I can't help much other than to sympathize. For me, this was a real 3D puzzle. I would first get the door to fit the opening before even installing the striker. Loosen the hinges and get the door centered in the opening with the same spacing on both sides, flush with the sides top to bottom. Then attach the striker and start fooling (up, down, right, left, in, out). A little movement makes a lot of difference.
Hopefully someone here has found an easier way.
Right now it closes fine but I have to wedge my fingers in the opening while pushing the button to open. Haven't had the courage to take it all apart again.
Such a pain. I got it set up like picture but cannot get it to latch. I guess the only way is to take off the under steering wheel?
CTD
Well-Known Member
That makes it easier because so you can actually see the action (or lack thereof) underneith.Such a pain. I got it set up like picture but cannot get it to latch. I guess the only way is to take off the under steering wheel?
Gave up for day but putting camera in compartment and taking a video is getting me closer. Say a prayer for me tonight that the E9 Gods will take mercy on my tomorrow. No it is time to watch football
I bet you wished you had continued to deal with your E9. I am not a Buffalo fan but I think this is their year.
The body mounted catch wasn't a big deal. It was getting the fiddly spring loaded latch apart, cleaned and putting it all back together with the spring in the correct orientation that was the challenge. Are you sure the spring loaded latch is operating correctly?
Smart people attach a small strip of nylon to that door they can pull on it while they push the button
Don Not sure I understand your advise.
I also had this problem when my button would not push in to move the claw. I bought another button on EBay and started from scratch like you. Making very tiny movements back and forth with the Phillips screw finally got the claw & striker in the correct position. The idea of removing the panel under the steering wheel should make the adjustments much easier to see.
TodB
Well-Known Member
^^This.The body mounted catch wasn't a big deal. It was getting the fiddly spring loaded latch apart, cleaned and putting it all back together with the spring in the correct orientation that was the challenge. Are you sure the spring loaded latch is operating correctly?
The spring loaded latch can get finnicky and not work smoothly or get stuck. Once it is working, its a matter of getting the catch in the right place so the latch catches it. Adjusted too much and you're taking the 3 screws out at the base to remove the door. Not adjusted enough and the door might drop open, only sometimes, while driving.
None of this has happened to me of course.
To expand on Tod's comments - the bracket that the latch hooks into must be installed so the square opening in the bracket allows the latch to catch it. If you look at the position of the bracket in the picture CTD posted, you can see how the latch is supposed to catch. Note that in this position, the latch is not holding the door, but is instead closed to the point where you need to push the button in so as to get the latch to engage. From this position, you push the button in, the hook on the latch drops down and you can then push the door in completely and release the button. Releasing the button causes the hook in the latch to move upward (assuming the spring works) into the square opening in the bracket. This holds the door in place.
You will notice that the U shaped portion of that bracket has oval shaped holes that allow the bracket to be moved so that it rides slightly higher or slightly lower on the dash. The screw holding the tongue of the bracket also is slotted, allowing it to move inward and up, or outward and down. You need to work with these adjustments to get the bracket into the position in CTD's picture.
Also, note that CTD has a pair of washers between the bracket and the body. Sometimes you need to do this in order to move the bracket further out away from the body.
I have used fishing line on my BMWs many times in the past. Great for the fuse door, holding stuff together until it is secured, then just cut the line and pull. I used it on the handbrake upgrade to hold all those bearings in place till I got the bolt fed through as an ex.
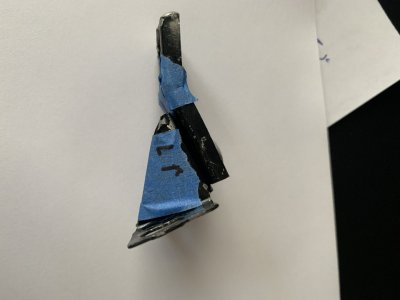
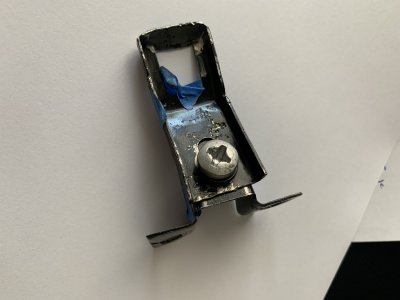
THANK YOU all so much for the advise and picture. I was able to Jerry rig a solution using some spare metal and duct tape. The issue was the strike plate was not extending enough and the area on the strike plate, were the latch hits was so worn it was not catching the latch. The solution was to put a piece of metal, vs washers behind the part that bolts to the dash and then putting another price of metal extending the latch portion of the strike plate. The real key was putting my phone in the compartment and taking a video so I could see how close I was with my adjustments. Once a again thank you to the forum for the great advice and support!! I am going to make another donation to the site for keeping me sane!
What I love about this forum, I mean a lot of things to love about it, but members give feedback and share the final solution. No other forum has this!


