Ideas for degreasing a diff

JFENG

Well-Known Member
Site Donor
Messages
3,227
Reaction score
1,434
Location
Bahston (Boston)
I have a filthy/greasy diff sitting in a 2ft aluminum drip pan in the floor.
Looking for suggestions on degreasing/cleaning up so I can paint it.

I prefer not to pressure wash it. I've tried that to clean a grimy engine block and it didn't work well.

Has any on tried simple green or purple power non solvent cleaners?
 
Found simple green clears a thin layer of grease each time, doesn't penetrate much. Almost have to use it straight without dilution. I usually get a narrow scrapper from HD to debulk the grease then go from there.
 
It all depends on how nice you want it to look and how far you want to go with it. I scraped the caked on stuff with a putty knife then took a wire brush to knock the loose stuff off. After that I took a wire wheel and took the whole thing to bare metal. After that I used de-greaser, then wiped down with acetone and finally painted with engine block paint. I taped off the factory "S" so that I wouldn't remove it in the process.
 
That's about where I want to take it. The transmission is already spotless and ready for a coat of catalyze silver paint.

When Mario does the color change in a year I will take that chance to disassemble and restore the entire suspension incl subframes. It'll never be as nice as HBChris's but it'll be close. Then I'm going to flog at the track with Duane ...
 
Last edited:
Yes I do. Used it a ton, no issues. I will look for an E9 that smells minty fresh at Larz Anderson.

Steam clean or power wash is another option and you are near a Harbor freight I bet.
 
Look for someone with a hotsy or a parts washer.
My hotsy degreaser is 10 gal propane hot water low pressure with degreaser
Any diff shop will take apart and run through the washer
I have heard of folks using a sand blaster
Make sure you pull the guts first.
 
The purple crap is worthless imho, it seems to atttack metal and really doesnt seem to clean all that well. Simple Green is good but yes it takes a while but it works eventually. Scraping off the built up sludge then several bottles of brake cleaner for the cracks and crevices and wire brushes to get it all clean. Then etch primer and paint, I also clear coated to help make it easier to clean.
 
Look for someone with a hotsy or a parts washer.
My hotsy degreaser is 10 gal propane hot water low pressure with degreaser
Any diff shop will take apart and run through the washer
I have heard of folks using a sand blaster
Make sure you pull the guts first.
��

Thanks don, but I don't want to disassemble it. I just need to clean the outside enough to prime and paint. I'm going to try hot simple green and stiff brushes. I'll etch what little surface rust there is will with a little SEM rust mort.
 
Last edited:
I actually clear coat a lot of stuff also. Ex, makes the original aluminum fuses, after cleaning, stay nice looking with no corrosion.
 
sandblasting tips for rear diff

Hi,

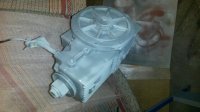
I sand blasted it. Then Epoxy and high temp paint. (i do hope the Epoxy holds..)

Basically the diff has 4 holes that need to be closed really tight.
See attached pics.

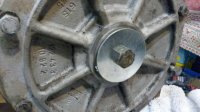
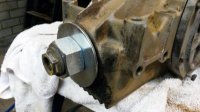
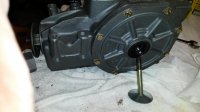
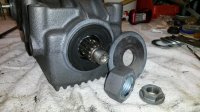
I used the side bolts and 2 large washers on the output side.
On the input side, I used a large washer combined with a very large nut, capped off with original nut.
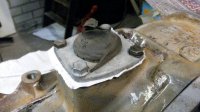
For the vent at the top you have 2 options; make a temp cover from 2 or 3 mm alu sheet, or like i did, cover the opening with a rubbertape (specifically resistant to sandblasting). Advantage of blasting with the original vent, is that itis directly ready for a clear coat.

The large washers are also ideal to use as a pressing tool to get new seals in place (should you consider it)

All large washers and nut are specifally purchased at a local hardware store, though 'anything that is larger then the hole" should work.
I can add washer and nut specs if needed. Just let me know & i'll update this post.

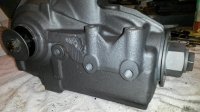
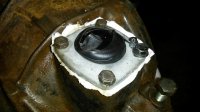
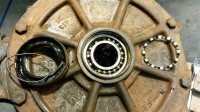
The last pic by the way was what I didn't expect; the ball bearing of the left output shaft was going to give out. I discovered this only upon removal of the seal. The cage that holds the balls at equal distance seperated in a front a back section, where it should be one unit. I was not a problem ....yet....

If you have the diff out from under the car, and are unaware of the age of the seals; I would advise to replace them. ~25 usd/euro and 30 minutes of work, it also gives you reassurance of the bearings.

Erik.
 

Attachments

  • 20150121_215339.jpg
    20150121_215339.jpg
    99.6 KB · Views: 108
  • 20150121_215352.jpg
    20150121_215352.jpg
    97.6 KB · Views: 113
  • 20150121_215356.jpg
    20150121_215356.jpg
    96.7 KB · Views: 103
  • 20150121_215405.jpg
    20150121_215405.jpg
    93.8 KB · Views: 104
  • 20150131_233248.jpg
    20150131_233248.jpg
    97.7 KB · Views: 108
  • 20150131_233157.jpg
    20150131_233157.jpg
    94.2 KB · Views: 103
  • 20150131_233222.jpg
    20150131_233222.jpg
    99.7 KB · Views: 108
  • 20150113_214348.jpg
    20150113_214348.jpg
    94.6 KB · Views: 101
  • 20150126_222022.jpg
    20150126_222022.jpg
    95 KB · Views: 99
  • 20150111_123546.jpg
    20150111_123546.jpg
    102.1 KB · Views: 117
Last edited:
Erik
Thanks for the advice on checking the output seals and bearings.

This is my excuse to buy an big impact gun that does 600ftlbs for removing the flange nut, right?

Seems like good preventative work and will allow me to get the side cover totally clean.

John
 
Last edited:
Back
Top