Ok, so here is another opportunity to show how little I know! But with the help of the members here I know everything is going to be alright ")
Ever since I got my blue car put together I wanted it to be faster, or at least able to match the speed of my secretary's KIA so I started looking around for a good block and after finding one out of a 1981 Euro 635 CSI I started the long process of figuring out what to do. I must say that Don helped allot, but I can't remember what he told me so I keep bugging him and will continue to do so.
I brought the block to a shop in San Antonio that was recommended by Terry Sayther, then the shop told me they could not find the pistons, freeze plugs or bearings. I sourced a set of Ross Pistons, and I have to say that Jeff Ireland was really helpful in that everything seemed to fit??
I was not frustrated by the machine shop because I have other people who truly frustrate me but I was "concerned" so Terry was kind enough to drive to San Antonio and get these guys what they needed to put in the pistons and bearings; half of me thinks these guys at the machine shop just enjoyed trying to make me sweat but they soon realized I was too stupid to be worried. When I picked up the block it looked OK, I guess, but not the nice shiny block all pretty like I expected. I was thinking of the old days when it was easier and cheaper to bring your Chevy 350 to the machine shop and pick up a fresh short block a week later.
Anyhow, when I got her home I put her on the stand, cleaned her off, gave her a few coats of the correct color, put in the freeze plugs and started bugging Don again for parts. So far this is where I'm at and I'll need some help already-
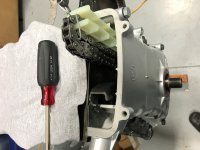
To shim or not to shim- someone please chime in. I have a new oil pump chain and, of course, a new crank sprocket. The old sprocket was not too bad coming off but I needed a good puller that could go around the sprocket, not the 3 claw type. I then cleaned up the shaft with VERY fine cloth and put on some assembly lube. And after tapping very lightly to get the new gear lined up and started on the shaft, I used the big nut with some spacers to push the sprocket into place. I did not think it would be a good idea to hammer it on there because it would likely jack up the main bearings.
So, here is progress so far and I would love to get some feedback regarding the oil pump shims. Thanks!


Ever since I got my blue car put together I wanted it to be faster, or at least able to match the speed of my secretary's KIA so I started looking around for a good block and after finding one out of a 1981 Euro 635 CSI I started the long process of figuring out what to do. I must say that Don helped allot, but I can't remember what he told me so I keep bugging him and will continue to do so.
I brought the block to a shop in San Antonio that was recommended by Terry Sayther, then the shop told me they could not find the pistons, freeze plugs or bearings. I sourced a set of Ross Pistons, and I have to say that Jeff Ireland was really helpful in that everything seemed to fit??
I was not frustrated by the machine shop because I have other people who truly frustrate me but I was "concerned" so Terry was kind enough to drive to San Antonio and get these guys what they needed to put in the pistons and bearings; half of me thinks these guys at the machine shop just enjoyed trying to make me sweat but they soon realized I was too stupid to be worried. When I picked up the block it looked OK, I guess, but not the nice shiny block all pretty like I expected. I was thinking of the old days when it was easier and cheaper to bring your Chevy 350 to the machine shop and pick up a fresh short block a week later.
Anyhow, when I got her home I put her on the stand, cleaned her off, gave her a few coats of the correct color, put in the freeze plugs and started bugging Don again for parts. So far this is where I'm at and I'll need some help already-
To shim or not to shim- someone please chime in. I have a new oil pump chain and, of course, a new crank sprocket. The old sprocket was not too bad coming off but I needed a good puller that could go around the sprocket, not the 3 claw type. I then cleaned up the shaft with VERY fine cloth and put on some assembly lube. And after tapping very lightly to get the new gear lined up and started on the shaft, I used the big nut with some spacers to push the sprocket into place. I did not think it would be a good idea to hammer it on there because it would likely jack up the main bearings.
So, here is progress so far and I would love to get some feedback regarding the oil pump shims. Thanks!