Need Help: Vent Window Gasket

Beam318ti

Well-Known Member
Site Donor
Messages
123
Reaction score
36
Hi All,

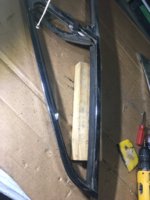
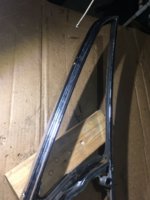
I am trying to replace the rubber gaskets within the frame of the front vent windows. I drilled out the two rivets that allows me to remove the glass from the frame but I am stumped on how to remove the vertical stretch of the rubber gasket in the frame. I could yank it out but I would like to see how it sits on the channel so I know how to seat the new gasket?

Any advice is most welcome.

Thanks.
 

Attachments

  • IMG_0464.JPG
    IMG_0464.JPG
    284.3 KB · Views: 147
  • IMG_0465.JPG
    IMG_0465.JPG
    279.4 KB · Views: 151
I struggled with this as well, did it all the possible wrong ways learning tricks every time. Do you have the replacements yet? There are some clues in the new one.

I don't recall needing to drill rivits.
 
I do have the replacements gaskets. I drilled the two rivets that hold the hinge for the glass to the frame. By removing the two screws in the frame it allows the frame to be slightly opened/expanded which allows the glass to be removed off the hinge and the frame.

Any tips will be very helpful.

Thanks.
 
Last edited:
It just pulls out, use some lube to put the new one in, it is tight

Thanks, Rick
Got any tips. I have new gaskets, new glass, new chromed frame but I can't get that SOB gasket to go in the frame. I've tried a lot of ways including lube, putty knives, fingers that hurt from trying so much. Currently the windows are closed and only I know the rubber is not inserted all the way. Just one of those, walk away ass kicking problems with an E9.
Gary
 
If you have re chromed the frame it will make for an even tighter fit. I did not have to remove any rivets and I can remember it was tight ........I used "spray on silicon lubricant" and a plastic spatular to push it in. I then tightened the window right up using my hand on the glass as well as the round winder to help out. left it over night and then tightened up further next day. I also used the below spray.......it conditions the rubber (relaxes it ) and makes it seat in......great for door seals etc.


20210301_200745.jpg
 
The quarter window seal installation is a pain , whenever I have to install any rubber I soak it in hot water first , 10 min will do it , and the rubber will be noticeably softer , and as the previous posts have said ,lube the hell out of it , and the plastic tool is very helpful. Not a pleasant job.
 
I will try again. I have done everything suggested but maybe will try some heat. Hot water only works if rubber is out. Wing window rubber cannot be taken in and out. Once it's in the frame you have to try to make it fit. There is a tab that goes down inside the door.
I am a pretty good mechanic as I spent 4 years rebuilding this car my self and this is extremely frustrating to me.
 
I will try again this evening as well and adopt some of the techniques described. I got pretty frustrated yesterday doing this and not getting the results I had expected.
 
I have procrastinated for years but I am at the point where I really should tackle this one. I have looked and tested the waters and, as mentioned by several above, this does not look like an easy or fun task.

Any new/fresh tips besides "Put the new one in hot water for 10 minutes" and "Lube the hell out of it"?
 
Last edited:
The small window must be opened for approximately 90 degrees or more than you push it downward in the rubber. The rubber gasket you want to replace. In that position there is a little space in the rubber gasket which allowing you the get the small pin out the chrome holder. Its only in for a few millimetres.

Replace the new gasket with very much glycerine and some not sharp spacers or so, not an easy job! Take a break with coffee
IMG_2449.jpeg
IMG_2450.jpeg


An finally you put the small window back as described at the beginning (90 ore more degrees open - push down in the new rubber - aligning the small pin for the chrome holder and release the downforce. The small pin slides in the chrome holder.

PS I did my best to explain it in English
 
Last edited:
Back
Top