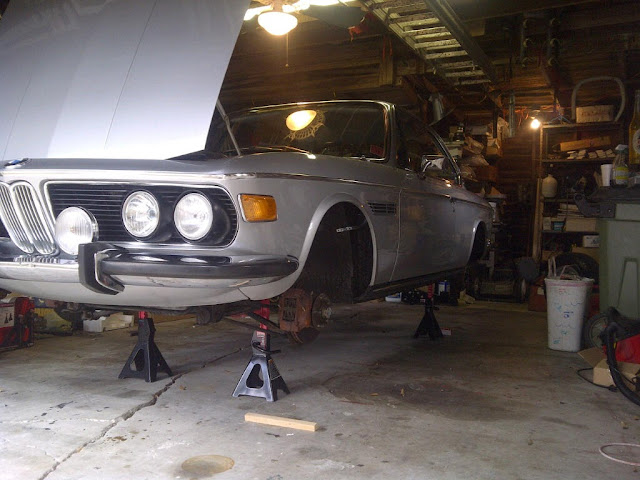
I have decided to do some under car detailing and maintenance and would like to put the car on jack stands and do brake fluid, caliper paint, shift linkage mounts, engine cleaning etc etc. What is the best technique for getting the car onto 4 stands - jack it up side to side or front to back? I have seen both theories but which works best for our cars for my shade tree projects? Thanks.
You are using an out of date browser. It may not display this or other websites correctly.
You should upgrade or use an alternative browser.
You should upgrade or use an alternative browser.
Putting the car up on stands - best technique?
- Thread starter Stevehose
- Start date
heroszeros
Active Member
I did the same thing a while back when overhauling the brakes, here's what I did, although not the smartest i'm sure but it worked for me..
First i jacked the rear up under the center of the rear axle, removed wheels and, placed stands on blocks of wood just in front of the rear wheelarch (where rear subframe mounts to rockers).
Then I did the front from under the front crossmember, and placed stands on blocks of wood under the front structural rails just behind the front front wheelarch (inboard of the rockers).
To remove the front wheels, you have to jack the car up quite high..and i wasn't feeling good about leaving the car on it's back stands at such an angle. I had to take the car back down in the front, raise the rear a few inches to compensate, then do the fronts again.. the whole thing was tedious, but in the end the car was level on its stands..
decoupe
(deceased)
Loosen the lug nuts before raising the car - just like changing a tire. Saves time and effort but also one less risk of toppling the car because they used a jack hammer for a torque wrench when they rotated your tires.
Front then rear (personal preference) in stages as suggested. Protect the frame with a pad or block of wood. If you need the car higher (depends on the jack stand) build solid pads twice the area of the jack stand base with ply wood on the top and bottom. Or buy bigger jack stands.
Be safe.
Doug
Front then rear (personal preference) in stages as suggested. Protect the frame with a pad or block of wood. If you need the car higher (depends on the jack stand) build solid pads twice the area of the jack stand base with ply wood on the top and bottom. Or buy bigger jack stands.
Be safe.
Doug
Got it
Ok 2 hours of very careful deliberation and execution I did it 3 stages at a time so as never to have to scary an angle going the other direction. 3 ton floor jack and stands. It's important to take your time because one false move or miscalculation and it could creak and groan then hit the ground like the titanic. Now the slippery slope begins - "while I am in here I may as well do this..."
First up - brake bleed and caliper repaint.
Thanks for the advice.

Heroszeros...did you use the differential as a support? My understanding, from several sources, is that using the diff as a jack pad IST VERBOTEN.
Ok 2 hours of very careful deliberation and execution I did it 3 stages at a time so as never to have to scary an angle going the other direction. 3 ton floor jack and stands. It's important to take your time because one false move or miscalculation and it could creak and groan then hit the ground like the titanic. Now the slippery slope begins - "while I am in here I may as well do this..."
First up - brake bleed and caliper repaint.
Thanks for the advice.
so, finally how did you do this ?
did you rise first front or rear ?
i can see and understand the front position for the stands, but can ypu please post a pic of the ones in the rear (the contact point in the car i mean)
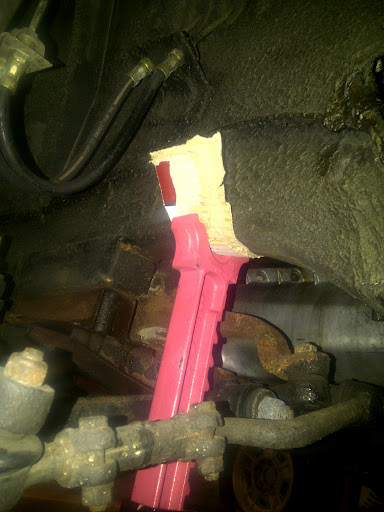
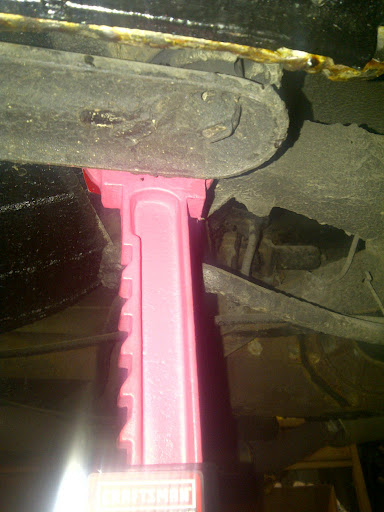
I did mine side to side because of the accessability of jack points. For the front I used the frame rail after it bends down from the suspension. The stand supported further forward of that point after it leveled out. The back I used the point where the frame rail meets just before the back of the rocker and the stand a little further inward. I could not find any jack points that i felt confident to do both front or back wheels first. This is the order I did the jacking:
1. Jack up passenger front wheel, place the stand here and then one by the passenger rear wheel (the front will be higher because of the jack point is up front.
2. Jack up driver front wheel, place the stand here and then one by the driver rear wheel (now the car will be slightly off the ground, level left and right, lower in back).
3. Jack up passenger rear wheel to bring it almost level with front.
4. Jack up driver rear wheel to almost level with front.
5. Repeat 2 more times until full height reached.
The front is slightly higher by an inch or so than the back.
Front jack stand location:

Rear jack stand location:

1. Jack up passenger front wheel, place the stand here and then one by the passenger rear wheel (the front will be higher because of the jack point is up front.
2. Jack up driver front wheel, place the stand here and then one by the driver rear wheel (now the car will be slightly off the ground, level left and right, lower in back).
3. Jack up passenger rear wheel to bring it almost level with front.
4. Jack up driver rear wheel to almost level with front.
5. Repeat 2 more times until full height reached.
The front is slightly higher by an inch or so than the back.
Front jack stand location:

Rear jack stand location:

so, finally how did you do this ?
did you rise first front or rear ?
i can see and understand the front position for the stands, but can ypu please post a pic of the ones in the rear (the contact point in the car i mean)
heroszeros
Active Member
Shaky, creaky.. Scary. I knew I was doing something wrong-
G
Well-Known Member
- Messages
- 230
- Reaction score
- 18
Steve,
Just a suggestion..If you already haven't.. "For Extra Safety" You might want to leave the jack in place under the car either front or back depending where you are working.
And always a good idea to have a cell or cordless telephone with you !
Safety First
Giorgio
Just a suggestion..If you already haven't.. "For Extra Safety" You might want to leave the jack in place under the car either front or back depending where you are working.
And always a good idea to have a cell or cordless telephone with you !
Safety First
Giorgio
Great idea - I was thinking of having some blocks or something there as a backup in case one of the jack stands breaks because I don't want to rely on the stands alone.
Steve,
Just a suggestion..If you already haven't.. "For Extra Safety" You might want to leave the jack in place under the car either front or back depending where you are working.
And always a good idea to have a cell or cordless telephone with you !
Safety First
Giorgio
Safety, etc. for jacking.
Guys,
Here's what I suggest:
Jacking- there's actually a homemade tool of sorts in the manual in the engine removal section. For those that trust the sills it's a harwood block that's scooped out to fit the sill profile and spead the load. The second is a part for the front crossmember- a piece of steel channel that catches both suspension points letting you jack from the middle. I pick the strongest suspension mounting and jack from there, but not before I find a suitable block of wood that spreads the load.
Jacks- can be extended too far for safety. I never go more than halfway then use wood blocking 2x10s etc. underneath them. It will be more secure. For those who contemplate cutting and welding- shim everything level in a normal position or in case your garage slopes. Think Porsche and the engine drops down and out, so the car gets jack up high and you're yanking the motor. Notice Steve's jacks on the head- they're v shaped. That's good.
E9s are unibody- don't go tweaking it. I cringe everytime I see a photo of a car in the air on the frame rails and original jack points. Be safe.
Put those tires under the sill/rails. If something does go wrong- it's something.
Jacking car
In the cars for sale section - the recently listed car in Houston (beautiful, recently sold - asking $42K) about 20 pics down there are underbody shots with the car up on a rack. Are these the appropriate jack points? If so it is a good photo, if not what is not correct? I get nervous whenever I think of jacking up these fragile bodies. Thanks.
In the cars for sale section - the recently listed car in Houston (beautiful, recently sold - asking $42K) about 20 pics down there are underbody shots with the car up on a rack. Are these the appropriate jack points? If so it is a good photo, if not what is not correct? I get nervous whenever I think of jacking up these fragile bodies. Thanks.
1. Jack up passenger front wheel, place the stand here and then one by the passenger rear wheel (the front will be higher because of the jack point is up front.
2. Jack up driver front wheel, place the stand here and then one by the driver rear wheel (now the car will be slightly off the ground, level left and right, lower in back).
3. Jack up passenger rear wheel to bring it almost level with front.
4. Jack up driver rear wheel to almost level with front.
5. Repeat 2 more times until full height reached.
vielen danke !
very clear explanation
and very sensible process too !
regards
Bwana
Well-Known Member
I've also been advised to roll the windows down a little before jacking, keeps them from binding up when only one corner is lifted.
Window
You gotta love these coachbuilt e9s.
I've also been advised to roll the windows down a little before jacking, keeps them from binding up when only one corner is lifted.
You gotta love these coachbuilt e9s.
