This works great in any brake component rebuild and it turns your brake fluid red for extra visual appeal!I have always used Castrol red rubber grease
You are using an out of date browser. It may not display this or other websites correctly.
You should upgrade or use an alternative browser.
You should upgrade or use an alternative browser.
Rear brakes over-heating, possibly fading on 3.0CS
- Thread starter taylorcom
- Start date
taylorcom
Well-Known Member
I saw a 'how-to' video on Youtube where the guy seems to put regular oil on the seal and piston (for an E30). Since petroleum degrades rubber, I'd think that might not be the best idea? He also has to use a C-clamp to get the piston back in place. Here's the vid:
Most of the red fluid gets flushed out when you bleed the systemThis works great in any brake component rebuild and it turns your brake fluid red for extra visual appeal!
") (sorry, quite lame)
(sorry, quite lame)Denis1967
Member
Sorry late chiming in (I'm a newbie) and kind lengthy, but here's my 2 cents on the topicI took my '72 3.0CS for a spin today (a 6.5-mile roundtrip to get gas) and when I got within about half a mile from home on the return trip, I noticed the brakes fading. I got home, checked the fluid reservoir and it was full. Then I checked the rear wheels and both were very hot. So I'm thinking the brake fade could have been due to over-heated hydraulic fluid at the rear brakes.
The right rear caliper was replaced with a new one in the mid-90s, the left rear caliper and hose may be original. I've noticed that new calipers are hard to find now, so would it be wise to start by replacing the hoses and see if that improves the situation? Thanks in advance, folk
Installing a Piston in a Caliper Housing (with a new Seal) typically requires a bit of force & unlikely you'll manage by hand.
To clean the Housings during rebuild, use only Isoprop alcohol + blow dry with compressed air. Remove bleed screws while doing so to allow air to escape through ports (otherwise you'll just push dirt into orifices). Obviously, be careful not to scratch / damage the Seal Groove or the Seal Land (the short bore surface between back of Dust Boot groove and front of Seal Groove). Use mild steel wool / brass bristle brush if needed (unless calipers are aluminum!).
During reassembly, stay away from grease(s) - not knowing their exact composition, they may interact with Seal / cause swell (and you'd be right back where you started).
I would only use either brake fluid (DOT3/4) or UCON Y22/Y24 assembly lubricants (although suspect you won't find any commercially).
Anything hydrocarbon based (eg. mineral oils, etc.) should be avoided with EPDM / Silicone seals. Keep in mind that anything residual (chemicals, etc.) in the housing after Pistons are installed is free migrate all the way back to your Master Cylinder & can damage anything it's incompatible with along the way (eg. causing swollen hoses, etc.).
Just apply brake fluid freely to Housing bore surface, Seal Groove, Seal, and nose of Piston (eg. back radius/chamfer on bottom of Piston to easy assembly through seal).
To install the Pistons; use a harbor press / one piston at a time. Don't use a pry bar as you'll never get piston aligned with bore (and more likely to damage something).
Get a 1/2" steel plate supported on both end (similar to if it was a rotor), sit the face of piston flat on plate, apply pressure SLOWLY to back of Housing (pushing housing onto piston) aligning piston with bore as you go. Once the nose of piston is past the seal, it will glide right in. Very simple / straight forward - just remember slowly.
Installed in the Housing, the Seal is squeezed between Housing groove ID and Piston OD. You'll have noticed that a new Seal is square cut (rectangular section) but the Housing Seal Groove is not. At typical, Seal Groove has 2 chamfers (angled front/back walls); the front chamfer is called the "retraction" chamfer / the back one is the "knock-back" resistance chamfer - They serve completely different functions. Over time, the Seal tends to conform to the Seal Groove (since the rubber material "flows") and takes a set.
--> Purpose of the "retraction" chamfer (angled wall / front of seal groove) is to provided volume into with Seal deforms/deflects outwards during a brake apply. Hydraulic pressure supplied to Housing pushes Piston outwards, overcoming running clearance until linings contact the Rotor surface. When pressure is released, the Seal "mechanically" pulls the piston back into the bore (eg. Seal returns to it's original shape/position). If tested after rebuild, you'll probably see 0.020-0.030" piston retraction values (after 300psi apply). Within hours, this retraction value already drops (due to seal flow/set) so you can imagine that after 50 years of heat cycling & aging, and pressure applies; the retraction values on your vehicle are considerably lower.
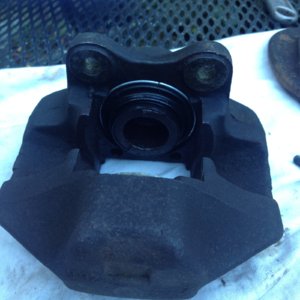
So; decreased retraction + increased friction between shoe plates & abutments (due to rust/dirt build-up) + lining material compressibility + rotor thermal expansion, and so on eventually results in increased drag (lining on rotor)... Even more so when the Dust Boot is punctured (like it appears to be in your picture above). Puncture Dust Boot allows contaminant infiltration into Seal Land area (eg. in front of seal groove). Over time, leads to rust in housing, pitted piston, etc. but also decreases the Seal's ability to retract piston (--> drag / friction --> hot brakes...)
--> Purpose of the "knock-back" resistance chamfer (angled wall / back of seal groove) is to provide volume into which the Seal deforms/deflects inwards when the piston is pushed into the bore. Operates similarly to the retraction chamfer but in reverse; it pushes the piston back outwards after input force is released.
This is the force you're trying to overcome as you install your pistons. Design wise, achieving a high piston knock-back (KB) resistance force (while provide adequate retraction) is a critical design parameter. If KB resistance force is too low, Rotor deflection/Axle end-play (during S-turns for example) can push on the Linings and causes Piston to slip (inwards) past the seal into the Housing bore. In turn, a volume of brake fluid (equivalent to piston diameter x distance of KB) is returned into the Master Cylinder Reservoir. At the next brake application, the driver may find his/her pedal going all the way to the floor if MC displacement during apply stroke is not enough to overcome the standard running clearance + the amount of piston knockback. I've actually seen this happen.
Note that Caliper Housing bores should not be honed as increasing the clearance between piston/bore can cause issues (eg. pistons binding in bore at full worn lining / rotor condition)
Hope this helps
This is what is GREAT about this forum. Everyone shares their experience and expertise. A long time ago I was the lead brake engineer at Ford Mo Co. there is a lot of really good advice given here. My experience was to replace ALL brake lines and hoses rebuild the front and rear calipers all new hoses and clips.
The old brake lines were made from steel with a lead/tin turncoat coating. The newer brake lines made of similar material but use a coating similar to zincrotrn. Having seen too many corroded brake lines the last thing I need to worry about at 100MPH is the brakes failing. I also vote yes to rebuild the rear proportioning valve ddue to exactly what OHMESS has stated.
The old brake lines were made from steel with a lead/tin turncoat coating. The newer brake lines made of similar material but use a coating similar to zincrotrn. Having seen too many corroded brake lines the last thing I need to worry about at 100MPH is the brakes failing. I also vote yes to rebuild the rear proportioning valve ddue to exactly what OHMESS has stated.
Denis1967
Member
Agree that the Proportioning Valve (Prop Valve) should be rebuild / replaced while you're at itThis is what is GREAT about this forum. Everyone shares their experience and expertise. A long time ago I was the lead brake engineer at Ford Mo Co. there is a lot of really good advice given here. My experience was to replace ALL brake lines and hoses rebuild the front and rear calipers all new hoses and clips.
The old brake lines were made from steel with a lead/tin turncoat coating. The newer brake lines made of similar material but use a coating similar to zincrotrn. Having seen too many corroded brake lines the last thing I need to worry about at 100MPH is the brakes failing. I also vote yes to rebuild the rear proportioning valve ddue to exactly what OHMESS has stated.
On a typical brake system (depending on Wheelbase, CG Height, Tire Rolling radius, Brake Effective radius, etc. etc.), the Fronts do between 70-80% of brake work (Rears only about 30-20%). Until ABS/ESP days, systems were front/rear split system (like this one) or cross-split brake system.
Different Prop Valves have different input / output curves to manage (avoid) rear wheel lock-up.
If Prop Valve malfunctions, you'll loose the desired system balance (& stability) during braking. For sure not good when coming down from 100mph, but could end up locking up the rears (or put you in a tail spin!) at much lower speeds on wet or slippery surfaces.
Denis1967 you are spot on. The good news is the mater cylinder is a two stage separate front to rear hydraulic chambers providing aprox. 70% front to 30% rear brake balance. AET manufactured these systems for their time pretty darn good.
taylorcom
Well-Known Member
Thanks for this detailed info, Denis. I'm glad to learn that brake fluid will be a good lubricant and that I'm correct in thinking it will take some force to re-seat the pistons correctly.Sorry late chiming in (I'm a newbie) and kind lengthy, but here's my 2 cents on the topic
Installing a Piston in a Caliper Housing (with a new Seal) typically requires a bit of force & unlikely you'll manage by hand.
To clean the Housings during rebuild, use only Isoprop alcohol + blow dry with compressed air. Remove bleed screws while doing so to allow air to escape through ports (otherwise you'll just push dirt into orifices). Obviously, be careful not to scratch / damage the Seal Groove or the Seal Land (the short bore surface between back of Dust Boot groove and front of Seal Groove). Use mild steel wool / brass bristle brush if needed (unless calipers are aluminum!).
During reassembly, stay away from grease(s) - not knowing their exact composition, they may interact with Seal / cause swell (and you'd be right back where you started).
I would only use either brake fluid (DOT3/4) or UCON Y22/Y24 assembly lubricants (although suspect you won't find any commercially).
Anything hydrocarbon based (eg. mineral oils, etc.) should be avoided with EPDM / Silicone seals. Keep in mind that anything residual (chemicals, etc.) in the housing after Pistons are installed is free migrate all the way back to your Master Cylinder & can damage anything it's incompatible with along the way (eg. causing swollen hoses, etc.).
Just apply brake fluid freely to Housing bore surface, Seal Groove, Seal, and nose of Piston (eg. back radius/chamfer on bottom of Piston to easy assembly through seal).
To install the Pistons; use a harbor press / one piston at a time. Don't use a pry bar as you'll never get piston aligned with bore (and more likely to damage something).
Get a 1/2" steel plate supported on both end (similar to if it was a rotor), sit the face of piston flat on plate, apply pressure SLOWLY to back of Housing (pushing housing onto piston) aligning piston with bore as you go. Once the nose of piston is past the seal, it will glide right in. Very simple / straight forward - just remember slowly.
Installed in the Housing, the Seal is squeezed between Housing groove ID and Piston OD. You'll have noticed that a new Seal is square cut (rectangular section) but the Housing Seal Groove is not. At typical, Seal Groove has 2 chamfers (angled front/back walls); the front chamfer is called the "retraction" chamfer / the back one is the "knock-back" resistance chamfer - They serve completely different functions. Over time, the Seal tends to conform to the Seal Groove (since the rubber material "flows") and takes a set.
--> Purpose of the "retraction" chamfer (angled wall / front of seal groove) is to provided volume into with Seal deforms/deflects outwards during a brake apply. Hydraulic pressure supplied to Housing pushes Piston outwards, overcoming running clearance until linings contact the Rotor surface. When pressure is released, the Seal "mechanically" pulls the piston back into the bore (eg. Seal returns to it's original shape/position). If tested after rebuild, you'll probably see 0.020-0.030" piston retraction values (after 300psi apply). Within hours, this retraction value already drops (due to seal flow/set) so you can imagine that after 50 years of heat cycling & aging, and pressure applies; the retraction values on your vehicle are considerably lower.
So; decreased retraction + increased friction between shoe plates & abutments (due to rust/dirt build-up) + lining material compressibility + rotor thermal expansion, and so on eventually results in increased drag (lining on rotor)... Even more so when the Dust Boot is punctured (like it appears to be in your picture above). Puncture Dust Boot allows contaminant infiltration into Seal Land area (eg. in front of seal groove). Over time, leads to rust in housing, pitted piston, etc. but also decreases the Seal's ability to retract piston (--> drag / friction --> hot brakes...)
--> Purpose of the "knock-back" resistance chamfer (angled wall / back of seal groove) is to provide volume into which the Seal deforms/deflects inwards when the piston is pushed into the bore. Operates similarly to the retraction chamfer but in reverse; it pushes the piston back outwards after input force is released.
This is the force you're trying to overcome as you install your pistons. Design wise, achieving a high piston knock-back (KB) resistance force (while provide adequate retraction) is a critical design parameter. If KB resistance force is too low, Rotor deflection/Axle end-play (during S-turns for example) can push on the Linings and causes Piston to slip (inwards) past the seal into the Housing bore. In turn, a volume of brake fluid (equivalent to piston diameter x distance of KB) is returned into the Master Cylinder Reservoir. At the next brake application, the driver may find his/her pedal going all the way to the floor if MC displacement during apply stroke is not enough to overcome the standard running clearance + the amount of piston knockback. I've actually seen this happen.
Note that Caliper Housing bores should not be honed as increasing the clearance between piston/bore can cause issues (eg. pistons binding in bore at full worn lining / rotor condition)
Hope this helps
It was braking that caused me to fall in love with BMW. I will never forget it.Denis1967 you are spot on. The good news is the mater cylinder is a two stage separate front to rear hydraulic chambers providing aprox. 70% front to 30% rear brake balance. AET manufactured these systems for their time pretty darn good.
I was in college, we met up with some friends, and a friend brought along a buddy who went to work in the family business rather than going to college. He was a sales guy who covered the entire state of WI, and his company car was an e23 735i. During the course of our first round of drinks, Eric announced he wanted to get drunk and asked who wanted to be the designated driver. I volunteered. Leaving the first bar (of many), as I got on the highway on-ramp, I did only a little braking so as to maintain momentum. I then had just begun to accelerate so as to attain highway speed by the time I needed to merge when I was then confronted with the fact that some idiot had put a stop light on the on-ramp, and at precisely that moment, the stop light was red. This revelation meant that I had to change from continue momentum and begin to accelerate mode to abruptly stop this big-ass vehicle carrying five people in a very short distance mode. The car handled the weight transfer beautifully, and I was simply blown away by how responsive the brakes were to both my initial brake pressure and the decreasing pressure thereafter. There was no drama with either the transition or the rather abrupt stop. Better yet, nobody in the car even noticed my little drama.
Our cars don't brake quite that well, primarily because they flex a lot more than did that e23, but they brake very well for a classic car.
Last edited:
Denis1967
Member
No kidding! I've worked in braking systems design/manufacture (for same company) since my internship in 1989 - full-time since 1992 and still at it.It was braking that caused me to fall in love with BMW. I will never forget it.
I was in college, we met up with some friends, and a friend brought along a buddy who went to work in the family business rather than going to college. He was a sales guy who covered the entire state of WI, and his company car was an e23 735i. During the course of our first round of drinks, Eric announced he wanted to get drunk and asked who wanted to be the designated driver. I volunteered. Leaving the first bar (of many), as I got on the highway on-ramp, I did only a little braking so as to maintain momentum. I then had just begun to accelerate so as to attain highway speed by the time I needed to merge when I was then confronted with the fact that some idiot had put a stop light on the on-ramp, and at precisely that moment, the stop light was red. This revelation meant that I had to change from continue momentum and begin to accelerate mode to abruptly stop this big-ass vehicle carrying five people in a very short distance mode. The car handled the weight transfer beautifully, and I was simply blown away by how responsive the brakes were to both my initial brake pressure and the decreasing pressure thereafter. There was no drama with either the transition or the rather abrupt stop. Better yet, nobody in the car even noticed by little drama.
Our cars don't brake quite that well, primarily because they flex a lot more than did that e23, but they brake very well for a classic car.
I was thoroughly surprised by the quality / performance of the system on my '72!
taylorcom
Well-Known Member
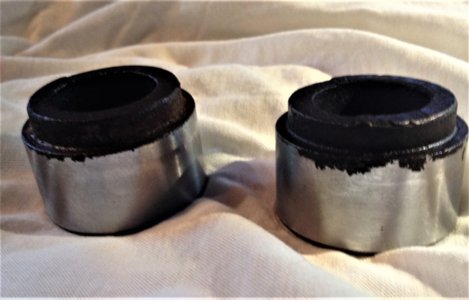
I borrowed a compressor from my neighbor, and finally got the stuck piston out. It's on the right in the pic, which was taken after I cleaned the pistons with light steel wool. Rust can be seen near the top, mostly on the piston at right. I'm hoping that since most of the piston's 'action' occurs further down, where piston meets the inner seal, the rust may not be a problem?
Attachments
m_thompson
Well-Known Member
The last time I rebuilt the calipers I bought new pistons from W&N. After 50 years and several rebuilds they were looking a little nasty.
taylorcom
Well-Known Member
It sure is hard to get them back in. I don't have a harbor press (as recommended above). A C-clamp, also recommended above, seems to help.
Last edited:
taylorcom
Well-Known Member
Denis1967
Member
not sure what price of new pistons is but after all you've gone through (and condition of your current pistons) think it would be good investmentThe last time I rebuilt the calipers I bought new pistons from W&N. After 50 years and several rebuilds they were looking a little nasty.
taylorcom
Well-Known Member
I may have jumped the gun, but had reinstalled everything before reading the above suggestions (for new pistons). After a test drive this morning, the brakes are working normally and the left rear with rebuilt caliper runs cooler.