Rear window trim removal

DWMBMW

Well-Known Member
Site Donor
Messages
936
Reaction score
1,099
Location
Miami, Florida
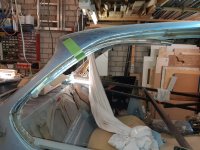
Does anyone know how to remove the aluminum trim that wraps around the rear windows under the drip rail?

I would like to have the scratches polished out but do not know how to remove it without damaging them.

Thanks,

Doug

1F80B2FA-4131-4335-9C97-CFE1EA8D1035.jpeg
 
The piece that extends over both front and rear windows? I just put mine on last week, think of it as trying to pry off a complex C-clip. Start with the under side front by gently pulling out.
 
Oh that piece! I was thinking the "C" cover in that photo upper right corner...
Yes that is a different piece, I did not take mine down that far but I think the window guide (C-channel) has to come out first then that piece has sheet metal screws holding it in place
 
I'm not trying to be a smartass, but the first word is carefully...They are aluminum and thin, screwed and caulked from the factory, and from the ones that I have seen off of a car are mostly buggered by body guys that just "have at it.." until they realize that they are doing (irrepairable...) damage. I think the only way to not damage the thin edge that stares at you when you open the door, is to remove the inside chrome trim piece, the rubber, and then, after removing the screws, to work a tool from the inside working out...prayers for the headliner...I am sure someone with more experience here will chime in...hopefully with some tricks. These are some the few parts that I think the factory thought would be in place forever...
As a by the way...I cleaned the caulk off with a sharpened popsicle stick; metal tools will scratch the devil out of the trim... The good news is that since they are fragile, they can be worked easily if dinged or bent, but polishing? I'd let someone else do it ...too light and flimsy for me to safely try. Maybe the pros fasten them to a wood buck or such to polish..?
 
Yes it is a chore. I would avoid like the plague. You might consider just taking the car to an aluminum polisher to see if they can polish in place.
 
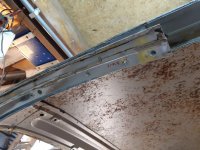
Just did it last week. It wasnt that difficult. First the felt lining for the window has to be pulled. Then small cross headed screws are exposed.
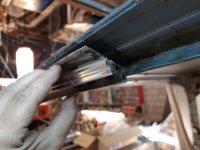
Unscrew these and the u shaped channel detaches. There was glue behind, but the u shaped channel actually has some strength, it is not to delicate.
Now you see a second alu piece that is flat. It also has the same cross headed screws.

I marked where all the screws were before removing them, it makes reinstall much easier

There was also a line of sticky glue behind both parts, and between the car body. I slid a plastic knife in between. Worked well.

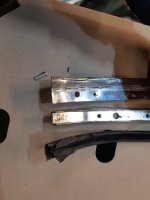
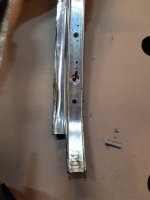
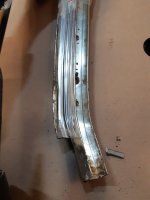
I just grabbed the parts and stuck em on the car for you , see pics.
Last pics show how all the holes line up.
Enjoy.
 

Attachments

  • 15912989073053486097776153723486.jpg
    15912989073053486097776153723486.jpg
    321.8 KB · Views: 293
  • 15912989599651474323288901147156.jpg
    15912989599651474323288901147156.jpg
    300.7 KB · Views: 303
  • 15912993138893521814305045388363.jpg
    15912993138893521814305045388363.jpg
    342.5 KB · Views: 261
  • 15912993698265886752498085790463.jpg
    15912993698265886752498085790463.jpg
    192.6 KB · Views: 261
  • 15912994189027305249578679299906.jpg
    15912994189027305249578679299906.jpg
    246.4 KB · Views: 274
Last edited:
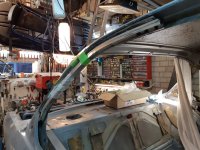
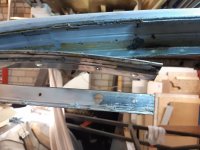
....... and my original pic was of the good side. The drivers side has been severely “buggered” and needs to be removed to be repaired.


4DFA8D4A-6895-4CD1-A26D-D209F6774090.jpeg
 
There are three pieces above the rear window...two in my above post. They are 60 cm long, 2 feet.
Then there also is the outer drip rail which spans the whole side.
Here's the two parts in clean view .

(Mind you it is easy to pull them out for me as I want to paint the whole car. Took me about 1.5 hours for left and right side, inc drip rail and dooorrubbers.)
 

Attachments

  • 15912998713253006520249687814003.jpg
    15912998713253006520249687814003.jpg
    203 KB · Views: 283
  • 15912999276132819137267741546292.jpg
    15912999276132819137267741546292.jpg
    195.1 KB · Views: 267
  • 15912999497565062441333251002422.jpg
    15912999497565062441333251002422.jpg
    190.5 KB · Views: 269
Last edited:
Can someone remind me if the C-shaped trim that runs across the entire roof from rear to front side window needs to go on first before these or it does not matter.
 
There are three pieces above the rear window...two in my above post. They are 60 cm long, 2 feet.
Then there also is the outer drip rail which spans the whole side.
Here's the two parts in clean view .

(Mind you it is easy to pull them out for me as I want to paint the whole car. Took me about 1.5 hours for left and right side, inc drip rail and dooorrubbers.)
Great pics thanks!
 
Can someone remind me if the C-shaped trim that runs across the entire roof from rear to front side window needs to go on first before these or it does not matter.
@bavbob The c shaped piece covers the thin aluminum sheet so I think it needs to go on last.
 
Side note.... If you've replaced sheet metal in this area it makes for a difficult re-assembly! :)
 
Great explanation by Erik. A tedious process but not difficult, just hard to understand until you do it. The screws are small too.
 
Great explanation by Erik. A tedious process but not difficult, just hard to understand until you do it. The screws are small too.

Not a single person mentioned removing that hard caulk from the aluminum. :D
 
Back
Top