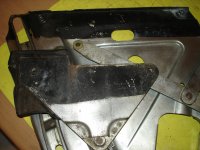
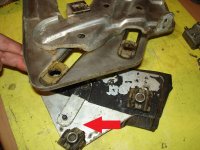
Rear windows mechanisms full cleaning tutorial

Wladek

Well-Known Member
Messages
1,332
Reaction score
824
Location
Gdansk, POLAND
Hello Guys,

this is my first post on this forum, so at first i just want shortly introduce myself - my name is Wladek, i'm from Poland, i have 1972 Fjord CSI for about 1,5 years (in full renovation process).

I'm here with you on forum for about half year - I am very happy that I could join you, because you are great community of very nice and helpful people; and what i think is most important, people who are not expecting anything in return.

I was thinking maybe it will be better to introduce myself with some helpful thread instead of just writing in „Intro”.

So here we are...

I've already made cleaning/disassembling of 4x different sets of E9 rear windows mechanism's. All of them where more or less stucked, because of old grease, after years this grease is more like plastic, than lube, so mechanisms just stucked, thats why pretty often also gear rubbers are broken.

  1. On the photo below i showed some tools that might be helpful, i didn't show this on photo, but you will also need something like WD40 (because some parts might be stuck like a „rock”, so at first step you just want to soften them).
  2. At this case i showed old type mechanism used till 1973, but the same manual can be use on later style mechanism, the only difference is motor mount (that is even more simple).

  3. FIRST THING BEFORE YOU START DISASSEMBLY – if you can try to make mechanism go down for at least half way (if outside the car using 12V battery ((+) plus is green or black depends on direction; (-) minus is brown), it will make your work easier on the next levels). If you can't, don't worry it can also be made whithout it, but it will require more work and patience (made it on one of the sets, was fully stucked). You also want to put some WD40 on places i marked on photo's.

  4. At first you have to unscrew cable socket (two philips type bolts)

  5. Unscrew ground wire

  6. Unscrew four 10mm motor mounting bolts.

  7. Gently push motor down (as shown on photos), be careful not to brake gear rubber.

  8. Now it's time for gear disassembly 3x 8mm bolts – if you pushed down your window as on 3 step, than you just make like me; If not you will need fully flat, short, thin 8mm key, because if window is up - lever will cover the 8mm screws and you will have to unscrew them from above or below with a very small movements to unscrew (but it can be done believe me).
  9. After gear disassembly time to disassemble window mount from lever. Use big/massive flat screwdriver (bigger is better in this particular situation) – scrape and press as shown on photo, it have just metal ball mount.

  10. Lever is free now and can be moved up & down (so you can feel the resistance). On this step you can disassemble spring for perfect cleaning, but if you can't or don't want you don't have to do this and just go for next step.

  11. After puting extra WD40 on marked places and additional 20-30 up & down movements lever should work a lot more fluent wihout much resistance, if not repeat WD40 and UP & DOWN movements.
DSC02815.JPG
DSC02816.JPG
DSC02817.JPG
DSC02819.JPG
DSC02820.JPG
DSC02821.JPG
DSC02822.JPG
DSC02823.JPG
DSC02824.JPG
DSC02825.JPG
DSC02826.JPG
DSC02827.JPG
DSC02829(0).JPG
DSC02829(1).JPG
DSC02830.JPG
DSC02831.JPG
DSC02832.JPG
DSC02833.JPG
DSC02834.JPG
DSC02835.JPG
DSC02836.JPG
DSC02837.JPG
DSC02838.JPG
DSC02840.JPG
DSC02841.JPG
DSC02842.JPG
DSC02843.JPG
DSC02844.JPG
DSC02845.JPG
DSC02846.JPG


Attachments

  • DSC02828.JPG
    DSC02828.JPG
    2.2 MB · Views: 261
Last edited:
Wladek - What a great informative and instructive first post. Your step by step instructions along with illustrations gave me the confidence that I could make this task a weekend project. You got me wanting to open up my working rear windows to see how much I can make them faster by using your methods of WD40 , degreasing and apply new grease including graphite grease on the rails and plastic washer /rollers. For a first post you really did a tremendous job. Looking forward to more of your posts.

Cheers!


  1. On this step you have to put full down window mount. Then you will need special tool for ring type locks disassembling. After 2x locks dissasembly (1x on each plastic washer) you can part out plastic „washers/rollers” and start to clean them/degreasing etc. You just disassemble outer ring, don't have to disassemble inner ring (you can if you want, but it's not much metter).

  2. Then you start to degrease all parts/cannections etc., you will need really strong degreaser, i used solvent/thinner (work goes a little bit faster with this old plastic grease).

  3. Very important is good cleaning of the rails (inner & outer part), some of you will need nylon brush, some will need metal brush.

  4. After everything is cleaned, you want to put new grease on cleaned parts, rails and connections. On rails and plastic washers/rollers you can use graphite grease instead of standard grease. On places like connections use thin grease like bicycle chain grease so it can get inside. After applying of greases you have to move every part couple times and put some more grease.
  5. Then you are ready to put parts back together, put back on the car & be happy with fast, fluently working rear windows.
If you have old, distorted stop rubbers, which are rubbing – you just want cut them a little bit on rubbing side or just replace them with new one.

Good luck!!!
 
Last edited:
Wladek - What a great informative and instructive first post. Your step by step instructions along with illustrations gave me the confidence that I could make this task a weekend project. You got me wanting to open up my working rear windows to see how much I can make them faster by using your methods of WD40 , degreasing and apply new grease including graphite grease on the rails and plastic washer /rollers. For a first post you really did a tremendous job. Looking forward to more of your posts.

Cheers!
Welcome and thanks!!!

Thanks for reply, that's great i could help.
I think later i will also update/add info in this thread how to fully clean & refurbish old type Bosch windows motor, because they also very often are stucked with old grease and rust.
 
Excellent! Welcome and thanks for posting! Now if we only had a tutorial like this for a bumper swap...
 
I just cleaned and regreased my rear windows for the 2nd time since owning my car (this time more thorougly) and just tried to order more of the adjustable window stops but have been informed they are NLA. Has anyone fabricated a replacement? I thought I remember seeing this but perhaps it's wishful thinking.

Maybe something like this?

https://www.mcmaster.com/#vibration-damping-sandwich-mounts/=17w8ldw
 
Last edited:
I just cleaned and regreased my rear windows for the 2nd time since owning my car (this time more thorougly) and just tried to order more of the adjustable window stops but have been informed they are NLA. Has anyone fabricated a replacement? I thought I remember seeing this but perhaps it's wishful thinking.

Maybe something like this?

https://www.mcmaster.com/#vibration-damping-sandwich-mounts/=17w8ldw

did it, #25

http://www.e9coupe.com/forum/thread...trim-panels-regrease-and-renewal.11320/page-2

i sourced end bump type locally
 
I just cleaned and regreased my rear windows for the 2nd time since owning my car (this time more thorougly) and just tried to order more of the adjustable window stops but have been informed they are NLA. Has anyone fabricated a replacement? I thought I remember seeing this but perhaps it's wishful thinking.

Maybe something like this?

https://www.mcmaster.com/#vibration-damping-sandwich-mounts/=17w8ldw

I used a McMaster part, as you suggest. Part numbers are here: http://www.e9coupe.com/forum/threads/window-regulator-stoppers.24159/
All windows are now operation and properly adjusted and these bumpers are working great.
 
Pay attention to the plastic slider with the notches in it. The notches are to clear this link arm, it has two notches so that the left and right are the same part. If you switch the sliders or install the nothced one upside down, the link arm will strike the slider. One of mine was put together wrong, so I put it back together wrong and had to take the regulator back out of the car to switch these sliders (and then took it out again for another reason I can't remember... but the other side I got right the first time).

e7fc2b37142d.jpg
 
Thanks, I believe hard is also the way to go, there is a lot of force generated by the gearing at the end of the movement.
 
Thanks, I believe hard is also the way to go, there is a lot of force generated by the gearing at the end of the movement.

Definitely. The McMaster 'hard' ones receive a substantial squishing at full stop, but they squish consistently the same amount and I think the neoprene will last a long time.
 
Wladek I'm trying to review your post because I have similar issues with my windows, however I can't see the images you have posted. I was wondering if you had removed them and if so could you re-upload or send them to me so I can have a look? Thanks in advance.
 
Wladek I'm trying to review your post because I have similar issues with my windows, however I can't see the images you have posted. I was wondering if you had removed them and if so could you re-upload or send them to me so I can have a look? Thanks in advance.
Images where probably deleted by image hosting. Uploaded them one more time straight on e9coupe.
Don't know, why you thought, that i removed my own photo's from my own post.
 
Thanks for re-uploading as well. I could not see your images initially, either. This is a great resource - thanks again!
 
Back
Top