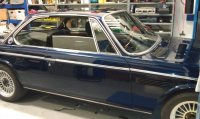
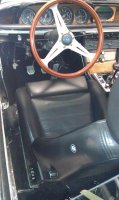
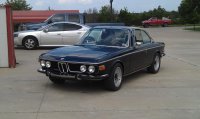
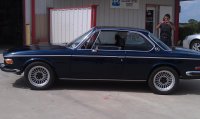
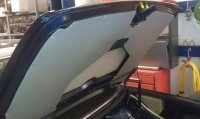
Yesterday the glass men came over and put in the "final" pieces- if that is ever possible, anyhow I think I can say she's done in that I can drive her more than just around the block. I have a few electrical issues and some fitment issues but I figure I can work through them as I test drive her to work and back each day. It was pretty scary watching these guys "bang" the glass into place, but they were familiar with the e9 and it went really smoothly, it only took about an hour for both pieces, and they probably would have been done faster if I was not there to help. I still have a few interior pieces to go in and I'm going to wait a week or two on the headliner because I want to thoroughly test the sunroof. I also have to re-read the instructions on the reverse light switch connection since the conversion. Anyhow, I put in a few pictures below and I'll post some more when I get her on the road for her first extensive test drive. As always, thanks to you all for the help!
You are using an out of date browser. It may not display this or other websites correctly.
You should upgrade or use an alternative browser.
You should upgrade or use an alternative browser.
She's done, I think
- Thread starter Peter Coomaraswamy
- Start date
Awesome-congrats!
Beautiful!
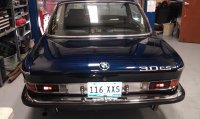
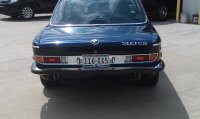
Looks like you need bumper blanks for thos holes under the rear license plate. PM sent
http://www.e9coupe.com/forum/showthread.php?t=13796
Looks like you need bumper blanks for thos holes under the rear license plate. PM sent
http://www.e9coupe.com/forum/showthread.php?t=13796
Polariscsl
Well-Known Member
Fantastic! Not long now!
wow !
great
congratulations !
great
congratulations !
Pictures?
Lets see how it looks with the blanks in place
Looks like you need bumper blanks for thos holes under the rear license plate. PM sent
http://www.e9coupe.com/forum/showthread.php?t=13796
Lets see how it looks with the blanks in place
She looks beautiful!
Major Pia
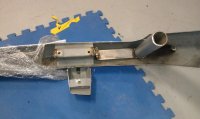
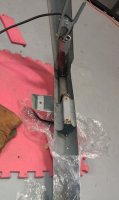
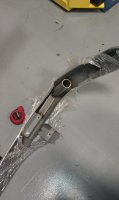
IF you are going to try this, it as allot more involved than I originally thought because the mounts you make need to have a pivot so the tubes will line up when you start and line up when the bumper is in. Technically, it is easy, but in practice, there is allot of trial & error. In retrospect I may take all the mechanations off and do it the Karmann way, (out of the 10 better ideas I think only 1 really worked). Basically, when all was said and done it may be unique-but is it really any better -that I question.
IF you are going to try this, it as allot more involved than I originally thought because the mounts you make need to have a pivot so the tubes will line up when you start and line up when the bumper is in. Technically, it is easy, but in practice, there is allot of trial & error. In retrospect I may take all the mechanations off and do it the Karmann way, (out of the 10 better ideas I think only 1 really worked). Basically, when all was said and done it may be unique-but is it really any better -that I question.
hi peter,
car looks great.
as you are the first to mount euro rear bumpers using orig '74 tubes, can you pls elaborate on what/how you did, and include pics of all?
thnks much,
alanmcg
Hi Alan, I put together some pictures and even though I measured everything as many ways as I could think of it still caused me some jammed digits. The advantage of the Karmann method is that you can slide the bumper left and right a quarter inch and when you use the tubes you can't move them sideways at all, well, it can "pitch" but not slide. Forgive the sloppy welding, I figured no one would see it and I had to re weld a few times to get the correct position. Note; it would help if you could fabricate a swivel where I mounted the tube to the plank of steel but clearance is at a premium. weld an "L" in the mount to bring it as close to the back of the bumper as possible. Also, when bolting up the bracket don't weld where the threads are in case you want to use the threads. Do anything you can to make the attachment of the side bolts easier. Have at least 1 extra set of hands around. Use some soap on the rubber guides. You can make everything and bolt it up before welding your bracket to the bumper and try it on for size but you can't leave the bolts in there because they'll hit the body and the bumper will be 1/4 inch(or more) away from the body. Also, grind down that corner stud that holds the rubber strip on. Measure, measure measure, because once you weld it on you can't get in to adjust anything except in and out but the tubes actually have a plate on the bottom with an elongated hole so you can make minor adjustments though you'll have to pull the bumper off to get to your bolts. It's the last 1/4 inch that is the major pain- like everything on these cars. When I put mine in it moved the rubber blocks so it was like "sh!t-what's next", thus my comment about doing it the old fashioned way. In the end, I don't think it really makes a difference, sorry I had to learn that after about 10 hours. :-(
And good luck!
And good luck!
Attachments
jamesw
Well-Known Member
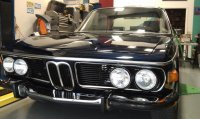
That is a really beautiful car Peter! I love the finish.
Cheers
James
Cheers
James
Thanks guys, yes Karmann method meaning the 4 bolts to the rear, which in my case would have to be drilled. It's so painful to put a drill bit to that new paint :-(
blue..
Really looks wonderful...the color and your TX tag look perfect together!
Dave V. in NC
Really looks wonderful...the color and your TX tag look perfect together!
Dave V. in NC
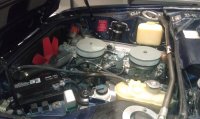
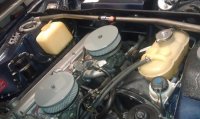
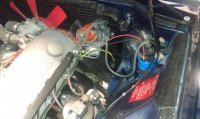
Every time I think I'm done... I type up another list of essentials. Well, the car is on the road but not running quite up to snuff. I got some suggestions regarding the hi reving and "popping" on my initial test drives and received my petronix yesterday. I connected everything up, gap at 30 per the instruction sheet, rev at 1700, "Z" visible at the mark on the bellhousing, removed resistor from blue coil. Runs better, but still seems a bit rich as my neighbors in the building next door were gagging a little. I also sprayed carb cleaner around the bases of the carbs and intakes and there was no change in idle and checked the nuts all around to be sure they were tight-all good. If it does not rain tomorrow I'll take her for another test drive to see if there was a decent improvement. Her symptoms are; rough running engine all the way through the rev range, smoother at idle at around 1000 RPM, but has an inconsistent shake as she revs.
Question, the linkage on the front carb (dual Webers) looks a little misshapen but does not seem to be binding, although I can't seem to get the idle stop to rest on the screw, it always stays about 1/16 in. off the stop?
From one of the pics below the yellow wire from the electric chokes is disconnected-where should I plug that in?
Side note, got the strut bar from La Jolla, could not put the air cleaner on because the Webers sit a little higher than the Zeniths- my neighbor offered to fabricate a custom air cleaner housing or does the forum suggest modifying the stock one. The little hub caps on there now are just temporary-and I promise not to paint flames on the car.
I fabricated some trunk-lid pieces from embossed fiber board. I think they came out well- now all I need is a toolbox.
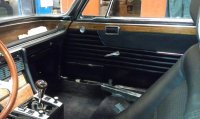
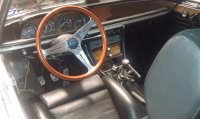
Also, on the interior I used a VW CV Joint boot to isolate/insulate the trans tunnel from the interior. That is my favorite mod so far. Also, if anyone is wondering about the wood pieces in the console, a few of the slots were broken/twisted and missing when I got her so they didn't seem to function for anything special- I guess I could mount an oil temp guage in one side?
Anyhow, I included some pics and if anyone sees anything in them that looks upside down please let me know. -Thanks
Question, the linkage on the front carb (dual Webers) looks a little misshapen but does not seem to be binding, although I can't seem to get the idle stop to rest on the screw, it always stays about 1/16 in. off the stop?
From one of the pics below the yellow wire from the electric chokes is disconnected-where should I plug that in?
Side note, got the strut bar from La Jolla, could not put the air cleaner on because the Webers sit a little higher than the Zeniths- my neighbor offered to fabricate a custom air cleaner housing or does the forum suggest modifying the stock one. The little hub caps on there now are just temporary-and I promise not to paint flames on the car.
I fabricated some trunk-lid pieces from embossed fiber board. I think they came out well- now all I need is a toolbox.
Also, on the interior I used a VW CV Joint boot to isolate/insulate the trans tunnel from the interior. That is my favorite mod so far. Also, if anyone is wondering about the wood pieces in the console, a few of the slots were broken/twisted and missing when I got her so they didn't seem to function for anything special- I guess I could mount an oil temp guage in one side?
Anyhow, I included some pics and if anyone sees anything in them that looks upside down please let me know. -Thanks
Attachments
Did you balance the carbs for airflow either with a synchrometer or a carbmate as suggested in the other thread? The shaking indicates this could be the cause. Linkage sounds suspect, it must be exact for both carbs so when the accelerator pedal linkage is moved each carb opens identically.
Vacuum advance plugged when setting timing?
Did we cap all unused vacuum ports on the carbs?
Vacuum advance plugged when setting timing?
Did we cap all unused vacuum ports on the carbs?
Steve, Plugged everything, and reset the linkage, checked for identical movement (was way off) and tomorrow I'm going to visit a friends shop who has a carbmate and allot more experience synching carbs as he does allot of work on VW's (old and new), he also does some aircraft engines so I think I'm in good hands. I'll post what I come up with. Thanks so much for your help!
Peter C
Peter C
DerSchwede
Well-Known Member
Definately sounds like a balancing issue.
BTW, have you checked the cam timing? Not that the cam is a tooth off....
BTW, have you checked the cam timing? Not that the cam is a tooth off....