jmackro
Well-Known Member
Page down to post #15 to see how I solved this problem. Thanks to everyone who provided ideas!
---------------------------------------
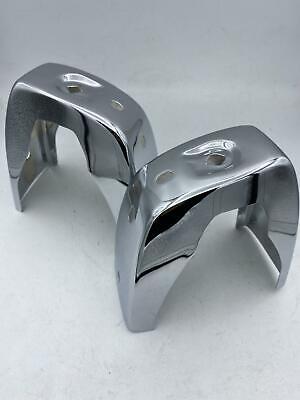
My reason for going down this rabbit hole is to have my bumper overriders replated. But to do that, I need to remove the black rubber "bumpers" that cover the faces of the four overriders. These are attached with four 6 mm studs and nuts (see first photo below). The hardware tends to rust, making it impossible to loosen without shearing off the studs. I have used a small nutsplitting tool to crack the nuts on the outer ends of the overriders, but was unable to fit my splitter over the curved surface of the overrider to attack the inner nuts (see second photo below).
Does anyone have a creative idea for removing these nuts? I have tried penetrating oil and heat (you can't cook them too much, as they are in contact with the rubber). I believe that splitting the nut is the best approach; does anyone know of a tool that is small enough to get in there? Most nut splitters seem to be made for huge nuts located in easily-accessed spaces. Getting a chisel and solid backing into the overrider seems impossible. Grinding off one side of the nut with a Dremel perhaps?
It would be nice if replacement rubber & stud assemblies were available, but they seem to be NLA.
I know that the "last resort solution" is to just shear off the studs and use short sheet metal screws to secure the rubber to the overriders. But before doing that, I thought I'd tap the collective wisdom & experience of this group.
.jpg")
.jpg")
---------------------------------------
My reason for going down this rabbit hole is to have my bumper overriders replated. But to do that, I need to remove the black rubber "bumpers" that cover the faces of the four overriders. These are attached with four 6 mm studs and nuts (see first photo below). The hardware tends to rust, making it impossible to loosen without shearing off the studs. I have used a small nutsplitting tool to crack the nuts on the outer ends of the overriders, but was unable to fit my splitter over the curved surface of the overrider to attack the inner nuts (see second photo below).
Does anyone have a creative idea for removing these nuts? I have tried penetrating oil and heat (you can't cook them too much, as they are in contact with the rubber). I believe that splitting the nut is the best approach; does anyone know of a tool that is small enough to get in there? Most nut splitters seem to be made for huge nuts located in easily-accessed spaces. Getting a chisel and solid backing into the overrider seems impossible. Grinding off one side of the nut with a Dremel perhaps?
It would be nice if replacement rubber & stud assemblies were available, but they seem to be NLA.
I know that the "last resort solution" is to just shear off the studs and use short sheet metal screws to secure the rubber to the overriders. But before doing that, I thought I'd tap the collective wisdom & experience of this group.
Last edited:
") )
)