The Paul Cain Seatbelt Mod

inovermyhead

Well-Known Member
Messages
516
Reaction score
166
Location
Sydney
Guys,

Tossing up how much time and effort it would be to relocate the seat belt mechanism into the void at the door pillar, the same arraignment that Paul Cain did on his coupe.
To really take this idea any further I need two things.

Your comments and views and, at least some photos of the interior of Paul's car or better still a working link to his photos that now seem to be unobtainable, or lead to a gambling site.

Cheers.

John
 
Rear Quarter seatbelt

I did something like (but not nearly as nice) the Paul Cain installation out of left over parts and some helicopter inertia reel seat belts and e21 bits and pieces.

The roll bar allowed me to position the top point where I wanted it but made the installation of the reel in the door panel cavity much more difficult. If you use the stock roof anchor point for the top mount it really isn't a difficult project. I haven't finished the quarter panel card part (using e21 parts here) but the system works well and I like the chest belt in it's lower position.

http://s54.photobucket.com/user/decoupe/slideshow/Quarter Panel Seat Belts
 
here are a couple of options ... i only have the finished visual from Paul's coupe ... but there are two that use the e30 bar, with an inertia wheel mounted like Paul did.

I have been considering doing this with an e24 wheel and lower mount. what remains is to figure out how to exit the panel and mount the e24 upper mount.
 

Attachments

  • seat belts - e30 - mount.jpg
    seat belts - e30 - mount.jpg
    91.6 KB · Views: 739
  • seat belts - e30.jpg
    seat belts - e30.jpg
    56.2 KB · Views: 1,314
  • seat belt - paul cain.jpg
    seat belt - paul cain.jpg
    34.6 KB · Views: 766
Thanks guys for your replies and photos, much appreciated.
I agree that the most difficult part will be how to exit the panel without destroying the panel itself or making somthing that looks really ugly.
If I go this route I will use the existing roof mount rather than than the low mount, my car has not got the later mount and although somthing could be fabricated to fit, I'm a little unsure where would be strong enough given that the panel behind is bolted in. Again thoughts,ideas and comments please.

Cheers. John
 
Can somebody please post a shot of the seat belt mounting point on the B pillar that the later cars had so I can see what the factory did. Thanks. John
 
Can somebody please post a shot of the seat belt mounting point on the B pillar that the later cars had so I can see what the factory did. Thanks. John
there were 3 front seat belt scenarios that i am aware of - the spaghetti belts that were attached in the rear and just had a hook on the wood of the rear side panel - this was on the 2800cs and perhaps very early 3.0cs (not sure)

the 3.0cs had the roof hoop above the rear of the door. manually tensioned belts with the floor mount for the other end. many people have used the extender that dropped the pivot point made by a forum member with an inertia wheel mounted behind the base of the seat. (normal seatbelt end).

the '74+ 3.0cs had the rear mounted inertia belt - i don't know if there was any mount.
 
There is another, "Bluedevil" has a drop in kit for three point belts. Uses existing mounts, no cutting, and could be returned to stock. He uses a cool drop down for the shoulder mount that makes the position of the belt more appropriate.

i have a set of e24 belts and is on the list of future projects. Been meaning to get a set of these drop down mounts to make the shoulder attachment.... The stock shoulder strap position sucks. The e24 belts also have a mechanism to swing the floor attachment out of the way for better access to the back seat.

Search Bluedevil.
 
I may well be wrong but I thought that the later cars had a mounting point at the b pillar for the shoulder swivel, that's the area I need to see. Mounting the retractor mech in the void in front of the rear window looks to be not all that hard, apart from the cosmetic look of the trim panel, the tricky bit will be the angle of the belt where it rises to go over the shoulder, as I understand it it cannot be more than 45 degrees and really needs to be shallower than this. It may explain why the reels were mounted so far back
Still would like to see a photo of the later mount if anyone has one.

Cheers. John
 
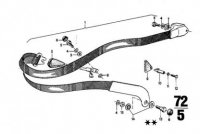
here is the pic of the parts diagram for the '74 seatbelt. perhaps part 9 is the part you are talking about. i don't have a '74, and don't have a rear seat pic with the seatbelt to show it ... but perhaps somebody else can help.

yes Bluedevil is the guy i was referring to that makes the dropped pivot from the roof hoop.

Wayne, if you start on the e24 seatbelt install please keep me informed and i will do the same. i like the bottom mount and the overall idea. if i start working on mine ... i will do the same as i already have the set of belts.

scott
 

Attachments

  • e9 seatbelt - 74.jpg
    e9 seatbelt - 74.jpg
    15.6 KB · Views: 552
Still would like to see a photo of the later mount if anyone has one.

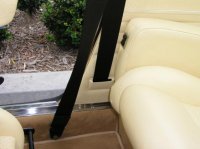
John, I'm not sure if this is what you mean but here is the seat belt from a '74. A pretty good setup in my opinion. I don't like the ones that hang from the roofline as they break the clean visual openness. This offers a retractible system that works well, as least for the front passengers.
 

Attachments

  • seat belt 1.jpg
    seat belt 1.jpg
    96.8 KB · Views: 915
  • seat belt 2.jpg
    seat belt 2.jpg
    94.3 KB · Views: 813
  • seat belt 3.jpg
    seat belt 3.jpg
    94.9 KB · Views: 594
  • seat belt 4.jpg
    seat belt 4.jpg
    94 KB · Views: 682
John, I'm not sure if this is what you mean but here is the seat belt from a '74. A pretty good setup in my opinion. I don't like the ones that hang from the roofline as they break the clean visual openness. This offers a retractible system that works well, as least for the front passengers.

I have this setup to on my '73...
 
I am interested in buying a set (#9/10 on the diagram) if anyone has a spare. I know W&N has aftermarket ones...currently on sale
 
Thanks guys for putting up the photos and comments, we are getting closer.
As I'm thinking of a more custom setup these photos show where the swivel for the shoulder mount needs to be, what I really need is a shot of what PC did at that point as my belt will arrive at that point vertically rather than horizontally.

I have been talking to Pawel at Quickfit belts in the UK, he is a mine of information regarding all things seatbelt related, and has a wealth of experience in fitting belts to older cars, including the E9 as the web site shows.

Cheers. John
 
Hi!
I can recommend Quickfit Belts. Pawel supplied all the parts that I needed to make my own seat belt design, which is working very well! It took a lot of time to find out how to engineer the upper (shoulder) mount solution. It´s not much room for additional metal profiles under the leather covered bracket but it is possible to solve this without compromising safety.
 

Attachments

  • P1000536.jpg
    P1000536.jpg
    87.3 KB · Views: 529
Thanks guys for putting up the photos and comments, we are getting closer.
As I'm thinking of a more custom setup these photos show where the swivel for the shoulder mount needs to be, what I really need is a shot of what PC did at that point as my belt will arrive at that point vertically rather than horizontally.

I have been talking to Pawel at Quickfit belts in the UK, he is a mine of information regarding all things seatbelt related, and has a wealth of experience in fitting belts to older cars, including the E9 as the web site shows.

Cheers. John

The 74> B-pillar hooks are just that...hooks. Their only function is for "hanging" the belt when they are not in use. In order for this point to be used as a belt swivel anchor, one has to reinforce the thin sheet metal in this area with some thick metal bars.
 
Last edited:
Hi!
I can recommend Quickfit Belts. Pawel supplied all the parts that I needed to make my own seat belt design, which is working very well! It took a lot of time to find out how to engineer the upper (shoulder) mount solution. It´s not much room for additional metal profiles under the leather covered bracket but it is possible to solve this without compromising safety.

i can confirm that quickfit and pawel are an excellent choice,
 
Thanks guys for putting up the photos and comments, we are getting closer.
As I'm thinking of a more custom setup these photos show where the swivel for the shoulder mount needs to be, what I really need is a shot of what PC did at that point as my belt will arrive at that point vertically rather than horizontally.

I have been talking to Pawel at Quickfit belts in the UK, he is a mine of information regarding all things seatbelt related, and has a wealth of experience in fitting belts to older cars, including the E9 as the web site shows.

Cheers. John

i posted this back on the day,

http://www.e9coupe.com/forum/showthread.php?t=11797&highlight=quickfit
 
74 seat belts

I have done in the past some 74 front seat belts as discussed here. You can reuse the existing triangles and hangers on the rear quarter panel. if you want a new set of quality seat belts for your 74 (and older models e.g., 73) please PM me. For 74, you need to send your triangles to install on new belts. If you don't have them, Ii can include a pair of aftermarket metal triangles that will work wit the existing hooks.
best
Bluedevils (al)
 
Seat Belt Update - Fronts

Latest work completed with successful update of seat belt design.

Huge thanks to Vaughn & Georgio at Motorretro in Sydney and Pawel at Quickfit Belts in London.

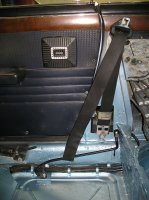
My method for Front Belts - and I'm hoping the photos will help explain.

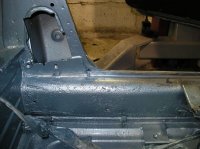
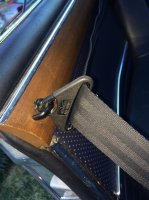
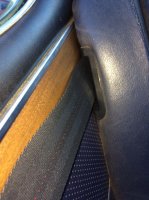
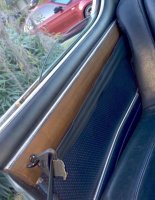
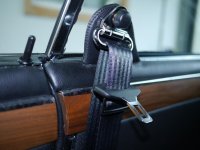
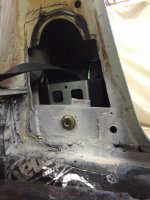
Existing cavity in the door post cut & reinforced with 5mm steel seam welded into the top of the sill and a right angled tab welded internally in the cavity. Drilled & tapped 7/16th for seatbelt mechanism mounting bolt. We strengthened the seatbelt mount by welding the supplied tapped bracket to the body, which allowed threaded bolt to go through both the reinforced bodywork as well as the solid, now modified, base of the mechanism.

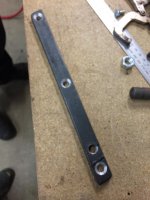
We used 20x10mm flat steel bar which was cut & shaped to fit the vertical recess in the removable panel in the rear window recess. The bar was cut to fit and oversized holes were drilled & countersunk to hold recessed head bolts that replace the standard three. Finally a 7/16 tapped hole for the seatbelt bolt to fit. This design allows for the possibilty of having to remove the rear window at some stage, and is much stronger that simply bolting through what is a removable panel.


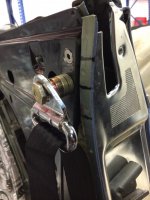
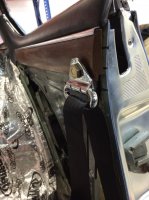
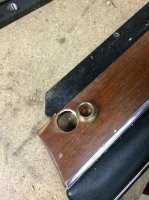
After careful measuring - several times - which involved refitting the wooden dress trim, we drilled a pilot hole carefully through the wood & steel of the panel and expanded the hole out to suit the swivel & spacers needed for the belt for the finished result.

Modifying the lower trim panel (the vinyl part) was fairly straight forward - involved cutting a slot at the right height in line with the stitching on the trim, large enough to let the belt run freely, so trimmed clear of any material and finished with escutcheons. We angled the mechanism back by a degree or two, to allow the swivel belt at shoulder height to be set back from the edge of the dress trim by approx 30mm. Quickfit Belts supplied stainless steel escutcheons which we modified simply by sanding any sharp edges that may cause wear on the seatbelt material (I made aluminum ones for the rear belts, much easier to sand).

Rears to follow.

Cheers

John
 

Attachments

  • IMG_1672.jpg
    IMG_1672.jpg
    91.2 KB · Views: 607
  • IMG_1683.jpg
    IMG_1683.jpg
    83.2 KB · Views: 617
  • IMG_1686.jpg
    IMG_1686.jpg
    90.1 KB · Views: 613
  • IMG_1690.jpg
    IMG_1690.jpg
    91.5 KB · Views: 591
  • IMG_1688.jpg
    IMG_1688.jpg
    97.4 KB · Views: 590
Back
Top