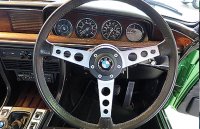
Wood

Mal CSL 3.0

Well-Known Member
Site Donor
Messages
543
Reaction score
234
Location
Sydney, Australia
Hi guys, couple of questions (have also reviewed previous threads on this topic):

1) Wood - my car's is only about 7/10, so considering what to do about it?

Am thinking of getting a professional wood work refurbishment (I have a dash specialist who did my wood on another '70's car and it was excellent work, but they said they have never attempted an E9) So need some guidance on how hard it is to remove all the wood off a BMW CSL dash and door panels? Is it easy to take off and then put back together or does the whole dash need to be dismantled just to get the wood off? And is it a nightmare job or relatively easy? (Rest of dash is fine, just need the wood redone).

As another option, aside from professional full refurbishment, I was wondering if anyone on the forum has done any quick wood work fix that looks okay? Has anyone done their own lacquering, wood stain or used beeswax or any other wood enhancer that made an improvement, without actually removing the wood from dash? (this a probably a lame idea that would end up looking rubbish, but sorry I needed to ask?)

IMG_3723.JPG
 

Attachments

  • Screen Shot 2017-01-24 at 8.22.43 PM.jpg
    Screen Shot 2017-01-24 at 8.22.43 PM.jpg
    614 KB · Views: 160
Last edited:
Highly recommend finding a shop well versed in E9 dash removal.

I had Vintage Sports and Restoration in Bow New Hampshire remove my wood trim and send it to Madera Concepts in California. As far as I know, the windshield has to be removed to properly remove the dash. There are several hidden fasteners securing the wood on the dash. The doors and rear quarter wood is easy in comparison. There are screws on the back that secure the pieces to the panels.

If there is no delimitation of the plywood substrate from water damage, refinishing is straight forward. Keep in mind the veneer is only 1/16 to 3/32 of an inch and can be sanded through easily.

I highly recommend having everything re-veneered so it all matches.
 
It looks like most of your issues are with the 'grab bar' and the doors. How is the wood dash face?

The door wood is easy to get off. The grab bar is even easier to remove. The steering wheel is simple to remove, and the under dash panel is a snap. The rest is a total pain. I'm in the process of documenting but I had to switch to some other tasks first.

A shortcut would be to remove the door wood, console wood, grab bar, and cluster. I think that any determined (but careful) e9 owner can tackle the removal of these parts on their own. If the actual big dash piece needs refinishing you could tape off the vinyl and lightly sand and stain. The dash removal is kind of a slippery slope. In addition to the windshield (which some folks have left in), you need to remove the chrome A-Pillar covers, which means you need to remove your door seals. If you have old door seals, you may want to tack on another $400-$500 to the potential budget in case they fall apart during removal. It may be possible to move the seals to the side to access the chrome screws, I didn't check when I removed mine.

IMO - If you go through the effort of having the dash and windscreen professionally removed and installed, have the wood re-veneered and not just refinished. That's a ton of labor just to re-work the old veneer. Also - if you do remove the dash it's a good time to paint your steering column.

Some pain mentioned below - I really like Scott's description of the cluster removal.
http://www.e9coupe.com/forum/threads/speedometer-instrument-removal.15607/
 
...sorry Mal, but to do it properly you will need to "pull the wood " ...snigger :)

Our good friend Wally with the CSL her in Perth has great knowledge on dashboard removal/replacement and I'm sure will guide you ...but from my novice perspective it's pretty straightforward. Just note /label "what goes where" when dismantling .I daresay one of the "Elders" will provide a link to the process .
Cheers, Simon
 
A pillar trim and door seals are not involved in dash removal

Perhaps not. However, If you look at Mal's photo below the chrome (aluminum) wraps around the end of the wood and the vinyl. If you look closer you will see that the aluminum swells to accommodate the dash, then gets more narrow as you travel up the A-pillar. I didn't come up with that one on my own, and unlike everything else I didn't read about it on here. I had two experienced members make that recommendation to me to avoid breaking the end points of the dash. I haven't done it without removing that trim but it doesn't surprise me that it's possible. I can give it a shot with my project dash since it's already beat up.

Borrowing Mal's photo:
IMG_3723.JPG
 
I've done this at least a dozen times.
I always remove both screws on the A pillar
Allows the ends of the dash to come out without damage.

Just to be clear- I only remove the 2 screws and loosen the trim.
The screws are behind the 2 inch intermediate door seal seal
 
Last edited:
Thanks Markos and everyone.

Actually the wood face is far better than the other parts so I could perhaps get away without doing it (I don't want to take the windscreen out).

I will talk to my dash specialist about removing and doing the grab bar (although it's been glued down on Lhs), doors (which are the worst) and the instrument console part. I will get his opinion on whether that would look okay without the large dash section being done. Also luckily the wood tray near the gear stick is still perfect.

Hopefully he can do it without it looking like piecemeal.

(Previously a lot of effort was made to restore the rest of the car such as body, paint, lights, engine and all other trim. Basically the only thing not done was the wood. I asked why and was informed the previous owner wanted the patina and to maintain origionality?)
 
Mal, you don't need to take the windscreen out.

This is true. My glass is out because it needed to come out. Everyone says it's easier to do with the glass out but I'm not far enough along to observe the benefits yet.

BMWPete told me he pulled one with the glass in. He said it was a chore. Having no AC has to help. That screw underneath the dash near the vent console is tricky with the AC installed. I pulled mine, again because it had to go regardless.
 
IF YOU HAVE A LONG 14" SET OF NEEDLE NOSE Pliers you can twist thew front clips out from the bottom
you crimp them and twist 90 DEG -THEY COME OUT OF THE rectangle washer they set in
the slot that is in the dash is a rectangle going left to right and the clip is front to back
there are two - one clip is in the dash and the other sets in it
push up first to release it then twist the bottom out
its then free to pull backward
ive done it twice - the the rest is documented here
you can also get the center screw out with needle nose pliers from the left
it helps to get access from the speaker hole also
the two center clips you can feel with your hand from the speaker hole
about 6" apart from center line
 
Last edited:
Mal, I have a complete set of restored wood for my CSL sitting on shelves if you wish to take a look.
 
I did the refurbishment of my wood. The most difficult topic is to mount the top black part of the dashbord again.
It is NOT possible when the windshield is mounted.
Alternatively the original "snap ins" could be replaced by special welding nuts and screws from the buttom upwords.

If you want to keep the origginal veneer: The original paint is uggly to remove. The third pickling agent works somehow. The paint is much tougher then the very thin "soft" veneer; so be extremly careful during sanding.

Have a lot of fun...

Best Regards from Germany; Willy
 
After loosening the defrost vents from below, I was able to remove my dash with the windshield in place. After removing the A/C box and thus the "infamous dash screw", I was surprised at how easy the dash came out.

The spring clips can be compressed from below, helps to have the seats out, but most of mine broke off from the dash. Now I can get to that last bit of wood for my at home relamination project!
WP_20170201_15_07_48_Pro.jpg
 
After loosening the defrost vents from below, I was able to remove my dash with the windshield in place. After removing the A/C box and thus the "infamous dash screw", I was surprised at how easy the dash came out.

Hi James,

I need to pick this up tomorrow. How do you get the vents out. Do you pull the spring clips holding them in or do you just wiggle the vent out? I tried but was overly gentle.
 
I wiggled gently fore and aft and was able to move the vents horizontally out of the clips. Lying under the dash I pushed the base of the vents lightly toward the rear of the car while pushing up on the dash itself at the dash clips that fit through the sheet metal frame. Once I got a bit of play, I attacked it from up top, lifting up on the dash while pushing down and forward on the vents. Popped right out, but several of my clips remained in the metal frame, rusted in place.
 
Hi James,

I need to pick this up tomorrow. How do you get the vents out. Do you pull the spring clips holding them in or do you just wiggle the vent out? I tried but was overly gentle.
Forgot to quote you in my previous post. Also, if your horizontal dash tray wood (the piece with the vinyl on top) isn't spoken for on your part-out, I'd be very interested. Mine is severely water damaged and delaminated. Came out in individual "plys" essentially.
 
Thanks James!

I bought my parts car for the minty dash. You are getting good at this laminating process though. In addition to my target dashboard, I have two dash faces, two clusters, and six pieces of door wood. Much of that is still in the project car but I have the dash parts free, plus the driver and passenger rear wood. Shoot me a PM.

I didn't intend to sell this stuff until I found d the parts car.
 
Back
Top