I just rebuilt my carbs and they run beautifully but now that's it's cold, the idle is pretty bad till it warms up. I know the thermo valves are shot and I got my hands on 3 other carbs and the valves are shot on all these. I cannot find any new. Is there some type of replacement for these.....and please don't say Weber? Thanks.
You are using an out of date browser. It may not display this or other websites correctly.
You should upgrade or use an alternative browser.
You should upgrade or use an alternative browser.
Zenith cold start valve
- Thread starter bavbob
- Start date
I just rebuilt my carbs and they run beautifully but now that's it's cold, the idle is pretty bad till it warms up. I know the thermo valves are shot and I got my hands on 3 other carbs and the valves are shot on all these. I cannot find any new. Is there some type of replacement for these.....and please don't say Weber? Thanks.
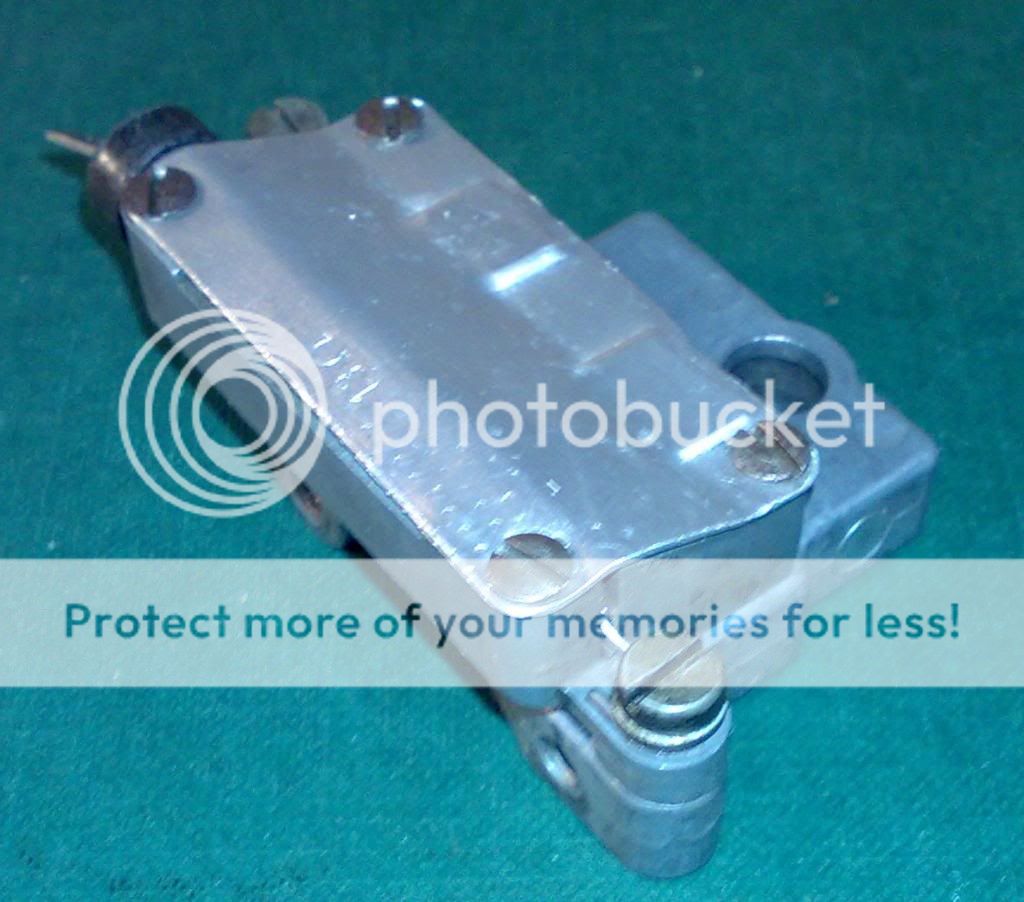
please post pics that detail the type of zeniths that you have and tell us which is the so called thermo valve
i run on zeniths too, and i rebuilt them
i have some spares, but i do not know what is what you need
of course, "never weber" and stay zenith !
regards
link to my videos, nine videos with a comprehensive repair of zenith carb
:
http://www.youtube.com/watch?v=7-bMXv_N-Vg&feature=youtube_gdata_player
Last edited:
Not every Zenith had these, are they really needed? If your water chokes work as designed you should be good. I'm not an expert on these however, other thoughts?
I just assume that it is necc since it ran well in summer immediately on start up and now needs to be warmed up first. The CSV is very important for the fuel injected cars, my E24's run horrible without them. The thing basically acts as an additional fuel injector till the car warms up.
Do you still have the original smog gear hooked up? Maybe that makes a difference. Of course in Huntington Beach I don't really have to deal with "cold."
tomorrow morning before you start it up (or tonight if the engine is cold), press the accelerator to the floor to set the chokes closed and take a picture of them before starting and post it here.
That device only works at below 40 degrees and only for a short time. There is a valve/ cone of sorts at the end of the bi-metallic spring. Make sure it's centered and not off to one side. The way I check that device is that the cover gets hot. If not, there's a ceramic resistor inside that the wiring connection just sits in. Check that. I've never seen one bad.
My guess is there's more to it than that part.
Dial in more choke. If your cold idle isn't at least about 1500 rpm then find that hidden screw to turn that up as well.
I assume no carb is spitting back indicating a lean condtion.
My guess is there's more to it than that part.
Dial in more choke. If your cold idle isn't at least about 1500 rpm then find that hidden screw to turn that up as well.
I assume no carb is spitting back indicating a lean condtion.
I assume the parts are bad since the guts look like they have exploded. I will check the choke again, but I set it like the manual states using a drill bit etc. Also it starts and idles great in warm weather. I did turn up the idle mixture screw which improved things but now when warm, idle is about 950. This would indicate I need to run a little richer for a while till warm which is what this thing is supposed to do. Sadly, already in the low 30's here in the am.
There are two methods of setting the flapper/ upper butterfly. The other way is to close it cold. Upon start up the flapper opens by the amount of the drill bit size. The BUT is that the linkage slack is removed which almost takes three hands. Pull up on the rod, push down on the small pivot/ setscrew.
Equal and almost closed is more important. Not binding and releasing the same is second.
You have to experiment a bit with factory settings on old parts something the factory never dealt with. Those heater coils both water and electric in particular.
Cold fast idle is terribly important past 40 degrees just for the first minute or two to allow the manifold to heat up a bit. The fuel atomization tends to puddle in the bottom of the first part when cold. Hence the water jacket.
If you're at 950 rpm and a smooth idle that's good. If you're careful, tweaking the butterfly screws a degree or two either way can help to enrich the mixture. But listen and wait for the exhaust note between tweaks. I'd say screw in those idle mixture screws a bit too becuase distributer advance can start kicking in and increase idle and go wonky. Something the manual doesn't speak to.
Basically as I suspected, this is an art. Perhaps I would achieve nothing if I replaced them. Since I am the only one concerned about them and they are no longer available, they may represent the classic German over-engineering. I can live with what I have, others think the car runs awesome, I am a perfectionists...... I do however prescribe to "The enemy of good is better". As a winter project I will try to rebuild these valves and let you all know the outcome.
Basically as I suspected, this is an art. Perhaps I would achieve nothing if I replaced them. Since I am the only one concerned about them and they are no longer available, they may represent the classic German over-engineering. I can live with what I have, others think the car runs awesome, I am a perfectionists...... I do however prescribe to "The enemy of good is better". As a winter project I will try to rebuild these valves and let you all know the outcome.
as to the valve, some said to cap the hole, others to left it always open, probably the best way is to check it as a trial-error way
unfortunately i can not help you since in my case those repaired carbs with the valve are now waiting on the shelf for an eventual need to replace the ones that are actually running good
did you perform all the settings in your carbs, as to the videos 8 and 9 of my collection ?
Last edited:
I will review all your videos. I have read everything on these carbs but actually seeing the adjustments performed should be far better. I do have to say I enjoyed re-building them. The only PIA was getting the carb closest to the firewall out. Once I did, the original starter was sitting in its glory asking to be changed.
I will review all your videos. I have read everything on these carbs but actually seeing the adjustments performed should be far better. I do have to say I enjoyed re-building them. The only PIA was getting the carb closest to the firewall out. Once I did, the original starter was sitting in its glory asking to be changed.
yes, it was hard to learn, but once learnt i love the detail job of cleaning and renewing them, and the feeling of having done it by yourself is great when you start the engine again after finishing the work
i have renewed 4 carbs in total, the first one took me a while, but the rest came easily
you did read about them ? great, there are different writings on that issue, in my case what comes to help was the unvaluable help of jerry (porsche61), a real expert in these carbs
as to the videos you will probably find help on the images only, because unfortunately the audio is in spanish
Let you know, my spanish is actually pretty good.
De Quincy- I watched all of your video clips and they were outstanding! I do not speak much Spanish, but did get a few words here and there. Tanks for posting them. Now we née an English version too!
as to the videos:
let me place here the link to the clip #2
it was uploaded by a friend due to the fact that lasts more than 15 minutes, so if you follow the first link you will not get this one:
#2:
http://www.youtube.com/watch?v=iJ6cZra27CU&feature=player_embedded
thank you glenn, english version ? i will put it in my "to-do" list
bob, fluent in spanish ? good for you ! cheers !
Last edited:
valv in question
i checked the spare thermo valves, they work ok
tell me if you are interested:

see the effect of the electric resistance, it opens the hole:

i checked the spare thermo valves, they work ok
tell me if you are interested:

see the effect of the electric resistance, it opens the hole:

Can you tell me how you tested them? I can do that to mine and let you know if I need to purchase yours. I can get this done tonight, thanks, Rob
Can you tell me how you tested them? I can do that to mine and let you know if I need to purchase yours. I can get this done tonight, thanks, Rob
sure
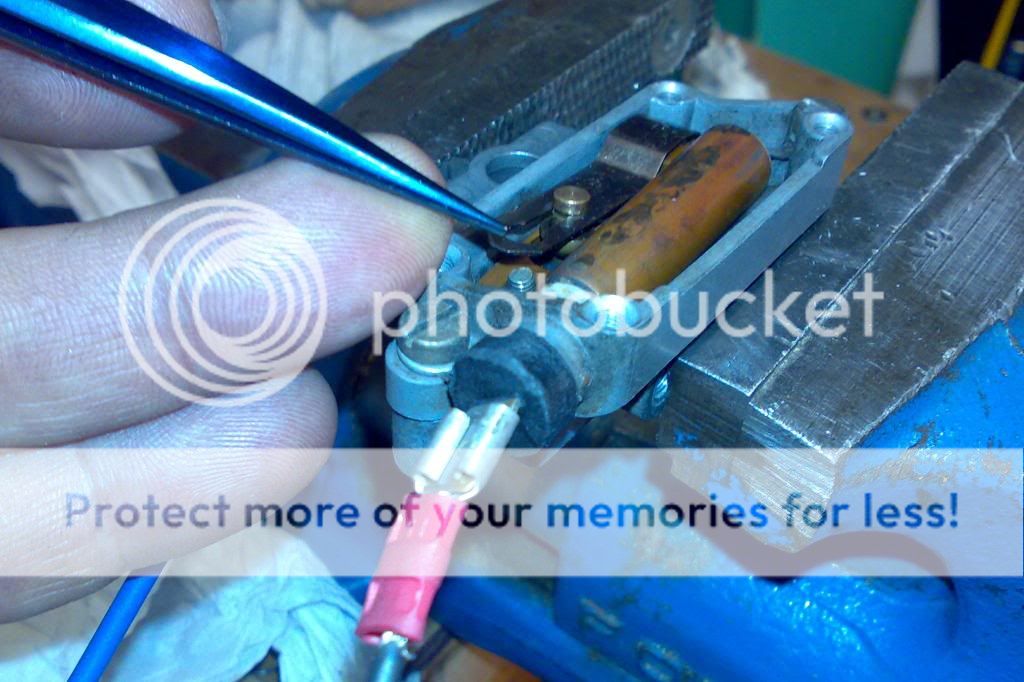
once cold, to check is simple, you open the closing plate (4 screws)
check resistance with an ohmmeter, 13 ohms
you look at the metal plate that holds the tiny metal element that closes the hole
you will see that it is closed due to the force of the spring, check that it is loose, and no grease or dirt blocks it
then you connect the cables, (+) to the faston terminal (-) to the body ot the valve
you will feel that the heat starts bending the plate outwards, leaving the hole open
that is it !


