1973 E9 3.5L engine Weber carbs need additional ignition advice

Ohmess

I wanna DRIVE!
Site Donor $
Messages
4,866
Reaction score
2,685
Location
Aiken, SC
Pretty sure those are DGAVs. Those are not E's of any kind because the E is for electric chokes and you can see the thermostat housing for the water chokes above the manifold with the coolant hoses running to them.

So before you begin tuning, your throttle plates are not closed. Either your linkage or the chokes or both are acting on the throttle plates. First step is to disconnect the linkage and see if they close. If not, your chokes may be clogged up or stuck.

Also, your throttle plates are not in the same position. If you look at the thermostat assembly on the rear carb, it points directly to the front one. The front one, however, is pointed somewhat up toward the rear. This probably accounts for the difference in the openings. I believe you adjust this by loosening the center bolt in the housing and turning it.
 

pickman

Well-Known Member
Site Donor $
Messages
406
Reaction score
132
Location
South Haven Michigan
Thanks I have done nothing to adjust the carbs since they were installed about 8 years ago. All the advice is appreciated.
 

pickman

Well-Known Member
Site Donor $
Messages
406
Reaction score
132
Location
South Haven Michigan
Pretty sure those are DGAVs. Those are not E's of any kind because the E is for electric chokes and you can see the thermostat housing for the water chokes above the manifold with the coolant hoses running to them.

So before you begin tuning, your throttle plates are not closed. Either your linkage or the chokes or both are acting on the throttle plates. First step is to disconnect the linkage and see if they close. If not, your chokes may be clogged up or stuck.

Also, your throttle plates are not in the same position. If you look at the thermostat assembly on the rear carb, it points directly to the front one. The front one, however, is pointed somewhat up toward the rear. This probably accounts for the difference in the openings. I believe you adjust this by loosening the center bolt in the housing and turning it.
I read this a couple times and am not sure I understand your observations, would it be possible for your to notate the photo so I can make corrections? There is a lot about these carbs I do not know. I did review the linkage and it need to be lubricated so any advice is much appreciated. Thanks!
 

Ohmess

I wanna DRIVE!
Site Donor $
Messages
4,866
Reaction score
2,685
Location
Aiken, SC
I read this a couple times and am not sure I understand your observations, would it be possible for your to notate the photo so I can make corrections? There is a lot about these carbs I do not know. I did review the linkage and it need to be lubricated so any advice is much appreciated. Thanks!

Sorry but I don't know how to mark up your pictures. I was referring to part number 5 in this diagram: https://www.carbparts.eu/exploded_view/WEBER_32-36_DGAV-DGEV.

There are two of these in each of your carbs. These are sometimes called choke plates. They are supposed to be closed only when the car is cold, and fully open when the car is warmed up. In your pictures, the rear carburetor appears to be fully open. The angle of these valves on the front carb is not fully open. I raise this because it can make your initial adjustments difficult.

The way those work, you are supposed to depress the throttle fully to the floor once before starting the car. That sets the fast idle screw on a cam (assuming the car is cold), which positions those choke plates partially open and the primary throttle plates fully closed. As the car warms up, device is supposed to turn the cam so that the device no longer acts on either the choke plate or the primary throttle plates.

You need to look at this once you get the car started and warmed up to ensure that the choke is not continuing to operate once the car is warmed up. Otherwise it will be hard to make the adjustments based on idle speed that Steve describes, and it will be difficult to synchronize.

If both are not open fully when the car is warm, I suggest disengaging them while you make your initial adjustments.

As to your point about lubricating the linkage, also make sure the linkage is clean. Parts of mine were pretty grungy.
 

Stevehose

Well-Known Member
Site Donor $$
Messages
12,976
Reaction score
5,650
Location
Sarasota, FL
and no slack in the linkage, particularly in the 2 carb connecting rod that mounts on the manifold with the ball joint ends, and each individual carb rod running from that to the carb.
 

pickman

Well-Known Member
Site Donor $
Messages
406
Reaction score
132
Location
South Haven Michigan
Again worked on the miss that is plaguing this engine, the front carb is experiencing a miss, backfire. Also noticed the front carb is making a sucking sound much louder than the rear carb and if I let the engine stall, around 900 RPM, the front carb smokes. This may be a valve issue??
 

pickman

Well-Known Member
Site Donor $
Messages
406
Reaction score
132
Location
South Haven Michigan
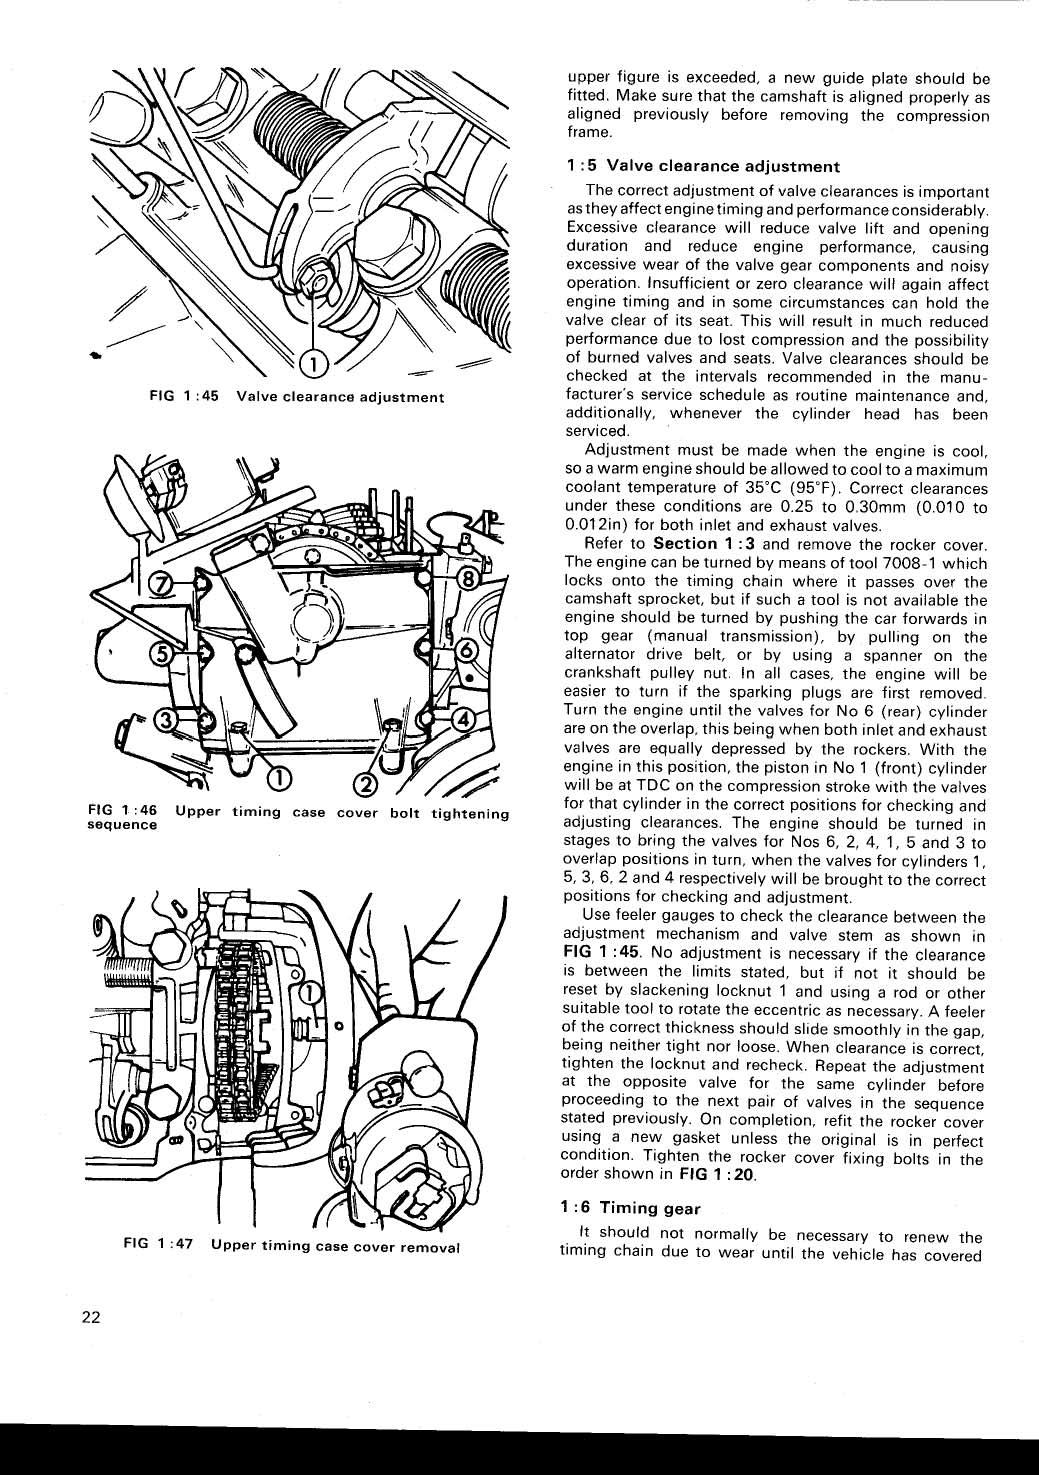
I checked the valve clearance all are 3.5 mm or slightly more cold. I then took Stevehouse's suggestion to point the cam lobe directly away form the valve (must mean the intake valve as its impossible to have both lobes pointing away for the respective vales at the same time.) ?? I have a mark on the OT of the front pulley but cannot see the notch in the timing chain cover so not sure where this aligns. I can see the OT and the ball bearing on the flywheel easily.

Assuming the cam lobe that is being referred to is the intake valve and guessing that the OT mark should be straight up on the front pulley the rotor in the distributor was NOT pointing even close to number one cylinder. It looks like I need further help with my reasoning on the timing.

No I do not have the synchronmeter or the adapter and probably need to find one if you can advise if I ever get the timing correct.
 

lloyd

Well-Known Member
Messages
444
Reaction score
94
I checked the valve clearance all are 3.5 mm or slightly more cold. I then took Stevehouse's suggestion to point the cam lobe directly away form the valve (must mean the intake valve as its impossible to have both lobes pointing away for the respective vales at the same time.) ?? I have a mark on the OT of the front pulley but cannot see the notch in the timing chain cover so not sure where this aligns. I can see the OT and the ball bearing on the flywheel easily.

Assuming the cam lobe that is being referred to is the intake valve and guessing that the OT mark should be straight up on the front pulley the rotor in the distributor was NOT pointing even close to number one cylinder. It looks like I need further help with my reasoning on the timing.

No I do not have the synchronmeter or the adapter and probably need to find one if you can advise if I ever get the timing correct.

Unless something has dramatically changed with the metric system, the valve lash you typed is much greater than the recommended clearance. ;)
In a pinch, synchronizing carburetors can be accomplished by ear.

A coughing carburetor make me think something is too lean and/or ignition timing may need some adjusting. A carburetor that has sat for a while can develop what appears to be mineral deposits that are promoted by moisture-attracting ethanol-laced fuel. This could easily occlude jet orifices making any attempts to synchronize carburetors futile. My first thought would be to remove the primary idle jet found on the side of the carburetor and ensure that it is clean and free flowing. This also includes the matching port into which the jet is secured. That idle jet is responsible not only for fuel delivery at idle, but part throttle too. If this doesn't result in any improved running, also consider (carefully) removing the forward carburetor cover (from memory 6 screws and an e clip for the choke linkage) and purge each jet with carb cleaner. What you find in the bowl, including the condition of the floats and needle valve, may indicate further remedial exploration.

Not having closely followed your travails, there are numerous things that are often taken for granted. Ignition points and spark plugs properly gapped? Any issues with leaky high tension leads? Even the routing of (compromised) plug wires can lead cross-firing. Inspect each wire and terminal for any signs of arcing, carbon tracking or corrosion. This includes distributor cap, rotor and even coil.


autobooks_manual_022.jpg
 
Last edited:

pickman

Well-Known Member
Site Donor $
Messages
406
Reaction score
132
Location
South Haven Michigan
lloyd thanks you for your advice. I can guarantee these carbs have set on the engine for about 8 years with only 2 hours idling runs. Looking at the plugs they look black all except #6 looks normal. Definitely plugs 1,2,3 (front carb) are the sooty-est. I have new wires but need a cap and rotor for the original distributor and am using the original coil. The advice to remove the jets and clean may be a good action due to the gas being in these for so long. I did drain the gas tank before starting this time and found the gas bad. I do no have a good fuel filter installed. I did get the timing set with the timing light to an acceptable point. I'll keep slowly working on these issues.
 

Stevehose

Well-Known Member
Site Donor $$
Messages
12,976
Reaction score
5,650
Location
Sarasota, FL
And once you have done Ohmess' suggestions then you can turn each carb's throttle stop screw out until it doesn't touch the linkage then back in until it barely does then in another 1/8 - 1/4 turn. Then turn idle mixture screws of each carb (not the thorttle stop screws) in until they seat (gently) then back them out 1 1/2 turns. This is your starting point. At idle, screw one in until the idle starts to drop then back out until it comes back up and doesn't increase any more. Then another 1/8 turn out or so. Repeat for other carb.

Your carbs are rich, did you do this yet?
 

pickman

Well-Known Member
Site Donor $
Messages
406
Reaction score
132
Location
South Haven Michigan
Yes I did, switched the idle needle valves front to rear and did exactly as you suggested. I have not had the time to fully tune them in or out form the suggested setting. I did get the engine timed with a timing light at the flywheel am satisfied this is very close, next to the fine tuning as you suggest.
 

Stevehose

Well-Known Member
Site Donor $$
Messages
12,976
Reaction score
5,650
Location
Sarasota, FL
So can you turn in th emixture screw(s) a little until it stumbles or does it stumble right when you turn them in? You want it to just stumble then back it out a little.
 
Top