1973 E9 Manual Center Counsel Help

pickman

Well-Known Member
Site Donor $
Messages
407
Reaction score
132
Location
South Haven Michigan
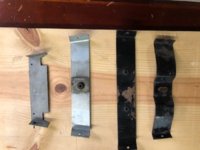
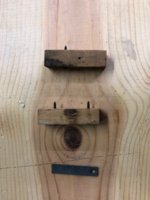
Beginning to install the center counsel, the schematic in the White manual is no like my counsel. I have two large plastic covered wood pieces with plastic grilles on the side- with lots of holes in them. Following are the various brackets that remain. In the Blue Manual they show two brackets anchored to the DS tunnel, can these be installed on top of the carpet or direct to the sheet metal?

Any photos of the install would be very helpful as I may not have all the required brackets especially how the wood covered pieces are attached toward the firewall.
 

Attachments

  • Brackets.jpg
    Brackets.jpg
    55.5 KB · Views: 191
  • Misc Parts.jpg
    Misc Parts.jpg
    54.1 KB · Views: 204
ON TOP OF CARPET
THE WOOD PIECES ATTACH TO THE BOTTOM MIDWAY INSIDE OF THE AC SIDE PANELS
THEY ARE THE SCREW BLOCK FOR THE "L" SHAPE BRACKETS ON EACH SIDE OF THE
WINDOW SWITCH PANEL THE LEFT PIECE GOES AT THE INSIDE BACK OF THE AC SIDE PANELS
TO HOLD THE BACK TOGETHER
THE NEXT PART GOES ON THE TRANS TUNNEL SO THAT THE AC PANEL BOTTOM CENTER SCREWS ATTACH THERE
YOU HAVE AN EXISTING HOLE DRILLED IN THE TONNEL
FEEL AROUND W/ A SMALL DRIVER TO LOCATE IE IT WILL LINE UP WITH PANEL SCREW HOLES
SAME FOR THE OTHER PIECES
ASEMBLE ONE SIDE THEN HOLD OTHER TO FIND WHAT FITS WHERE.
 
Last edited:
Thanks a lot for the feedback the photo of the console is worth a thousand words. I don't have both brackets with a hat section as shown in the photo one has the others straight - maybe does not matter?
 
Sounds like you are describing A/C side panels with the vent grilles. You don’t need the two lower mounts as the side panels mount to the heater control panel and the A/C panel as well as the described L bracket on the shifter platform. There is another mount near the firewall.
 
@dang offers no console during this confusing time for you. Fortunately this council of enthusiasts will help to counsel you on the proper mounting of your console.
And the 25 minutes it took you to write that sentence could've been used to work on your coupe! I'm off to do more cleaning in my e3 engine compartment...
 
Pickman -- I have the lower mount toward the center of the console installed over my carpet. Also, when you are testing the fit of your side panels in the car, you can raise the side panels by placing a washer or two under this lower mount and thereby tighten up the gap at the top of the side panels where they meet the dash.
 
Your vinyl covered side panels are made from crappy old chipboard that’s 40 plus years old, if it has been apart before there’s a very good chance that the small screws that hold it together won’t have a strong bite and will possibly pull apart, after a couple of failed attempts with mine I remade the panels with new plywood and it’s solid now and as a bonus recovered in leather. Have a look for D’Qs remake step by step on this site and you will see what’s involved.
 
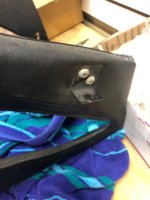
The original panels were burned in a fire, several years ago I found good replacement panels but not all the fasteners and brackets, needless to say am no sure how the brackets attach? Following are photos of the situation.
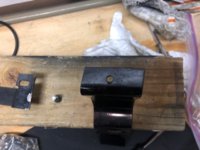
1) The center bracket has holes in the side panels to attached I have no fasteners and assume they are screws that go thru the hole in the bracket end?
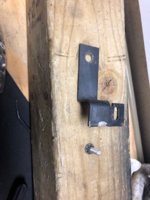
2)RH rear bracket - I do not have the LH bracket or the insert that is in the wood and don't see where they attach?
3) Unknown bracket is on the RH side - also not sure where this attaches

The white engraving on the die cast metal plate is almost gone is there a method to restore this?

As always your help is needed and appreciated.
Center.jpg
 

Attachments

  • center bracket.jpg
    center bracket.jpg
    69.3 KB · Views: 168
  • RH rear Bracket.jpg
    RH rear Bracket.jpg
    65.6 KB · Views: 210
  • Unknown bracket.jpg
    Unknown bracket.jpg
    54.1 KB · Views: 211
Your vinyl covered side panels are made from crappy old chipboard that’s 40 plus years old, if it has been apart before there’s a very good chance that the small screws that hold it together won’t have a strong bite and will possibly pull apart, after a couple of failed attempts with mine I remade the panels with new plywood and it’s solid now and as a bonus recovered in leather. Have a look for D’Qs remake step by step on this site and you will see what’s involved.

thanks for the reference

 
The original panels were burned in a fire, several years ago I found good replacement panels but not all the fasteners and brackets, needless to say am n

and one more from scratch

 
The screws for the sides are long coarse thread Phillips wood screws with cup washers, both black. My coupe never had holes for that center mount in the side panels down low though some coupes did, don’t know when they were added (or deleted). I also don’t have the bracket next to the handbrake to hold the sides together but if missing it’s no big deal. The main mounts are to the heater facia with a machine screw and slotted head hidden by the removable grilles and two wood screws on each side of the A/C face plate plus the wood blocks next to the shifter.
 
Back
Top