A/C Evaporator and Console

HB Chris

Well-Known Member
Site Donor $$
Messages
19,426
Reaction score
8,813
Location
Huntington Beach, CA
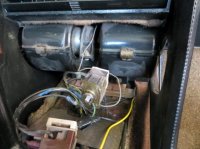
With my motor ready to get yanked out this weekend, I am going through all of the A/C components. I ordered the condenser Steve recommended, I have a BMW Seiko compressor with gold adjusting bracket that Rob described and I plan to install the dryer behind the passenger headlight under the horn as my air cleaner would interfere with the normal location. I am also going to replace the two hard lines as I will go with R134 and I want o-rings wherever I can. Everything has been removed except the evaporator.

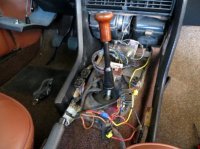
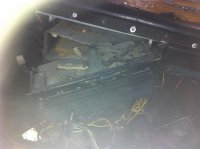
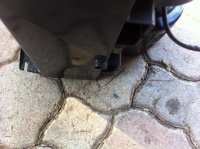
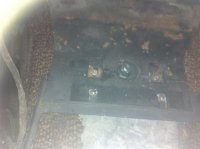
I am assuming I have to remove all the Bowden cables to get this unit out, correct? I removed the four upper mounting bolts and two lower ones to the mounting tray. This is going to be one big PITA. Any thoughts on how to keep it organized? I have been dreading this day but I need to make sure my drain grommet is intact and functioning.
 
If your transmission is out you can ensure that the drain hole is clear. Then I found a hose which fit snuggly into the evaporator - but not pushed in too far, it needs to be level with the inside bottom of evaporator case so that the hose does not dam up any liquid. IIRC it was inserted about an 1/8" into the housing. Once I was sure I had it the right amount in I then epoxied the hose in place. I have the hose hanging down from the metal tunnel about 1/2" or so but not enough to touch the transmission. I also left the remaining gap between the hose and the body drain hole in order to drain any possible residual and allow some airflow in there. Now the condensate drains straight out of the evap to the outside, never touching any body metal.
 
Thanks Steve, I might do that instead.
 

Attachments

  • IMG_2708.jpg
    IMG_2708.jpg
    47.5 KB · Views: 460
  • IMG_2707.jpg
    IMG_2707.jpg
    49.4 KB · Views: 406
Last edited:
Chris,

Having recently removed and re-installed the evaporator I can confirm it is a major PITA.

If all you want to do is to replace the two hard lines connected at the evaporator then you do not need to remove it.

If you want to remove the evaporator then yes, you will need to disconnect the Bowden cables (4) AT the evaporator. Once this is done, you will need to lift the evaporator about 1/4-1/2 inch and pull it out.

The reason you need to lift it up is so that the drain plug from the evaporator is lifted out from the drain hole. I had used a long thick screwdriver for leverage to hold it up and then pull out.

I suggest you take pictures of the position of the Bowden cables vis a vis each other and where they are connected or mark them. You may not remember which goes where as two are fairly close in length.

To disconnect the cables you will also need to remove 'clamps' that hold them in place. When removing those clamps (not easy) they may get slightly distorted making it hard to re-use. You may want to buy new ones beforehand just in case. I had provided pictures ( provided by Bwana) of those clips in a post I made about 2-3 weeks ago.

I would try if at all possible to not disconnect the Bowden cable thats located all the way in the back. Its hard to reach making the reinstallation difficult. You may not have a choice though.

One more point, when you remove/pull out the levers control box you may inadvertently disconnect the electrical "plug" connection for the heater blower. Just be mindful of that when re-installing.

Personally I found it easier to work by removing the glove box.

At the left in the 1st picture you'll note the white electrical plug for the heater blower mentioned above.
The 2nd picture gives you an idea how/where the cables are located. The 'bar' is what you see with the glove box removed.
At the bottom of the third picture you will note the drain plug/protrusion from the evaporator. It needs to be lifted out from the drain hole.
The last pictures is that of the drain hole above the transmission for the evaporator.

Hope this helps.
 

Attachments

  • IMG_0764.jpg
    IMG_0764.jpg
    87.5 KB · Views: 323
  • IMG_0765.jpg
    IMG_0765.jpg
    94.5 KB · Views: 287
  • IMG_0768.jpg
    IMG_0768.jpg
    96.1 KB · Views: 546
  • IMG_0769.jpg
    IMG_0769.jpg
    87.9 KB · Views: 290
Excellent pic, it shows about how far the tube should go in (maybe a mm or 2 less than all the way in) if you choose to do so.

attachment.php
 
Last edited:
Chris, I want to gently question your logic in removing the evap assembly for the sole reason -- if I understand you correctly -- of removing the hard lines so you can replace the flare fittings with o-ring fittings.

Like the 2002 evap assembly, the E3 assembly has a #10 and a #6 flare fitting coming out of them. There's really nothing you can do about that; those are the pipes that come out of the assembly itself. If you disassemble the assembly, inside they mate to other flare fittings.

On my 2002tii, I threaded flare to o-ring adapters directly onto the pipes coming out of the evap assembly. I did this so I could run hoses with o-ring fittings. But there is still the flare fitting on the pipe. So why did I do it? Because on an 02, there aren't the extra hard lines like there are on an E3 or an E9. The hose fittings thread onto the flares. But you can't reach them to tighten them because the ends of the pipes are practically behind the assembly. The 2002 Behr assembly, for this reason, actually has a flare-to-flare adapter for the sole purpose, I think, of giving you something you can reach with the wrench. By threading a flare to o-ring adapter onto the flare fittings with the evap assembly out of the car, you can then easily thread on an o-ring fitting onto the adapter when the assembly is in the car.

But 1) you STILL have a flare fitting (actually two; there's the other ones inside the assembly, and 2) this isn't necessary on an E3 or an E9 because of the hard pipes, which are there to make the 90 degree bend angles behind the glove box.

If the expansion valve or fan is bad, then obviously you need to pull the evap assembly, but boy I hate to see you go through all that pain just to change a flare to an o-ring when in fact you won't really get rid of the flare.

--Rob
 
Thanks guys, I am leaving flare fittings at the evap. One reason I went this far is I want to make sure drain is functional, and I thought I might as well check heater core. I get a sweet coolant smell sometimes even though I have never lost coolant. I have been told the whole assembly can come out without disconnecting cables, I just need to remove four nuts at firewall that holds heater box. Glove box already out and I will replace the two tiny fascia bulbs too.
 
All great info but let me ad this.

I had to remove the whole evaporator because my expansion valve was bad.
I knew this because I tried to charge the system and there was little difference between the high and low sides.
I bought the expansion valve from Vintage air where I also bought a parallel flow condenser.
I found that the expansion valve and dryer are fairly common parts a good auto AC supply company would have or could order.

After I got all this working I found that the temperature control switch with capillary tube would not do its job of turning the compressor off and on therefore my evaporator would freeze up.
BMW shows one for the E9 and I ordered one and took on my trip to Ofest.
When I had some time I was going to replace it only to find that it won't fit the space behind the grill when it is mounted through the hole for the knob.
I zip tied it there so I could have a working AC but will now have to find some other alternative. I think Vintage air has a possible substitute.
HTH
Gary
 
I have a new switch with tube if I need it as well. I turned the old one on its side so it wouldn't interfere with radio. I may do expansion valve while I'm in there. Again, cables do not need to be disconnected.
 
I have a new switch with tube if I need it as well. I turned the old one on its side so it wouldn't interfere with radio. I may do expansion valve while I'm in there. Again, cables do not need to be disconnected.


I did have to disconnect some of the cables. Like said take a picture and if careful with clips all will go back. Yes BIG PITA.
Check fit of new switch while grill is out. I think you will see what the problem is?
I just saying about the expansion valve since this is so difficult, for a $40? part it might be good just to replace. It's the heart of the system.
It's only money?

Gary
 
So all this Bowden cable/levers/vents assembly discussion has me wondering: for coupes with no AC, does said assembly need to be replaced by one from an AC equipped car or is it a common part to both AC and non-AC cars?
 
I think they are the same except of course the grills with labels and the one's without.
They really don't do anything to the operation of the AC.

BTW on my trip home from Colorado I ran my AC in high 80's temps and depending on sun location I would have to turn the vents away from blowing on me. I would get cold. Of course highway speeds helped keep it colder.
Gary
 
Back
Top