Another ignition switch expires

bluecoupe30!

Well-Known Member
Site Donor
Messages
2,264
Reaction score
1,423
Location
Delta, British Columbia, Canada
After 53 years, it is time to replace my ignition switch. After reading all the posts here, and researching part numbers, I found the go-to replacement switches have disappeared. The fix now is to install one from an E12, E24. SFDon suggested I call Carl, and I now have my new switch, part number 61321366107.
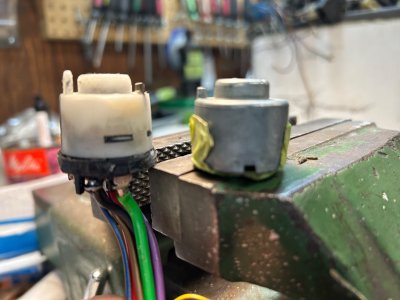
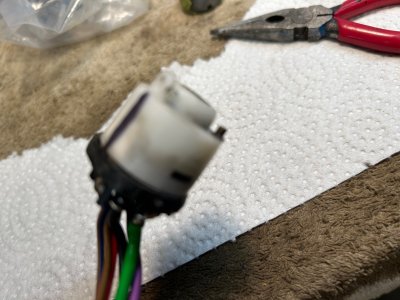
Extra wires on the new one. I see the common Red, Black, Violet and Green ones, but there is also thinner brown, brown/blue, and brown/yellow.
So, anyone used this switch and can tell me what to do with the brown, brown/blue and brown/yellow wires?
Also puzzling, my original switch has a short length of grey wire from a terminal on the back of my ignition switch. This plugs directly into a stalk on my steering column. New switch does not have this. Any ideas?
Oh, and if you haven't ever replaced your ignition switch, I suggest you at least acquire one to have on a shelf before even this part number becomes NLA.
Thanks for your input. Mike
some photos: New 61321366107, my original, nice shot of never-been-messed-with and painted red, grub screw. Came out easy!

Screenshot 2025-04-09 at 12.58.18 PM.pngIMG_9231.jpegIMG_9218.jpeg
 
Last edited:
that part number is for an e12 and e24 - it also superceded the part for the e3. the original part was xxx147. the original e9 part was xxx148. probably some very minor differences. 148 is definitely NLA according to getbmwparts.com, the xxx701 part is currently unavailable.
 
Hoarding, yes it's a thing! I did find this short grey wire plugs into a connector that is part of the loom that goes to the turn signal/wipe wash stalk. I can see the grey wire soldered to the back of this switch. I wonder if this is power to the switch or what? Somehow, the wipe/wash turn signal switch connects to ignition switch this way. Hmmm
 
i just traded emails with Carl - the 701 switches are gone. i think the switch in the pic is the 107 switch which Carl says has a couple of extra wires
 
Yes, you are correct, Scott. I entered the wrong p/n above. (edited now) I did in fact receive 61321366107 from Carl. I tried everywhere for ..701, but truly NLA. The ...107 is the next one up. It comes with a plastic case. The metal ones, as per original, now only available on eBay for $$$$. Yes, extra wires. So, perhaps they are just not needed?
 
Last edited:
Keep the yellow/brown wire- that is your horn wire

Cut off the other 2 small gauge wires at the switch
IMG_1105.jpeg
 
Last edited:
I'm still a little confused after reading five or six different threads on the ignition switch. Maybe someone can help me here.

There appear to be two different electrical switch parts. But some of the descriptions look as if the wire length is different but then another thread said something about it not matching as the locator pin is at 90 degrees and 120 degrees for the different switches. Or was that some kind of speculation?

So which one is this part number 61321366107 replacing? Or do I just have myself thoroughly confused with too many ignition threads.
 
I was confused as well. it seems the only switch available now, has its locator peg at 90 degrees to grub screw mount. The switch that came out of my car has this peg at about 120 degrees. So, the peg has to be removed from the replacement switch to allow it to fully enter the barrel and get secured by the grub screw.
 
Aha... okay. If this is what it is then we will all work with it.

Think I will go ahead and order it to "get in" before everyone here hoards these too :p
 
So today I fitted the new switch as per our discussion.

It's definitely not straightforward plug and play as we all had discussed.

First, in my case and who knows if this is just my 2800CS or an early late thing... Couldn't tell ya... The little nub for locating and I'm sure for rotational issues has to be ground off. It indeed is in the wrong position. That's easy

Next after a few test fits... I had to grind some of the black casing in order for it to fit around the metal structure of the column. I shaved a little here and there around the two places.

Having cleared those I found that it would "almost" go in. I had to relieve a bit more of the casing on the bottom in order for it to slide in all the way so that the grub screw could go in hole in the housing.

I did test the rotation. Turns just fine. Definitely more feel... Resistance than the original. I am a little concerned that it's just one little piece of plastic holding it from rotating but we shall see how it holds up.

You can see in one picture how it was not sitting down far enough in the barrel. The other are where I was relieving the black casing ... Careful not to grind off the tabs holding it together and then the final fit.
 

Attachments

  • PXL_20250427_180417950.jpg
    PXL_20250427_180417950.jpg
    318.7 KB · Views: 11
  • PXL_20250427_183716136.MP.jpg
    PXL_20250427_183716136.MP.jpg
    327.1 KB · Views: 12
  • PXL_20250427_181411767.jpg
    PXL_20250427_181411767.jpg
    213.7 KB · Views: 12
  • PXL_20250427_183556590.jpg
    PXL_20250427_183556590.jpg
    309.6 KB · Views: 16
I was doing all of this.. well because it needed done but also because I have been working on my wiring harness for the last week. After test fitting... I plugged it in the fuse box... The final fitting of the switch and grub screw will have to wait until the car is being assembled.

Oh yah... They wire connectors come bare. I used some heat shrink tubing for covers... Don't like bare wires back there.
 

Attachments

  • PXL_20250427_191116097.MP.jpg
    PXL_20250427_191116097.MP.jpg
    289.4 KB · Views: 14
Back
Top