Console ASSembly

Laldog

Well-Known Member
Site Donor
Messages
268
Reaction score
42
Location
Boston, MA
I need a little help.

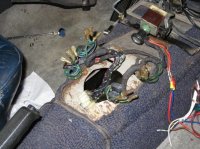
I lost (through a computer crash) the pictures detailing how the console/shift assembly came apart. I did a half-a**ed attempt at labelling the wires and connections, but the 6 years of restoration inertia have rendered them mostly unreadable.

Has anyone detailed the re-assembly on a website or have pictures available to help me with this?

Any other tips not involving gasoline and a match would be greatly appreciated.

Thanks.
 

61porsche

Well-Known Member
Messages
1,732
Reaction score
28
Location
Dallas
A picture of where you are now or a description would help us on where to start the reassembly.

For instance:

Have the fresh air controls been removed?

Do you have a/c?
 

61porsche

Well-Known Member
Messages
1,732
Reaction score
28
Location
Dallas
The console sides attach to the front a/c panel at the top. This peice needs to be installed first. It is the most structural part of the assembly and controls the side peices at the dash. ( The important part of the next step is to make sure that the clips that the screws go into are positioned. Sometimes it's necessary to use an awl to realign the holes and position so the top sides meet the dash rather than droop down a bit.)

Next would be the right hand side. there is a bolt and screws.

I leave the left for last after the radio, wires, etc. Just screws.

Both sides are tied together in the front by a bracket that fits the hump. Screws in the front.

Then all the wiring for the switches, etc. on the top plate. Below two switches is a sheetmetal angle that a scrrew holds down the top. Be sure to check the function of the switches before the last step.

Kinda went fast- ask again if you get stuck. It's a puzzle though.
 

Sven

Well-Known Member
Site Donor $
Messages
1,145
Reaction score
110
Location
Seattle
Here is a photo from my disassembly. I too am trying to put the puzzle back together. See the position of the bracket under the temp control just in behind the AC mounting plate. For some reason my bracket had a huge washer underneath. Although now, I cannot seem to locate the center hole where all this mounts???? Maybe I sprayed over it with sound coating/undercoating.

Also, the side panels at the rear are attached with small bolts to the plastic tab on each side of the heater box.
 

Attachments

  • ShifterHump.jpg
    ShifterHump.jpg
    89.1 KB · Views: 198

61porsche

Well-Known Member
Messages
1,732
Reaction score
28
Location
Dallas
Sven,

Your a/c bracket in your picture, the front shows the clips ( I call them speaker clips) that attach to one of the side panels. Over time this bracket bends down a bit. I assume the washer was an attempt to shore up the mounting. Because the holes in the side peices are already there you have to play with it if you want the best fit at the dash/ trim recess. I've used hardwood wedges or plastic wedges to better the fit. The other clips are located in the a/c panel.

Rearward of the shifter is a metal plate. The bottom is curved to fit the hump. It gets screwed on each side panel from the inside with tiny wood screws. The plate has two holes for the top/ shifter boot plate near the handbrake for two screws. The same top plate- switch area has a sheetmatal angle which screws to the wood block glued on the inside of the side panels.
 

Sven

Well-Known Member
Site Donor $
Messages
1,145
Reaction score
110
Location
Seattle
Thanks Jerry, I straightened the longer piece prior to refinishing it. It seems that neither of the two brackets are screwed to the tunnel. Is that true? I do not have any obvious holes on the tunnel, although the longer bracket does have a center hole.
 

61porsche

Well-Known Member
Messages
1,732
Reaction score
28
Location
Dallas
The other two brackets just hold the sides by the handbrake or the top plate with the boot under the window switches.

Nothing screwed to the tunnel.:)

Took me a couple of times after looking at the dash gap which started the whole thing for me. One side drooped a bit.
 
Top