Control arm bushing replacement-HELP something not right

jjs2800cs

Well-Known Member
Messages
286
Reaction score
105
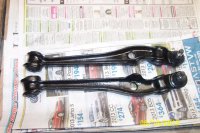
We are updating all the suspension bushings on our 1970 2800CS. Look at the attached photo which shows quite a difference between the old and new bushings.

New inner bushing 31122614100 and new outer bushing 31121112902 look significantly different than the removed old ones. The are the same length and diameter but the lips sure look like they will not center the bushing in the control arms repective holes. The lips are more inboard. I suppose they would work but it would appear me that they would not get centered in the hole until they are actually "drawn in" when being tightened during control arm installation. The old bushings had their lips outside of the control arm bore which would tend to center them and provide more of a bearing surface.

Anyone have photos when they replaced the bushings. I did a search and did not find any.

Do I have the wrong parts? Part numbers match realoem and vendors match. It really looks like these new bushings are for a different control arm, one that has thinner bores.

Or am I really missing something here?

Help!

jjs2800CS
 

Attachments

  • DCP_2999.jpg
    DCP_2999.jpg
    89.2 KB · Views: 504
Additional question. Looking at these new bushings, is it possible that they actually get squeezed out upon installation? Appears as if the inner diameter of the new ones is more than the old, so they would have to get reduced somewhat?

Thanks

jjs2800cs
 
I just did mine and lower bushes in your photo look like the ones that I removed and also replaced. I bought replacements from BMW, same part number as shown in the W and N web page. Note the small arrow when you install them.
They flex heaps (the rubber) when you put them in, clearly the metal part of the bush does not change during installation. Be sure to get the correct bush in the correct hole as they are similar OD but different ID, test by inserting the relevant bolt and tie bar.
If required I can probably send photos on putting them, need to check the camera so let me know. 14mm piece of studding and a piece of scaffold pipe as a spacer to pull against, plus red rubber grease.
Regards
Charles
 
Thanks for the replies so far. I am fairly certain I was supplied the right bushings and I did check the various suppliers for their photos against what I got.

Assuming I do have the correct replacements I am very surprised that these bushings squeeze out that much during installation as holding them they seem pretty stiff.

Before I start to install I want to draw on the wisdom of this group to verify. Anyone else have input?

Thanks

jjs2800cs
 
You question is very valid and the answer not intuitive. I bit the bullet and installed them and was amazed how they transformed their appearance and were exactly as described. They will have a lip on both sides even though it just doesn't seem like they will.
 
No luck getting bushes started. Seems like e9John also had problems in this thread

http://www.e9coupe.com/forum/showthread.php?t=13677&highlight=bushes

but he finally got them.

Have tried all of e9John's tricks plus others, hose clamp around the leading edge, piston ring type surround that we necked down inside, made similar guide out of thick pvc pipe that exploded when drawing in bushing with all thread, silicon grease, pledge wax, armour all, etc etc.

I have yet to destroy a bushing, maybe I am not going far enough, but have been to point when the rubber part has mushroomed so much that it is only half as long as in length. Mushroomed so much that by going further would destroy the part.

Too bad these complete control arms are not yet available as have been on backorder for near a year or more from autohauz.

http://www.autohausaz.com/search/pr...id=1011047@2800CS&year=1970&cid=27@Suspension System&gid=7536@Control Arm %26 Ball Joint Assembly


I would try to go the e12 control arm route, but are still stuck with replacing bushings and much more expensive, but my ball joints are in great shape.

Am at all stop. Anyone have further ideas?

Thanks to all

jjs2800cs
 
use steel pipe, mount arm in a vice, use a good C-clamp and lots of Vaseline. I got all my stuff from Lowes, just sat in the pipe section and got the right sizes, bring parts with you. I had to do all the front end bushings and they are defenitely "difficult" but it can... and will be done!

Good luck and if you still have problems post a couple of pics so we can see what you are doing and I'm sure others can help. BTW, I think Carl Nelson has the full arms but I don't know where you are located.

 
Thanks Peter C.

I did get some fittings and made special tool. But, still no luck. Bought aftermarket inners from Autohaus and they will not fit. Made special tool out of pipe fitting reducer where ground out threads and start bushing with unsqueezed diameter necking down to bore on the control arm, a conical reducer. Rubber just will not squeeze anymore. Actually bending washers using 1/2 all thread to try to pull in. We get to the point where cannot tighten the nut anymore. Have only been trying to get the outers in place as an earlier post said these were more difficult. The inners seem to have more of a taper.

Already have BMW OEM bushing for the inners, now have ordered OEM outers. If can get the outers in, pretty sure inners will go. What a struggle. Too bad economical complete control arms are not available.

Will keep updating. Wonder how BMW installed these in the first place with out special tooling.

jjs2800cs
 
Have you tried to work with a press? Harbor Freight and/or Northern Tool have decent prices on small press' that might be helpful. Also, I always but bushings in the freezer for a while before pressing in, and also heat up the part I am pressing into.

Good luck.
 
I'm missing why you are working so hard on this.

Rule I work on is if the bush is gone so is the ball joint??


Share
Quantity:
$79.07 + $9.55 shipping
In Stock. Sold by B2C Auto Parts

or
Sign in to turn on 1-Click ordering.

More Buying Choices
ProParts USA Add to Cart
$84.12 + $13.97 shipping
2 new from $79.07
Have one to sell? Sell yours here
OCAP Front Control Arm
by Ocap
Be the first to review this item
Price: $79.07
Only 6 left in stock
 
Alternative is to go poly which I hear are much easier to work with. Have to use a press. I use wd40, turns rubber into teflon.
 
Bushes

W&N now stock wishbones with all the rubbers fitted for 109 euros (currently on offer) My ball joints were good and I thought as it was all apart I would renew the bushes because I thought it would be easy !!!! but I got there in the end.

e9john
 
I'm missing why you are working so hard on this.

Rule I work on is if the bush is gone so is the ball joint??


Share
Quantity:
$79.07 + $9.55 shipping
In Stock. Sold by B2C Auto Parts

or
Sign in to turn on 1-Click ordering.

More Buying Choices
ProParts USA Add to Cart
$84.12 + $13.97 shipping
2 new from $79.07
Have one to sell? Sell yours here
OCAP Front Control Arm
by Ocap
Be the first to review this item
Price: $79.07
Only 6 left in stock

Don, where do you get those search results?
 
Success Got Them!

Success in getting in the bushings. We offer the following as how we did it so maybe can help other in the future as some of you helped me.

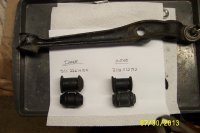
1. The outer bushings we bought were after market - way to big. Ordered the OEM bushings and first photo shows the difference. The after market ones would never go. The new inner ones we had were OEM. The OEM bushings do have an arrow that shows which end goes in first which we did, but we could not tell the difference from the other end.

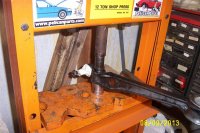
2. As suggested we used a press instead of all thread. Also used Vaseline. The bushings leading lips slid right in the bore.

3. Had to press, release, press, release several times as the rubber slide and squeezed into the bore. We found we could not just continue to press and press as the bushings tended to start to mushroom. Probably had to press and release at least 5 or 6 times and wait a few moments in between for the rubber to relax.

4. Once all the way in we found that by pressing the bushing in a little further so the leading lip would totally exit the bore was the final trick. Once it was out of the bore we then pressed the bushing back the other way to center.

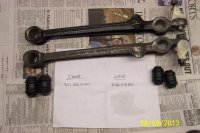
5. Once done all four bushings were centered with their outer lips flush against the bores.

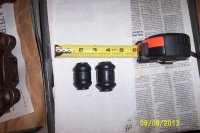
Photo 2 shows before, photo 3 shows the pressing, and the last photo shows the final painted control arms with new bushings and new ball joint boots. We did check the ball joint and they are very tight and with no play that's why we went with the bushing replacement. The original bushings were dry rotted as the car spent most of its life in CA in the desert.

Thanks again to all who responded and to all those who read the thread. Now have to put it all back together again with new Bilsteins.

jjs2800cs
 

Attachments

  • DCP_3050.jpg
    DCP_3050.jpg
    97 KB · Views: 401
  • DCP_3052.jpg
    DCP_3052.jpg
    96.5 KB · Views: 412
  • DCP_3054.jpg
    DCP_3054.jpg
    97.9 KB · Views: 362
  • DCP_3061.jpg
    DCP_3061.jpg
    97.5 KB · Views: 372
Press

I also had the similar problem
took them to two shops and it still didn't go all the way in
but since my outer ball joints are bad i just bought two new pieces with all bushings already there.
 
Back
Top