CSL Re-Birth - Sydney

Atavistic

Well-Known Member
Site Donor $
Messages
166
Reaction score
47
Location
Sydney, Australia
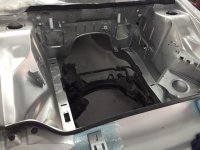
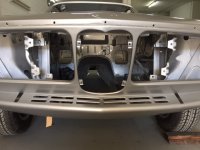
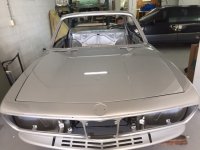
Have a Polaris City Pack that someone kindly imported to Australia. The problem is that it has spent far too long in the UK - so while it was tidy looking and largely complete - what lurked beneath!

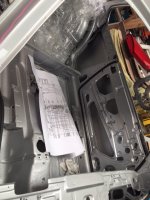
When the tiny bubbles got to me, we attacked the sills only to confirm our fears, and so unravelled to a strip, long dip, and nut and bolt. I will post some choice metal re-work in time, as some incredible panel making, resculpting, and lead wiping rescued the car.

She is now a rolling chassis with wiring and insulation underway. Back suspension done, front to go.

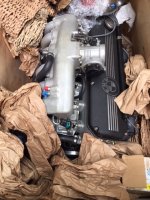
Have been using the time to get everything else restored to near factory - see engine in its box as an example.

Thanks to those of you who have helped already and thanks in advance for helping with our forthcoming questions as we ensure another of these wonderful cars is enjoyed for many decades to come.

Best,

David
 

Attachments

  • engine bay.jpg
    engine bay.jpg
    33.2 KB · Views: 731
  • IMG_2107.JPG
    IMG_2107.JPG
    93.9 KB · Views: 766
  • IMG_2108.JPG
    IMG_2108.JPG
    94.7 KB · Views: 738
  • IMG_2329.JPG
    IMG_2329.JPG
    66 KB · Views: 711
  • IMG_2414.JPG
    IMG_2414.JPG
    83.3 KB · Views: 733
Very nice. This is going to be interesting to follow, but most exciting to 'get it on the road again' for you. Keep us up to date on the progress.
 
I've seen the pics from the fabricator and I was highly impressed with the work. As usual I get a stabbing pain looking at the pics knowing the fate of my car when I finally tear into the sheet metal. Looking forward to your write-up!
 
David,
Very impressive. the shell looks very clean & well taken care off. It seems that it is in the right hands.
Are there any links to "the pics from the fabricator" as mentioned by Markos? I'd like to scavenge the pictures for information for my own fabrication projects.

good luck with the rest of the build.
Erik
 
The build has been slowed down because in moving the car from the fabricator to the engineering and paint shop we mysteriously lost a few very difficult to find parts. Fortunately, Ben from CSi, and a donor car, have rescued us, and the donor is delivering lots of hidden value by providing much more confidence on factory treatment as it looks totally unmolested! The donor might be of use to others needing hard to find items in Sydney - if so drop me a line.

The engineer is now trial fitting everything into the engine bay, once we have everything complete the plan is to deinstall, paint everything to factory and have all fixings cadmium plated and then a final build. Estimate is to have the car is a reasonable shape in the next 10 weeks, which will bring us closer to three years in total.

The following show some work getting the brake lines just right, again based on the donor as ours were not especially well shaped.
IMG_3629.JPG
IMG_3627.JPG
IMG_3626.JPG
 
After sitting in its shipping box for a year longer than planned, the engine has now been dropped in as part of the full trial fitting.
Note that the brake lines are now per factory (but the boosters need to be re-painted)
IMG_3694.JPG
IMG_3695.JPG
IMG_3696.JPG
IMG_3697.JPG
IMG_3698.JPG
IMG_3699.JPG
IMG_3700.JPG
and many unoriginal nuts and washers are being replaced with factory originals from the unmolested 3.0S.
 
A major milestone this week - the first piece of trim. We carefully removed the original which was black with a crazed grey line through it - but it wasnt quite good enough to put back in and it is apparently no longer available - so this is from Ben at csi and appears consistent with other nut and bolt approaches.
We had to unwarp one of the under panels but otherwise one of the easier jobs todate..


IMG_6582.jpeg
 
Truly beautiful build, it must be fun watching this go back together the correct way the first time! I am planning on tearing mine down after 5 years to do everything right since I was in a hurry to get her on the road I cut corners- not in the structural area, but performance and interior fitment and materials. I love the black headliner and I think I will try that material in my coupe even though it has a sunroof. Please keep posting pictures, we all get inspired when we see what others are doing.

Thank you!
 
more detail on the excellent headlining job, we also needed to plastic weld the dash air vents which were very cracked as they face full sun (not quite finished yet - but getting close) and the instrument panel which has been cleaned and refurbished (we just need to repaint the little hoods).

Note that the reconditioned dash (Mel based vacuum dash restorer) and re-polished wood (Remin wood restoration which have refurbed a lot of Ferrari and other 60s and 70s dashes) are now back in for their trial fit,

With a new engine - what is the standard - do we reset
back to zero or leave as is (whatever 56K miles means?

IMG_3862.JPG
IMG_3861.JPG
IMG_3860.JPG
IMG_3859.JPG
IMG_3858.JPG
IMG_3856.JPG
IMG_3855.JPG
IMG_3854.JPG

IMG_3850.JPG
IMG_3851.JPG
IMG_3854.JPG
IMG_3855.JPG
 
If you have hard documentation that your chassis has only 56,000 miles then don't change it! If you don't know the mileage then it's true miles unknown, or TMU, so do whatever you like.
 
If you have hard documentation that your chassis has only 56,000 miles then don't change it! If you don't know the mileage then it's true miles unknown, or TMU, so do whatever you like.

Thanks Chris.

Alas the latter (TMU) though there are quite a lot of later receipts (90s and 2000s) there is no early history (yet).

I have been reading on other forums and the consensus is there is little to no upside from a reset, even though this restoration is as close to a rebirth/factory car as is sensible. My inclination is to leave as is as the new records will make clear the mileage from this latest restoration.

On another front, I have not seen any posts on log books, nor have I seen any for sale. BMW told me they are not listed as a part. I guess manufacturers limit these to stop fraud, but it would be nice to start a fresh one from the day the car is back on the road.


Sent from my iPhone using Tapatalk
 
Atavistic, I just did a repaint on the "little hoods", I'm thinking you mean the gauge sleeves- the black cone/tube/bezel things. I got a great look by moving the rattle can about 14-16 inches away so the original texture would not be changed. Just a thought- btw everything looks superb!
 
Hi David, It is fascinating to follow your CSL build. I am certainly jealous of your nut and bolt restoration.
Anyway I also have a CSL (had an older restoration). I live not far from Roseville so maybe when yours is done we can catch up.
Was also curious who did your engine? it looks absolutely brand new now.
 
Back
Top